Epson Stylus Photo R300M User Manual - Page 28
One-Touch Printing, button for at least three seconds, until you see a message
 |
View all Epson Stylus Photo R300M manuals
Add to My Manuals
Save this manual to your list of manuals |
Page 28 highlights
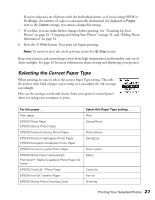
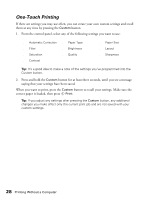
One-Touch Printing If there are settings you may use often, you can create your own custom settings and recall them at any time by pressing the Custom button. 1. From the control panel, select any of the following settings you want to use: ■ Automatic Correction ■ Filter ■ Saturation ■ Contrast ■ Paper Type ■ Brightness ■ Quality ■ Paper Size ■ Layout ■ Sharpness Tip: It's a good idea to make a note of the settings you've programmed into the Custom button. 2. Press and hold the Custom button for at least three seconds, until you see a message saying that your settings have been saved. When you want to print, press the Custom button to recall your settings. Make sure the correct paper is loaded, then press Print. Tip: If you adjust any settings after pressing the Custom button, any additional changes you make affect only the current print job and are not saved with your custom settings. 28 Printing Without a Computer
-
 1
1 -
2
-
3
-
4
-
5
-
6
-
7
-
8
-
9
-
10
-
11
-
12
-
13
-
14
-
15
-
16
-
17
-
18
-
19
-
20
-
21
-
22
-
 23
23 -
 24
24 -
 25
25 -
 26
26 -
 27
27 -
 28
28 -
 29
29 -
 30
30 -
 31
31 -
 32
32 -
 33
33 -
34
-
35
-
36
-
37
-
38
-
39
-
40
-
41
-
42
-
43
-
44
-
45
-
46
-
47
-
48
-
49
-
50
-
51
-
52
-
53
-
54
-
55
-
56
-
57
-
58
-
59
-
60
-
61
-
62
-
63
-
64
-
65
-
66
-
67
-
68
-
69
-
70
-
71
-
72
-
73
-
74
-
75
-
76
-
77
-
78
-
79
-
80
-
81
-
82
-
83
-
84
-
85
-
86
-
87
-
88
-
89
-
90
-
91
-
92
-
93
-
94
-
95
-
96
-
97
-
98
-
99
-
100
-
101
-
102
-
103
-
104
-
105
-
106
-
107
-
108
-
109
-
110
-
111
-
112
-
113
-
114
-
115
-
116
-
117
-
118
-
119
-
120
-
121
-
122
-
123
-
124
 |
 |
