Epson Stylus Pro 5000 Product Information Guide - Page 10
Running a Cleaning Cycle, Aligning the Print Head - ink cartridges
 |
View all Epson Stylus Pro 5000 manuals
Add to My Manuals
Save this manual to your list of manuals |
Page 10 highlights
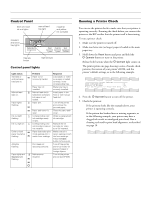
EPSON Stylus Pro 5000 Paper Tray Tips Keep these tips in mind when you load paper in a tray: t Place the printable side of the paper face-down in the tray. If you're using preprinted paper, such as letterhead or forms, load it with the top edge leading into the printer. t Load paper before you send your print job. If the paper runs out during a print job, you can have the printer automatically switch to the other tray. To have the printer switch automatically, the paper size and media type levers must be set the same for both trays, or the levers must be set to Other on the lower tray. t If you're using thick paper or if ink smears on the printout, set the media type lever to Thick Paper. t Press the Eject button if you need to remove a sheet of paper. Loading Paper in the Optional Lower Tray Always pull the paper tray completely out of the lower paper cassette before you insert paper. Note: If you use paper longer than letter size in the lower tray, pull out the tray and cover extensions of the upper paper tray, so your printouts will be supported when they come out of the printer. To print on paper in the lower tray, make sure you select it (or select Auto) in your print options before you send the print job. To run a cleaning cycle: 1. Make sure the printer is on and the H ink out lights are off. If any of the H ink out lights are on or flashing, you must replace the corresponding ink cartridge(s) before you can run a cleaning cycle. 2. Press the cleaning button and hold it for three seconds. The P Operate light begins flashing, and the printer ejects any paper in the paper path. The cleaning cycle takes about three minutes. Caution: To avoid damaging the printer, never turn it off while the P Operate light is flashing-unless the printer hasn't moved or made any noise for more than five minutes. 3. After the light stops flashing, print a few lines or run a printer check to confirm that the nozzles are clean. If your print quality has not improved, repeat the steps above. If you don't notice any improvement after running four or five cycles, check the print quality solutions in Chapter 5 of the Printer Guide. Aligning the Print Head Before you use the printer, you should align the print head to ensure accurate, clean printouts. Make sure the printer is turned off, and it has paper in the standard paper tray. To align the print head: 1. Hold down both the Reset and Eject buttons while you press the P Operate button to turn on the printer. The P Operate light and [ lower paper tray light start flashing and the printer enters the print head alignment mode. A pattern similar to the one below is printed: Running a Cleaning Cycle If your printed image is unexpectedly light or faint or dots are missing from the image, you may need to run a cleaning cycle. This unclogs the print head nozzles so they can deliver ink properly. The cleaning cycle process uses ink, so you should run it only if print quality declines. You can use the printer check to determine if the cleaning cycle has been successful, or if you need to run it again. 2. Check the printout and select the numbered pattern, from #1 to #4, that is misaligned. (If more than one pattern is misaligned you will need to repeat this step.) For example, pattern #1 above requires alignment. 10 - EPSON Stylus Pro 5000 11/98
-
 1
1 -
2
-
3
-
4
-
 5
5 -
 6
6 -
 7
7 -
 8
8 -
 9
9 -
 10
10 -
 11
11
 |
 |
