Epson Stylus Pro 5000 Product Information Guide - Page 6
Control Panel, Running a Printer Check - print head
 |
View all Epson Stylus Pro 5000 manuals
Add to My Manuals
Save this manual to your list of manuals |
Page 6 highlights
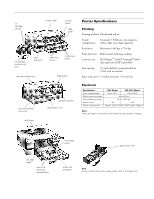
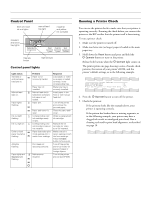
EPSON Stylus Pro 5000 Control Panel black and cyan ink out lights manual feed tray light standard and lower tray lights magenta and yellow ink out lights Operate button Operate light Control panel lights Light status Problem Response Standard or optional paper tray light on. [ Paper out or incorrectly loaded. Load paper, or make sure paper is loaded correctly, in the corresponding tray. Paper tray not installed. Make sure tray is correctly installed. Manual feed light on. Z Manual feed slot is Insert paper in the selected in software, front or rear manual but paper is not feed slot. loaded. Paper lights flashing. Z Paper jam. [ [ Paper path cover is open. Turn off the printer and remove the jammed paper. Close the paper path cover. Ink out light flashing \ Corresponding color ink cartridge nearly empty. Obtain a replacement ink cartridge. Ink out light on. H Corresponding color Replace the ink ink cartridge empty or cartridge (or make not installed. sure it's installed). Either or both [ Paper size and/or print Make sure print paper tray lights mode settings don't option settings match flashing. [ match lever settings. the lever settings. Press the Eject button to force print. All lights flashing. Print head not operating correctly. Turn off the printer and check inside for pieces of paper or foreign objects. Paper lights and Operate light flashing. Z Maintenance required. [ [ Turn off the printer and contact EPSON. P Running a Printer Check You can use the printer check to make sure that your printer is operating correctly. Running the check before you connect the printer to the RIP verifies that the printer itself is functioning. To run a printer check: 1. Make sure the printer is turned off. 2. Make sure letter-size (or larger) paper is loaded in the main paper tray. 3. Hold down the Reset button and press and hold the P Operate button to turn on the printer. Release both buttons when the P Operate light comes on. The printer prints one page showing a series of nozzle check patterns, the version of your printer's ROM, and the printer's default settings, as in the following example: 4. Press the P Operate button to turn off the printer. 5. Check the printout. t If the printout looks like the example above, your printer is operating correctly. t If the pattern has broken lines or missing segments, as in the following example, your printer may have a clogged ink nozzle or misaligned print head. Run a cleaning cycle and/or print head alignment, as described on page 10. 6 - EPSON Stylus Pro 5000 11/98
-
 1
1 -
 2
2 -
 3
3 -
 4
4 -
 5
5 -
 6
6 -
 7
7 -
 8
8 -
 9
9 -
 10
10 -
 11
11
 |
 |
