Epson Stylus Pro 5000 Product Information Guide - Page 7
Installing the Ink Cartridges
 |
View all Epson Stylus Pro 5000 manuals
Add to My Manuals
Save this manual to your list of manuals |
Page 7 highlights
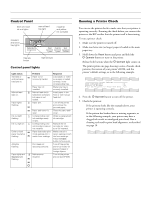
EPSON Stylus Pro 5000 Installing the Ink Cartridges Always use new ink cartridges. Reinstalling partially empty ink cartridges prevents the ink counter from accurately indicating the amount of ink remaining. To install the ink cartridges: 1. Plug in the printer and turn it on by pressing the P Operate button until the P Operate light comes on. 4. Lift up the ink cartridge clamp for the corresponding ink slot. Note: The first time you plug in the printer, the power supply may cycle the fan and then turn off. This is normal operation. 2. Open the left and right ink cartridge compartment doors. Warning: To avoid injury, do not reach into the ink cartridge compartments. 5. Hold the ink cartridge with the arrow mark face-up and pointing to the rear of the printer, and fully insert the cartridge into the slot. 6. Close the clamp until it clicks into place. Repeat steps 3 through 6 for the other ink cartridges. Note: You can install the ink cartridges in any order; however, each slot can only hold the specified ink color: black cyan magenta yellow 3. Open one of the ink cartridge packages. Warning: If ink gets on your hands, wash them thoroughly with soap and water. If ink gets in your eyes, flush them immediately with water. 7. Close the ink compartment doors. The printer begins charging the advanced ink delivery system. The P Operate light flashes and the printer makes various sounds. Charging takes about 5 minutes. Do not turn off the printer or interrupt this important process or you'll use up more ink than necessary. Caution: Never turn off the printer when the P Operate light is flashing. However, if the light is still flashing after 15 minutes and the printer is not moving or making noise, you may turn off the printer. The P Operate light stops flashing when the ink charging process is finished. 11/98 EPSON Stylus Pro 5000 - 7
-
 1
1 -
 2
2 -
 3
3 -
 4
4 -
 5
5 -
 6
6 -
 7
7 -
 8
8 -
 9
9 -
 10
10 -
 11
11
 |
 |
