Epson Stylus Pro 5000 Product Information Guide - Page 8
Replacing an Ink Cartridge, Selecting a Paper Path - manual
 |
View all Epson Stylus Pro 5000 manuals
Add to My Manuals
Save this manual to your list of manuals |
Page 8 highlights
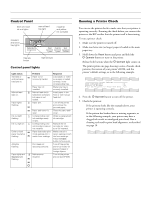
EPSON Stylus Pro 5000 Replacing an Ink Cartridge When one of the ink out lights on the printer's control panel flashes, the corresponding cartridge is low on ink. This is a good time to make sure you have a replacement cartridge. When the light stays on, the cartridge is empty and you need to replace it. You'll also see an error message on the RS 5000 control panel when one of your cartridges runs out of ink. Caution: To ensure high quality printing results, use genuine EPSON cartridges and do not refill them. Other products may cause damage to your printer not covered by EPSON's warranty. Always leave the empty cartridge installed in the printer until you are ready to replace it with a new one. Use only the following EPSON ink cartridges: t Black: S020118 t Cyan: S020147 t Magenta: S020143 t Yellow: S020122 To order EPSON ink cartridges, contact your dealer or call EPSON Accessories at (800) 873-7766 (U.S. only). In Canada, please call (800) 873-7766 for dealer referral. To replace an ink cartridge: 1. Make sure the printer is turned on. Check the control panel lights to determine which cartridge needs to be replaced. 2. Open the appropriate ink cartridge compartment door. The compartment for the black and cyan cartridges is on the left; the compartment for magenta and yellow is on the right. 3. Lift up the clamp for the empty cartridge, then carefully pull the cartridge straight out of the printer. Warning: If ink gets on your hands, wash them thoroughly with soap and water. If ink gets in your eyes, flush them immediately with water. 4. Make sure the replacement cartridge is the correct color, then remove it from its package. 5. Insert the ink cartridge with the arrow mark face-up and the arrow pointing toward the printer. Warning: To avoid injury, do not reach into the ink cartridge compartments. 6. Lower the clamp until it clicks into place. 7. Make sure the corresponding ink out light goes off. If it remains on, the cartridge may not be installed correctly. Remove the cartridge and reinsert it as described above. 8. Close the compartment door and resume printing. Selecting a Paper Path You can use the 250-sheet auto feed paper trays for the substrates you print on most often. The front manual slot gives you a convenient way to feed individual letter-size or larger sheets. The rear manual slot provides a straight-through paper path for substrates of all sizes and weights, up to 44 inches long. The following illustrations show the paper paths available: Standard paper tray: Optional lower paper tray: Front manual feed slot: Rear manual feed slot: 8 - EPSON Stylus Pro 5000 11/98
-
 1
1 -
2
-
 3
3 -
 4
4 -
 5
5 -
 6
6 -
 7
7 -
 8
8 -
 9
9 -
 10
10 -
 11
11
 |
 |
