Epson Stylus Pro 7600 - UltraChrome Ink Product Support Bulletin(s)
Epson Stylus Pro 7600 - UltraChrome Ink - Stylus Pro 7600 Print Engine Manual
 |
View all Epson Stylus Pro 7600 - UltraChrome Ink manuals
Add to My Manuals
Save this manual to your list of manuals |
Epson Stylus Pro 7600 - UltraChrome Ink manual content summary:
- Epson Stylus Pro 7600 - UltraChrome Ink | Product Support Bulletin(s) - Page 1
: 19 EPSON Stylus Color 3000, Stylus Pro 4000, 5000, 5500, 7000 Series, 7600 Series, 9000 Series, 9600 Series, 10000 Series, and 10600 Series Maximum Printable Area Limits for the EPSON Professional Graphic Printer line. This bulletin was created to inform you of the maximum custom page sizes - Epson Stylus Pro 7600 - UltraChrome Ink | Product Support Bulletin(s) - Page 2
Spark Professional EPSON ColorBurst RIP Stylus Color 3000 44 in. N/A N/A N/A N/A Stylus Pro 4000 N/A Stylus Pro 5000 44 in. Stylus Pro 5500 N/A Stylus Pro 7000 N/A Stylus Pro 7500 N/A Stylus Pro 7600 N/A Stylus Pro 9000 N/A Stylus Pro 9500 N/A Stylus Pro 9600 N/A Stylus Pro 10000 Series - Epson Stylus Pro 7600 - UltraChrome Ink | Product Support Bulletin(s) - Page 3
driver must be set for Roll Paper (Banner) mode so that page breaks at the printer's maximum page length do not occur (in essence gives you a 0 margin for the bottom of the page). The Stylus Pro 5000/5500 however will give a slight page break at the 44 inch limit as these printers do not support 9600 - Epson Stylus Pro 7600 - UltraChrome Ink | Product Support Bulletin(s) - Page 4
low resolution text and line art to sharpen their edges. For photos, this may create a massive print file that is too large for the printer driver to process correctly. The following examples show how to setup banner printing from Adobe Illustrator 8.x/9.x and CorelDRAW 9 from the PC platform. The - Epson Stylus Pro 7600 - UltraChrome Ink | Product Support Bulletin(s) - Page 5
NOTE: Adobe Illustrator CS: In this example, we are creating a banner, which is 227 inches (Illustrators max. page setup). Mac O/S 10.3.3 system is used in this example. Windows versions of this application should be very similar in functionality. Please refer to your software documentation for - Epson Stylus Pro 7600 - UltraChrome Ink | Product Support Bulletin(s) - Page 6
File, Print, click Setup, under Tiling click on the drop down arrow, select Tile Full 4. Pages and click the Printer button. 5. When the printer setup window comes up, select your printer name and set the Roll Paper Options to: Roll Paper Banner Roll Paper Banner - No Margin ( if printing no margins - Epson Stylus Pro 7600 - UltraChrome Ink | Product Support Bulletin(s) - Page 7
7. Then click on Print. This will bring you back to the Print window. 8. This time click on Page Setup, you see the following screen, just click on Continue (If you don't want to see the window again, place a check mark on Don't Show Again box). 7 - Epson Stylus Pro 7600 - UltraChrome Ink | Product Support Bulletin(s) - Page 8
banner size by a value that will make it less than the printer maximum custom page size (90.5 inches). In this example we take (180/2 = 90), therefore the custom page size created would be 20x90 (inches). 10. Click on New, name the custom size (i.e. 20 x 180 in this example), under Paper Size type - Epson Stylus Pro 7600 - UltraChrome Ink | Product Support Bulletin(s) - Page 9
11. Under Paper Size, click on the drop down arrow and select the custom paper size you created (i.e. 20 X 180) orientation is set to portrait mode. Then click OK. 12. In the Print windows the preview pane will show 2 grids or pages. This indicates that a full image is tiled. 9 - Epson Stylus Pro 7600 - UltraChrome Ink | Product Support Bulletin(s) - Page 10
13. Click on General, then click the square on Reverse Order. 4. Click on Print. 10 - Epson Stylus Pro 7600 - UltraChrome Ink | Product Support Bulletin(s) - Page 11
, instead of the last page first. Or Change the orientation to "Reverse", then you don't have to check the "Reverse Order". NOTE 2: Always select the custom page size last, if not, it will default to other paper sizes. NOTE 3: Before printing a large document, make sure you have enough - Epson Stylus Pro 7600 - UltraChrome Ink | Product Support Bulletin(s) - Page 12
, enable Tile Full Pages and create the page size (in our example we used 44x227 inches). 4. Click, Print Setup. This will bring up the print driver. 12 - Epson Stylus Pro 7600 - UltraChrome Ink | Product Support Bulletin(s) - Page 13
(Banner) and also enable Save Roll Paper. 7. When creating the custom page size, divide the banner size by a value that will make it less than the printer maximum custom page size. In this example we take (227/3 = 75.7), therefore the custom page size created would be 44x75.7 inches. The reason for - Epson Stylus Pro 7600 - UltraChrome Ink | Product Support Bulletin(s) - Page 14
8. After setting the custom page size and other driver settings (media type, resolution, etc.), click OK. This will bring you back to the document setup. Now double-click the "Page" tool. 9. The page should - Epson Stylus Pro 7600 - UltraChrome Ink | Product Support Bulletin(s) - Page 15
CorelDRAW: In this example, a banner is created at 227 inches. 1. Launch CorelDRAW and open or place an image in your page layout. 2. Adjust the page size and image for the document as shown in the following image. 3. Click on File and Print Setup. 15 - Epson Stylus Pro 7600 - UltraChrome Ink | Product Support Bulletin(s) - Page 16
4. Click on the Paper Tab. The following appears. 5. Set the Paper Source to Roll Paper (Banner) and also enable Save Roll Paper. 16 - Epson Stylus Pro 7600 - UltraChrome Ink | Product Support Bulletin(s) - Page 17
that will make it less than the printer maximum custom page size. In this example we take (227/3 = 75.7), therefore the custom page size created would be 44x75.7 inches. The reason for this is to save media. 7. After setting the custom page size and other driver settings (media type, resolution, etc - Epson Stylus Pro 7600 - UltraChrome Ink | Product Support Bulletin(s) - Page 18
8. At this point, click File then Print. CorelDRAW will then run a pre-flight check and will show the following window. 18 - Epson Stylus Pro 7600 - UltraChrome Ink | Product Support Bulletin(s) - Page 19
) and click Print Preview (recommended) if you want to see how the file will be printed or Print to output the file to your printer. For all other applications, please refer to your software documentation for information on maximum custom page sizes for documents, banners or tiling prints. 19 - Epson Stylus Pro 7600 - UltraChrome Ink | Product Support Bulletin(s) - Page 20
Plug-in Up-Date v1.0cE for the Epson MAC OS-X Printer Driver This bulletin was created to inform you of a Epson Driver Plug-in up-date for the Stylus Pro 5500, 7600DYE, 7600UCM, 9600DYE, 9600UCM, 10000DYE, 10000CF, 10600UCM standard Mac OS X Epson printer drivers released prior to January 01, 2004 - Epson Stylus Pro 7600 - UltraChrome Ink | Product Support Bulletin(s) - Page 21
Plug-in Update v1.0bE for the Epson MAC OS X Printer Driver A connectivity plug-in update is available for the standard Epson MAC OS X printer drivers released prior to January 1, 2004. This update applies to these printers: Stylus Pro 5500, 7600DYE, 7600UCM, 9600DYE, 9600UCM, 10000DYE, 10000CF - Epson Stylus Pro 7600 - UltraChrome Ink | Product Support Bulletin(s) - Page 22
provide transportation and long term storage information for the Epson Stylus Pro 7600/9600 Ink Jet printers. Transportation and Storage Preparation Information: Transportation and Storage preparation of the Stylus Pro 7600/9600 printers can be performed in two ways depending on the transportation - Epson Stylus Pro 7600 - UltraChrome Ink | Product Support Bulletin(s) - Page 23
move: 1.1 Remove the paper and paper spindle from the printer. 1.2 Power off the printer from the Control Panel. Wait until the printhead moves to place. If you do not have the shipping bracket you can contact EPSON technical support or your dealer to request one. Make sure the print head - Epson Stylus Pro 7600 - UltraChrome Ink | Product Support Bulletin(s) - Page 24
our technical support line. Take extra care when packing the printer to prevent it form sustaining any shipping damage, since shipping damage caused by improper shipping will not be covered by Epson. Do on ship the ink cartridges inside the printer crate. Place the ink cartridges inside a plastic - Epson Stylus Pro 7600 - UltraChrome Ink | Product Support Bulletin(s) - Page 25
printer via padded van or have a shipping container custom built locally. Epson Shipping Container: Stylus Pro 7600 P/N: PRO7600BOX, Stylus Pro 9600 P/N: PRO9600BOX. 2.2 Have the Shipping Head Lock Clamp and screw available. P/N 1112287 Also available from Epson. 2.3 Have at least One new Waste Ink - Epson Stylus Pro 7600 - UltraChrome Ink | Product Support Bulletin(s) - Page 26
revision for the Epson Stylus Pro 7600 and Stylus Pro 9600 inkjet printer. Description of Change: This firmware version supersedes and includes all previous firmware versions. Firmware Date: April 04, 2003 Reason: 1. This firmware allows the user to perform an ink discharge for transportation - Epson Stylus Pro 7600 - UltraChrome Ink | Product Support Bulletin(s) - Page 27
performing the driver installation, this insures a complete driver installation. NOTE: Although this document references the Epson Stylus Pro 7600/9600 ALL Epson Stylus Pro series Macintosh OS X printer driver Installation and Removal steps follow the same instructions. EPSON Professional Graphics - Epson Stylus Pro 7600 - UltraChrome Ink | Product Support Bulletin(s) - Page 28
driver. 2. Click on the file with the .DMG file extension (example: SP7600_1.6bE.dmg) to create the printer driver installation package. 3. The printer driver SPro7600_16b.pkg) double click on the file to start the printer driver installation. TIP Prior to starting the installation it is recommended - Epson Stylus Pro 7600 - UltraChrome Ink | Product Support Bulletin(s) - Page 29
CONTINUE. 6. Read the License Agreement and click CONTINUE. You are asked to Agree or Disagree to the License Agreement click AGREE to continue the installation. EPSON Professional Graphics Group Page 3. - Epson Stylus Pro 7600 - UltraChrome Ink | Product Support Bulletin(s) - Page 30
INSTALLATION. The Printer Driver will now be installed, a progress window is displayed during the installation. 9. The Printer Driver will now be installed, a progress window is displayed during the installation. 10. When the Printer Driver installation has - Epson Stylus Pro 7600 - UltraChrome Ink | Product Support Bulletin(s) - Page 31
After the printer driver is printer. You can use the Add button or you can select Add Printer from the Printers drop down menu, click Add. 4. On the Add printer window you first need to select the Epson Interface Connection the printer is attached with: Only choose an Epson selection EPSON - Epson Stylus Pro 7600 - UltraChrome Ink | Product Support Bulletin(s) - Page 32
5. After you choose the Epson Interface Connection, the Print Center automatically searches the connection for printers. When the search completes: 5.1 Select your printer from the list by clicking on it. 5.2 Next select your Page Setup. Roll Paper is the default. If your work flow will include - Epson Stylus Pro 7600 - UltraChrome Ink | Product Support Bulletin(s) - Page 33
information you would like to display: 8. To make the printer the Default printer highlight the printer then go to the Printers Menu and select Make Default or click the Make Default button. 9. The Default printer will be highlighted in the Printer List: EPSON Professional Graphics Group Page 7. - Epson Stylus Pro 7600 - UltraChrome Ink | Product Support Bulletin(s) - Page 34
10. To view the Job Status of a printer double click on it in the Printer List to display its information and status: EPSON Professional Graphics Group Page 8. - Epson Stylus Pro 7600 - UltraChrome Ink | Product Support Bulletin(s) - Page 35
by: 1.1 First selecting your printer from the Print Center Printer List. 1.2 Next click Configure. 1.3 Then from the new Printer List window select your printer and click OK. 2 1 3 4 1.4 From the Epson Printer Utility you can Check the Status of Ink-Paper-and the printer itself, perform print head - Epson Stylus Pro 7600 - UltraChrome Ink | Product Support Bulletin(s) - Page 36
you must first properly remove the existing Driver and all of its components. 1. Open the Epson Driver from any application and select print. Remove all user created "Presets" that were created for the printer you are removing. From the Presets drop down menu select the Preset (example: MYPRESET - Epson Stylus Pro 7600 - UltraChrome Ink | Product Support Bulletin(s) - Page 37
install OS X and/or the Printer Driver, in addition a password may be required if assigned for the user. (Example Only) 4. You have TWO choices for removing files from the Epson Folder. The two choices are outlined below: 4.1 Removing ONLY the Stylus Pro 7600 or 9600 Plug-in and Preference from the - Epson Stylus Pro 7600 - UltraChrome Ink | Product Support Bulletin(s) - Page 38
to the TRASH. NOTE: If you only removed the Stylus Pro 7600/9600/ 10000/10600 files from the Epson folder, then ONLY remove the Stylus Pro 7600/9600/10000/ 10600.pkg file. If the entire Epson folder was deleted then remove ALL the Epson Printer.pkg files. EPSON Professional Graphics Group Page 12. - Epson Stylus Pro 7600 - UltraChrome Ink | Product Support Bulletin(s) - Page 39
revision for the Epson Stylus Pro 7600 and Stylus Pro 9600 inkjet printer. Description of Change: This firmware version supersedes and includes all previous firmware versions. Firmware Date: February 06, 2003 Reason: 1. Corrects Epson Status Monitor 3 ink level information reporting. 2. Corrects - Epson Stylus Pro 7600 - UltraChrome Ink | Product Support Bulletin(s) - Page 40
3rd RIP's. 5. Firmware Upgrade Information: The Stylus Pro 7600 and 9600 firmware can be upgraded with the "Epson Printer Service Utility" available separately. The Epson Printer Service Utility can be down loaded from Epson's Web site: www.epson.com Instructions for the utility are included when - Epson Stylus Pro 7600 - UltraChrome Ink | Product Support Bulletin(s) - Page 41
9600 Reference Guide EPSON Stylus Pro 7600/9600 Series No Margin and Borderless Printing Originator: Authorization: Total Pages: RR/ER 4 This bulletin is provided for assistance on how to create and print a borderless document on the EPSON Stylus Pro 7600 and EPSON Stylus Pro 7600 Inkjet printers - Epson Stylus Pro 7600 - UltraChrome Ink | Product Support Bulletin(s) - Page 42
the Printer Setup Menu. 3. Press the down button until the display shows No Margin. Press the SelecType button to enter the No Margin menu. 4. Press the up or down buttons to select one of the three types of No Margin printing options. NOTE: When not selecting no margin in the Epson driver or - Epson Stylus Pro 7600 - UltraChrome Ink | Product Support Bulletin(s) - Page 43
how to use the standard Epson software driver to setup and print a driver. Step 4) Once at the printer Properties, Select the Paper tab and under Paper size select "User Defined" and set the page size to the finished borderless size you want (taking into consideration the supported widths). Custom - Epson Stylus Pro 7600 - UltraChrome Ink | Product Support Bulletin(s) - Page 44
) Step 6) Select OK to get back to the Print Options menu and verify that the custom page size is correct in the Print Options window. If not, go back to page setup and verify the custom page size selection. Once this is done, select Print, you will likely see the following message - Epson Stylus Pro 7600 - UltraChrome Ink | Product Support Bulletin(s) - Page 45
EPSON PRODUCT SUPPORT BULLETIN Date: 11/26/02 Bulletin #: PSB.2002.11.001 Reference: TE02-387/TE02-409 Product: Stylus Pro 7600/9600 Subject: Firmware UpGrade to BN282A_Q.UPG / BW282A_Q.UPG Originator: RWS Authorization: Total Pages: 2 This bulletin was created to inform you of a printer firmware - Epson Stylus Pro 7600 - UltraChrome Ink | Product Support Bulletin(s) - Page 46
Firmware Upgrade Information: The Stylus Pro 7600 and Stylus Pro 9600 firmware can be upgraded with the "Epson Printer Service Utility" available separately. The Epson Printer Service Utility can be down loaded from Epson's Web site: www.epson.com. Instructions for the utility are included when - Epson Stylus Pro 7600 - UltraChrome Ink | Product Support Bulletin(s) - Page 47
.2002.09.004 Authorization: N/A Total Pages: EPSON Stylus Pro 9000, 9500, 9600, 7000, 7500, 7600, 10000, 10600, 5000, 5500 and Stylus Color 3000 Printers PostScript Printing Support for Mac OS X Native Mode This bulletin provides instructions for installing and configuring a Mac OS X Client - Epson Stylus Pro 7600 - UltraChrome Ink | Product Support Bulletin(s) - Page 48
. Select Other to continue. 4. Navigate to the location of your PPD file. After selecting the PPD file it should reflect the name of the printer under the Printer Model section. Click on the Add button. 5. Repeat the process to add your additional queues. Your Mac OS X Client should now be ready to - Epson Stylus Pro 7600 - UltraChrome Ink | Product Support Bulletin(s) - Page 49
under Applications - Utilities 2. Click on the Add button and select IP Printing from the sub-menu. 3. Enter the IP Address of the Postscript Server under Printer's Address. Uncheck the Use default queue on server and type in the queue you wish to add. Click on the - Epson Stylus Pro 7600 - UltraChrome Ink | Product Support Bulletin(s) - Page 50
4. Navigate to the location of your PPD file. After selecting the PPD file it should reflect the name of the printer under the Printer Model section. Click on the Add button. 5. The Print Center should now show the Queue that you typed along with the IP address. 6. Repeat the - Epson Stylus Pro 7600 - UltraChrome Ink | Product Support Bulletin(s) - Page 51
Configuration menu and options for the EPSON Stylus Pro 7600/9600 Series Inkjet printers. PURPOSE: The EPSON Stylus Pro 7600/9600 Printer control panel Paper Configuration menu allows the user to make ten custom paper configurations that override the standard printer driver or 3rd. party RIP paper - Epson Stylus Pro 7600 - UltraChrome Ink | Product Support Bulletin(s) - Page 52
recommends performing a nozzle check prior to using the custom paper configuration to ensure that the printer is functioning properly in order to obtain the best possible image quality and results. The EPSON Stylus Pro 7600/9600 Printer control panel Paper Configuration menu contains the following - Epson Stylus Pro 7600 - UltraChrome Ink | Product Support Bulletin(s) - Page 53
.2002.09.003 POWER ON NORMALY 10/7/02 Stylus Pro 7600/9600 Paper Configuration Control Panel Navigation Map MENU NAVIGATION BUTTONS START Press SelcType PRINTER SETUP C A U T IO N Press TEST PRINT 1. Check Nozzle Test Pattern. 2. Select a Paper Number 1st. 3. Record your Configurations. A D JU - Epson Stylus Pro 7600 - UltraChrome Ink | Product Support Bulletin(s) - Page 54
Stylus Pro 7600/9600 PSB.2002.09.003 10/7/02 PAPER CONFIGURATION DESCRIPTION This section describes each of the Custom Paper Configuration choices and how they can be used. In most cases when the Epson driver and media are used all of these values are pre-configured and do not require a custom - Epson Stylus Pro 7600 - UltraChrome Ink | Product Support Bulletin(s) - Page 55
Stylus Pro 7600/9600 PSB.2002.09.003 10/7/02 3. Cut Pressure: The default is *100%. The Cut Pressure configuration setting is useful to insure good cuts with supported media and to allow cutting of thinner media without snagging or tearing it. (Range 0% - 150%). For thinner media try a value less - Epson Stylus Pro 7600 - UltraChrome Ink | Product Support Bulletin(s) - Page 56
Stylus Pro 7600/9600 PSB.2002.09.003 10/7/02 6. Drying Time: The default is *0.0 Sec. Setting a Dry Time is useful if the printer pauses during a print waiting for more data to print from the computer. Ideally the print head of the printer should continue moving consistently from start to finish - Epson Stylus Pro 7600 - UltraChrome Ink | Product Support Bulletin(s) - Page 57
Stylus Pro 7600/9600 PSB.2002.09.003 ISSUES AND SOLUTIONS 10/7/02 Below are some common issues you could experience and suggestions on how they may be corrected using the Epson driver or try reducing the ink saturation in the driver or RIP. • Printer Control Panel Paper Configuration Page 7. - Epson Stylus Pro 7600 - UltraChrome Ink | Product Support Bulletin(s) - Page 58
inform you of the use and functionality of the EPSON Printer Service Utility for the EPSON Stylus Pro 7600/ 9600 Series Inkjet printers. PURPOSE: The EPSON Printer Service Utility allows the user to make custom settings without using the standard printer driver. it also allows the user to use media - Epson Stylus Pro 7600 - UltraChrome Ink | Product Support Bulletin(s) - Page 59
or Parallel connection. Apple® Macintosh®: Mac OS 8.6 to 9.2.2 with USB or IEEE1394 connection with EPSON Standard Printer Driver (Status Monitor is part of driver) installed. Note: Ethernet Connection is not supported on either platform. Minimum of 30Mb free Hard Disk space and 128Mb RAM (both - Epson Stylus Pro 7600 - UltraChrome Ink | Product Support Bulletin(s) - Page 60
Stylus Pro 7600/9600 Printer Service Utility 8/26/02 Printer Service Utility Installation To install and run the Printer Service Utility, do the following: 1. Download the appropriate file (.exe or .hqx) from the Epson Web Site to the Desktop of your computer (http://support.epson.com). 2. - Epson Stylus Pro 7600 - UltraChrome Ink | Product Support Bulletin(s) - Page 61
Stylus Pro 7600/9600 Printer Service Utility Print Head Alignment 8/26/02 When setting up your EPSON Stylus Pro 7600/9600 ink jet printer, one of the essential adjustments to perform is a print head alignment. Print head alignment adjusts the vertical alignment of the print head when printing - Epson Stylus Pro 7600 - UltraChrome Ink | Product Support Bulletin(s) - Page 62
Stylus Pro 7600/9600 Printer Service Utility 8/26/02 1. Launch the EPSON Printer Service Utility program from the program menu. 2. Select the printer model from the drop down menu and select the "Print Head Alignment / Custom Paper Configuration" option and click Next. 3. Select the Print Head - Epson Stylus Pro 7600 - UltraChrome Ink | Product Support Bulletin(s) - Page 63
Stylus Pro 7600/9600 Printer Service Utility 8/26/02 4. Select the Direction and Print Quality from the Print Head Alignment menu and select Next. refer to the image below for the resolutions that are affected for print quality. Print Head Alignment Printer Component, Software Item, LCD Display - Epson Stylus Pro 7600 - UltraChrome Ink | Product Support Bulletin(s) - Page 64
Stylus Pro 7600/9600 Printer Service Utility 8/26/02 5. Select the Platen Gap (*Standard, Narrow, Wide, Wider). Standard is the default for EPSON media. If using a 3rd party media, you can leave the selection as Standard or set it for a specific Platen Gap setting. NOTE: Setting the Platen - Epson Stylus Pro 7600 - UltraChrome Ink | Product Support Bulletin(s) - Page 65
Stylus Pro 7600/9600 Printer Service Utility 8/26/02 Note: Depending on whether you are printing the unidirectional or bidirectional pattern, for unidirectional printing, you will move on to the bidirectional adjustment. Print Head Alignment Printer Component, Software Item, LCD Display - Epson Stylus Pro 7600 - UltraChrome Ink | Product Support Bulletin(s) - Page 66
Stylus Pro 7600/9600 Printer Service Utility 8/26/02 10. For the bidirectional print pattern, inspect the alignment pattern and find the satisfied with the alignment patterns. 14. Once completed, select Quit to exit the program. Print Head Alignment Printer Component, Software Item, LCD Display - Epson Stylus Pro 7600 - UltraChrome Ink | Product Support Bulletin(s) - Page 67
Stylus Pro 7600/9600 Printer Service Utility Custom Paper Configuration 8/26/02 PURPOSE When using the Epson driver and media all the parameters listed under the Custom Paper Configuration are automatically preset for optimal results and should not require modification. Use the Paper Configuration - Epson Stylus Pro 7600 - UltraChrome Ink | Product Support Bulletin(s) - Page 68
Stylus Pro 7600/9600 Printer Service Utility 8/26/02 RUNNING THE PRINTER SERVICE UTILITY 1. Run the EPSON Printer Service Utility from the EPSON Printer Service Folder on your computer. 2. On the opening screen select the Printer 3. Select the Function "Print Head Alignment / Custom Paper - Epson Stylus Pro 7600 - UltraChrome Ink | Product Support Bulletin(s) - Page 69
Stylus Pro 7600/9600 Printer Service Utility 4. Select Custom Paper Configuration and Next to continue.. 8/26/02 CUSTOM PAPER CONFIGURATION MENU The Custom Paper Configuration menu allows you to customize default media settings, modify previously created custom settings, or create configurations - Epson Stylus Pro 7600 - UltraChrome Ink | Product Support Bulletin(s) - Page 70
Stylus Pro 7600/9600 Printer Service Utility 2. The Configuration selections allow you to select one or more items to configure. 8/26/02 MEDIA TYPE 1. The media type #1 gives you a choice of selecting a pre-configured Epson default media configuration to modify. 2. Paper Thickness #2 is - Epson Stylus Pro 7600 - UltraChrome Ink | Product Support Bulletin(s) - Page 71
Stylus Pro 7600/9600 Printer Service Utility 8/26/02 3. For Third Party media the Sample Prints button #3 allows you to print a test image with one or more Epson default media configurations. This will allow you to choose which Epson default media configuration produces the best results as a - Epson Stylus Pro 7600 - UltraChrome Ink | Product Support Bulletin(s) - Page 72
Stylus Pro 7600/9600 Printer Service Utility 8/26/02 DRY TIME PER PRINT HEAD PASS The drying time of the ink between print head passes can be set in.1 Sec. Increments for a range of 0 to 5 Seconds. This can be useful in reducing horizontal banding caused when - Epson Stylus Pro 7600 - UltraChrome Ink | Product Support Bulletin(s) - Page 73
Stylus Pro 7600/9600 Printer Service Utility 8/26/02 PAPER Print head cleanings can be performed from the Utility tab in the Epson driver, from the Select Type printer control panel menu, or with the Power Head Cleaning selection in micro band can be noticed. Custom Paper Configuration Page 16. - Epson Stylus Pro 7600 - UltraChrome Ink | Product Support Bulletin(s) - Page 74
Stylus Pro 7600/9600 Printer Service Utility 8/26/02 1. TEST RANGE - This represents the range paper feeding will be adjusted. This value can be typed and below the value of the image you determined had the least amount of banding previously. Click the Sample Custom Paper Configuration Page 17. - Epson Stylus Pro 7600 - UltraChrome Ink | Product Support Bulletin(s) - Page 75
Stylus Pro 7600/9600 Printer Service Utility 8/26/02 Prints button again to produce another set of five images to narrow the range again, repeat this process until banding has been eliminated. Custom Paper Configuration Page 18. - Epson Stylus Pro 7600 - UltraChrome Ink | Product Support Bulletin(s) - Page 76
Stylus Pro 7600/9600 Printer Service Utility 8/26/02 3. ADJUSTMENT VALUE - When you have produced a sample print without banding of paper suction are: • Standard = 100% Suction • -1 = 50% Suction • -2 = 30% Suction • -3 = 10% Suction • -4 = 6% Suction Custom Paper Configuration Page 19. - Epson Stylus Pro 7600 - UltraChrome Ink | Product Support Bulletin(s) - Page 77
Stylus Pro 7600/9600 Printer Service Utility 8/26/02 CUT METHOD This manual cutting: Smooth Fine Art Paper Enhanced Matte Posterboard Textured Fine Art Paper Somerset Velvet Fine Art Paper Canvas Adhesive Vinyl Heavy Weight Polyester Banner Backlight Film DuPont Semi Gloss Proofing Custom - Epson Stylus Pro 7600 - UltraChrome Ink | Product Support Bulletin(s) - Page 78
Stylus Pro 7600/9600 Printer Service Utility 1. Click on the selection box arrow and choose the suction Photo, Advanced Photo-2880. 2. From the drop down selection select the Print Quality for your Custom Paper Configuration and press the Print button. A test print will be printed with the print - Epson Stylus Pro 7600 - UltraChrome Ink | Product Support Bulletin(s) - Page 79
Stylus Pro 7600/9600 Printer Service Utility 8/26/02 hand corner. You can reprint the test pattern at the other quality modes for the media then choose which Quality mode produces the best print for the current Custom . Reducing the density or saturation of ink on the media will prevent the media - Epson Stylus Pro 7600 - UltraChrome Ink | Product Support Bulletin(s) - Page 80
Stylus Pro 7600/9600 Printer Service Utility 8/26/02 2. Click Print to produce a test print to verify your density selection and repeat the process as required to achieve the proper density. 3. Click Next to confirm your selection and continue with other configuration choices. NAMING THE CUSTOM - Epson Stylus Pro 7600 - UltraChrome Ink | Product Support Bulletin(s) - Page 81
Stylus Pro 7600/9600 Printer Service Utility 8/26/02 3. Click the Save button to save your custom paper configuration for future use when your work flow requires the same media and configuration. 4. You will then have the choice of where you would like to save your custom paper configuration file - Epson Stylus Pro 7600 - UltraChrome Ink | Product Support Bulletin(s) - Page 82
Stylus Pro 7600/9600 Printer Service Utility 8/26/02 USING YOUR CUSTOM PAPER CONFIGURATION 1. To use a previously created custom paper configuration, from the Epson Driver Main tab select Custom in the drivers Mode area. 2. Then click the drop down box arrow for custom settings. 3. Select your - Epson Stylus Pro 7600 - UltraChrome Ink | Product Support Bulletin(s) - Page 83
Stylus Pro 7600/9600 Printer Service Utility 8/26/02 Power Head Cleaning If Horizontal micro banding is noticed and a Nozzle test print shows misaligned, missing or deflected nozzles, head cleaning form the printer control panel, or Epson driver should be performed first, followed by another - Epson Stylus Pro 7600 - UltraChrome Ink | Product Support Bulletin(s) - Page 84
Stylus Pro 7600/9600 Printer Service Utility 8/26/02 4. Click Start to run a Power Head Cleaning. NOTE: A "Power Head Cleaning" can run for approximately 2 1/2 minutes, it uses more ink then a driver or printer control panel cleaning try them first to clear nozzle issues. 5. During the Power Head - Epson Stylus Pro 7600 - UltraChrome Ink | Product Support Bulletin(s) - Page 85
Stylus Pro 7600/9600 Printer Service Utility 8/26/02 Firmware Update The firmware update option of the EPSON Stylus Pro 7600/9600 Printer Utility program allows you to update the printers firmware without the need of entering a special service menu on the actual printer itself. The version of - Epson Stylus Pro 7600 - UltraChrome Ink | Product Support Bulletin(s) - Page 86
Stylus Pro 7600/9600 Printer Service Utility 1. Ensure that the printer is online and the LCD displays READY. 8/26/02 2. Select the model type from the printer menu and the function to perfom "Firmware Update" and click Next. 3. At the following screen click Browse and Select the firmware file. - Epson Stylus Pro 7600 - UltraChrome Ink | Product Support Bulletin(s) - Page 87
Stylus Pro 7600/9600 Printer Service Utility 8/26/02 4. Click version to check the version between the selected file and the currently installed firmware version and click OK. The firmware information is specified as follows: BN or BW = Printer Model (BN= Stylus Pro 7600, BW= Stylus Pro 9600) 30 = - Epson Stylus Pro 7600 - UltraChrome Ink | Product Support Bulletin(s) - Page 88
Stylus Pro 7600/9600 Printer Service Utility 8/26/02 5. Click the Update button to begin the firmware download. During this process, the printer will reinitialize and once the printer has completed its initialization, select Quit to exit the program. Firmware Update Page 31. - Epson Stylus Pro 7600 - UltraChrome Ink | Product Support Bulletin(s) - Page 89
in the printer. If the No Margins option in the software driver is not selectable (grayed-out), this means the feature is not available for the media width specified. The table below details the supported media widths: EPSON Stylus Pro 7600 (24" width maximum) EPSON Stylus Pro 9600 (44" width - Epson Stylus Pro 7600 - UltraChrome Ink | Product Support Bulletin(s) - Page 90
the Printer Setup Menu. 3. Press the down button until the display shows No Margin. Press the SelecType button to enter the No Margin menu. 4. Press the up or down buttons to select one of the three types of No Margin printing options. NOTE: When not selecting No Margin in the Epson driver or - Epson Stylus Pro 7600 - UltraChrome Ink | Product Support Bulletin(s) - Page 91
driver. Step 4) Once at the printer Properties, Select the Paper tab and under Paper size select "User Defined" and set the page size to the finished borderless size you want (taking into consideration the supported widths). The following window will pop up NOTE: On the MAC platform, the margin - Epson Stylus Pro 7600 - UltraChrome Ink | Product Support Bulletin(s) - Page 92
) Step 6) Select OK to get back to the Print Options menu and verify that the custom page size is correct in the Print Options window. If not, go back to page setup and verify the custom page size selection. Once this is done, select Print, you will likely see the following message - Epson Stylus Pro 7600 - UltraChrome Ink | Product Support Bulletin(s) - Page 93
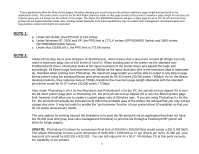
(s) being used. Maximum custom page size allowable per operating system (for Epson standard driver): Stylus Stylus Stylus Stylus Stylus Stylus Stylus Stylus Stylus Stylus Pro Color 3000 Pro 5000 Pro 5500 Pro 7000 Pro 7500 Pro 7600 Pro 9000 Pro 9500 Pro 9600 10000 Series Macintosh OS - Epson Stylus Pro 7600 - UltraChrome Ink | Product Support Bulletin(s) - Page 94
See NOTE 1 N/A Stylus Pro 7600 N/A N/A N/A Stylus Pro 9000 N/A See NOTE 1 N/A N/A See N/A NOTE1 Stylus Pro 9500 N/A See NOTE 1 N/A Stylus Pro 9600 N/A N/A N/A N/A See NOTE1 Stylus Pro 10000 Series N/A N/A N/A See NOTE 1 Print jobs being sent through the Epson PostScript driver can be - Epson Stylus Pro 7600 - UltraChrome Ink | Product Support Bulletin(s) - Page 95
XP, the PPD limit is 1771.6 inches (SP7000/9000 Series) and 1800 inches (SP7600/9600/10000 Series). c. Under Mac OS 8.x/9.x, the PPD limit is 273.06 inches. NOTE Epson large format printer using the standard Epson print driver would be 83.33 inches (30,000 pixels / 360dpi). As for the Epson desktop - Epson Stylus Pro 7600 - UltraChrome Ink | Product Support Bulletin(s) - Page 96
, enable Tile Full Pages and create the page size (in our example we used 44x227 inches). 4. Click, Print Setup. This will bring up the print driver. 4 - Epson Stylus Pro 7600 - UltraChrome Ink | Product Support Bulletin(s) - Page 97
5. Click on the Paper Tab. The following appears. 6. Set the Paper Source to Roll Paper (Banner) and also enable Save Roll Paper. 5 - Epson Stylus Pro 7600 - UltraChrome Ink | Product Support Bulletin(s) - Page 98
size, divide the banner size by a value that will make it less than the printer maximum custom page size (not necessary for OS/Drivers that support 590.5 inches). In this example we take (227/3 = 75.7), therefore the custom page size created would be 44x75.7 inches. The reason for this is to save - Epson Stylus Pro 7600 - UltraChrome Ink | Product Support Bulletin(s) - Page 99
8. After setting the custom page size and other driver settings (media type, resolution, etc.), click OK. This will bring you back to the document setup. The page should now show the following. 9. At this point you can and resize the image to fit within the printable area and print. 7 - Epson Stylus Pro 7600 - UltraChrome Ink | Product Support Bulletin(s) - Page 100
CorelDRAW 9: In this example, a banner is created at 227 inches. 1. Launch CorelDRAW and open or place an image in your page layout. 2. Adjust the page size and image for the document as shown in the following image. 3. Click on File and Print Setup. 8 - Epson Stylus Pro 7600 - UltraChrome Ink | Product Support Bulletin(s) - Page 101
4. Click on the Paper Tab. The following appears. 5. Set the Paper Source to Roll Paper (Banner) and also enable Save Roll Paper. 9 - Epson Stylus Pro 7600 - UltraChrome Ink | Product Support Bulletin(s) - Page 102
size by a value that will make it less than the printer maximum custom page size (not necessary for OS/Drivers that support 590.5 inches, unless the document is beyond that size). In this example we take (227/3 = 75.7), therefore the custom page size created would be 44x75.7 inches. The reason for - Epson Stylus Pro 7600 - UltraChrome Ink | Product Support Bulletin(s) - Page 103
8. At this point, click File then Print. CorelDRAW will then run a pre-flight check and will show the following window. 11 - Epson Stylus Pro 7600 - UltraChrome Ink | Product Support Bulletin(s) - Page 104
) and click Print Preview (recommended) if you want to see how the file will be printed or Print to output the file to your printer. For all other applications, please refer to your software documentation for information on maximum custom page sizes for documents, banners or tiling prints. 12
-
 1
1 -
 2
2 -
 3
3 -
 4
4 -
 5
5 -
 6
6 -
 7
7 -
8
-
9
-
10
-
11
-
12
-
13
-
14
-
15
-
16
-
17
-
18
-
19
-
20
-
21
-
22
-
23
-
24
-
25
-
26
-
27
-
28
-
29
-
30
-
31
-
32
-
33
-
34
-
35
-
36
-
37
-
38
-
39
-
40
-
41
-
42
-
43
-
44
-
45
-
46
-
47
-
48
-
49
-
50
-
51
-
52
-
53
-
54
-
55
-
56
-
57
-
58
-
59
-
60
-
61
-
62
-
63
-
64
-
65
-
66
-
67
-
68
-
69
-
70
-
71
-
72
-
73
-
74
-
75
-
76
-
77
-
78
-
79
-
80
-
81
-
82
-
83
-
84
-
85
-
86
-
87
-
88
-
89
-
90
-
91
-
92
-
93
-
94
-
95
-
96
-
97
-
98
-
99
-
100
-
101
-
102
-
103
-
104
 |
 |
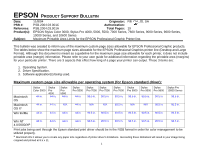
EPSON
P
RODUCT
S
UPPORT
B
ULLETIN
Date:
11/8/04
Originator:
RB, CH, JD, SA
PSB #:
PSB.2004.03.001C
Authorization:
Reference:
PSB.2004.03.001A
Total Pages:
19
Product(s):
EPSON Stylus Color 3000, Stylus Pro 4000, 5000, 5500, 7000 Series, 7600 Series, 9000 Series, 9600 Series,
10000 Series, and 10600 Series
Subject:
Maximum Printable Area Limits for the EPSON Professional Graphic Printer line.
This bulletin was created to inform you of the maximum custom page sizes allowable for EPSON Professional Graphic products.
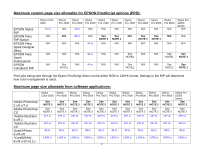
The tables below show the maximum page sizes allowable for the EPSON Professional Graphics printer line (Desktop and Large
Format). Although this document is meant as a guideline for the maximum page size allowable for each printer, it does not include
printable area (margin) information. Please refer to your user guide for additional information regarding the printable area (margins)
for your particular printer. There are 3 aspects that effect how long of a page your printer can output. Those 3 items are:
1. Operating System.
2. Driver Specification.
3. Software application(s) being used.
Maximum custom page size allowable per operating system (for Epson standard driver):
Print jobs being sent through the Epson standard print driver should be in the RGB format in order for color management to be
utilized properly.
Stylus
Color 3000
Stylus
Pro
4000
Stylus
Pro
5000
Stylus
Pro 5500
Stylus
Pro 7000
Stylus
Pro 7500
Stylus
Pro 7600
Stylus
Pro 9000
Stylus
Pro 9500
Stylus
Pro 9600
Stylus Pro
10000 Series
Macintosh
OS
44 in.
44 in.
44 in.
44 in.
90.5 in.
90.5 in.
90.5 in.
90.5 in.
90.5 in.
90.5 in.
90.5 in.
Macintosh
OS X
*
44 in.
44 in.
N/A
44 in.
N/A
N/A
90.5 in.
N/A
N/A
90.5 in.
90.5 in.
Win 9x/Me
44 in.
44 in.
44 in.
44 in.
90.5 in.
90.5 in.
90.5 in.
90.5 in.
90.5 in.
90.5 in.
90.5 in.
Win NT
4.0/2000/XP
44 in.
44 in.
44 in.
44 in.
90.5 in.
90.5 in.
90.5 in.
90.5 in.
90.5 in.
90.5 in.
90.5 in.
1
*
Macintosh OS X allows you to create any paper size regardless of printer driver’s limitations.
Exceeding these limitations will result in your image being
cropped and printed at 8.5 x 11.