Epson Stylus Pro 7600 - UltraChrome Ink Product Support Bulletin(s) - Page 62
Launch the EPSON Printer Service Utility program from the program menu.
 |
View all Epson Stylus Pro 7600 - UltraChrome Ink manuals
Add to My Manuals
Save this manual to your list of manuals |
Page 62 highlights
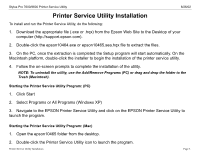
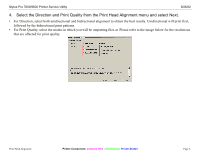
Stylus Pro 7600/9600 Printer Service Utility 8/26/02 1. Launch the EPSON Printer Service Utility program from the program menu. 2. Select the printer model from the drop down menu and select the "Print Head Alignment / Custom Paper Configuration" option and click Next. 3. Select the Print Head Alignment check box and then select Next. Print Head Alignment Printer Component, Software Item, LCD Display, Printer Button Page 5.
-
 1
1 -
2
-
3
-
4
-
5
-
6
-
7
-
8
-
9
-
10
-
11
-
12
-
13
-
14
-
15
-
16
-
17
-
18
-
19
-
20
-
21
-
22
-
23
-
24
-
25
-
26
-
27
-
28
-
29
-
30
-
31
-
32
-
33
-
34
-
35
-
36
-
37
-
38
-
39
-
40
-
41
-
42
-
43
-
44
-
45
-
46
-
47
-
48
-
49
-
50
-
51
-
52
-
53
-
54
-
55
-
56
-
 57
57 -
 58
58 -
 59
59 -
 60
60 -
 61
61 -
 62
62 -
 63
63 -
 64
64 -
 65
65 -
 66
66 -
 67
67 -
68
-
69
-
70
-
71
-
72
-
73
-
74
-
75
-
76
-
77
-
78
-
79
-
80
-
81
-
82
-
83
-
84
-
85
-
86
-
87
-
88
-
89
-
90
-
91
-
92
-
93
-
94
-
95
-
96
-
97
-
98
-
99
-
100
-
101
-
102
-
103
-
104
 |
 |

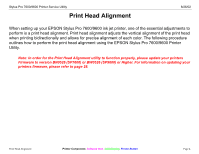
Stylus Pro 7600/9600 Printer Service Utility
8/26/02
Print Head Alignment
Printer Component,
Software Item,
LCD Display,
Printer Button
Page 5.
1.
Launch the EPSON Printer Service Utility program from the program menu.
2.
Select the printer model from the drop down menu and select the “Print Head Alignment / Custom
Paper Configuration” option and click Next.
3.
Select the Print Head Alignment check box and then select Next.