Eureka LightSpeed 4700D Owners Manual - Page 18
How To Use, How To Use Accessories, Routine Maintenance - upright vacuum
 |
View all Eureka LightSpeed 4700D manuals
Add to My Manuals
Save this manual to your list of manuals |
Page 18 highlights
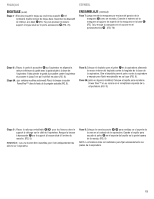
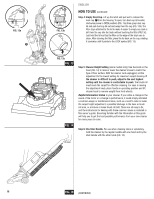
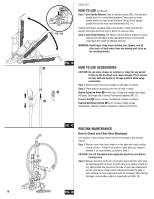
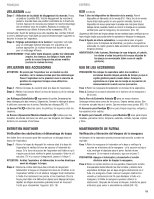
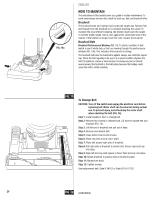
FIG. 16a ENGLISH HOW TO USE (continued) Step 7: Use Handle Release. Step on handle release (FIG. 16a) and pull handle back to a comfortable position. Press again to lower handle further to clean under furniture. Return to full upright position to use the hose and attachments (FIG. 16). Helpful hint: Before cleaning under low furniture, check area first for objects that might harm the unit or block the vacuum hose. Step 8: Auto Height Setting. The cleaner has the optimal setting for carpet cleaning and will adjust to the appropriate surface. The brushroll must reach the carpet for effective cleaning. WARNING: Avoid injury. Keep loose clothing, hair, fingers, and all other parts of body away from any moving part (such as the revolving brush). FIG. 16 ●B HOW TO USE ACCESSORIES CAUTION: Do not place cleaner on furniture or steps for any period of time as the brushroll may cause damage. Place cleaner on floor with the handle in storage position while using accessories. Step 1: Remove hose from hose adapter on the base of cleaner. ●C ●A Step 2: Place desired accessory onto end of hose or wand. Nested Extension Wand ●A to add reach. Grasp both wands near ridges. Pull apart. Turn ridge end to center. Push wands together (FIG. 17). Crevice Tool ●B cleans corners, baseboards, between cushions. Dusting/Upholstery Brush ●C is for furniture, blinds, books, lampshades, shelves, curtains, draperies, cushions and fabrics. FIG. 167 ROUTINE MAINTENANCE How to Check and Clear Hose Blockages Low suction or poor pickup may be due to a blockage in the vacuum cleaner. Step 1: Remove hose from hose retainer on the base and check suction at end of hose - if little or no suction, check dust cup. Empty if needed. If no improvement, proceed to step 2. CAUTION: Turn off the switch and unplug the electrical cord before clearing hose. Step 2: Remove electrical cord from cord hooks. Disconnect the clear tube by unscrewing the 2 screws, then lift away from cleaner. Check for any obstructions that may be in the tube or hose. Any obstructions can be removed by using a blunt instrument to clear the tube or hose. Flexing the hose may help loosen the blockage. After clearing blockage, reverse above steps to reassemble unit (FIG. 18). 18 FIG. 18
-
 1
1 -
2
-
3
-
4
-
5
-
6
-
7
-
8
-
9
-
10
-
11
-
12
-
 13
13 -
 14
14 -
 15
15 -
 16
16 -
 17
17 -
 18
18 -
 19
19 -
 20
20 -
 21
21 -
 22
22 -
 23
23 -
24
-
25
-
26
-
27
-
28
-
29
-
30
-
31
-
32
-
33
-
34
-
35
-
36
 |
 |
