Eureka Quick Up Cordless 96F Owners Guide - Page 12
How To Maintain
 |
View all Eureka Quick Up Cordless 96F manuals
Add to My Manuals
Save this manual to your list of manuals |
Page 12 highlights
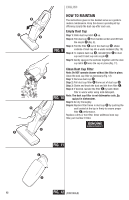
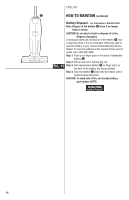
ENGLISH ●B ●O ●D HOW TO MAINTAIN The instructions given in this booklet serve as a guide to routine maintenance. Keep the cleaner operating at top efficiency. Empty the dust cup after each use. FIG. 9 Empty Dust Cup Step 1: Slide dust cup latch ●B up. Step 2: Pull dust cup ●D from handle section and lift from the nozzle ●O (Fig. 9). Step 3: Pull the filter ●E out of the dust cup ●D , shake contents of dust cup into a waste container (Fig. 10). Step 4: To replace dust cup ●D , reinstall filter ●E in dust cup and fit dust cup into nozzle ●O . Step 5: Gently squeeze the sections together until the dust cup latch ●B locks the cup in place (Fig. 11). Clean Dust Cup Filter Note: Do NOT operate cleaner without the filter in place. ●D Clean the dust cup filter as necessary (Fig. 12). Step 1: Remove dust cup ●D . Step 2: Pull dust cup filter ●E frame out of dust cup ●D . Step 3: Shake and brush the dust and dirt from filter ●E . Step 4: If desired, launder the filter ●E by hand. Wash filter in warm water using mild detergent. FIG. 10 Note: The dust cup filter is not dishwasher safe. Do not put in dishwasher. Step 5: Air dry thoroughly. Step 6: Replace filter frame in dust cup ●D by pushing the ●B seal located at the top in firmly to ensure proper filter ●E performance. Replace a dirty or torn filter. Order additional dust cup filter, part number 61544. ●D ●O FIG. 11 ●E D ●D 12 FIG. 12 (CONTINUED)
-
 1
1 -
2
-
3
-
4
-
5
-
6
-
 7
7 -
 8
8 -
 9
9 -
 10
10 -
 11
11 -
 12
12 -
 13
13 -
 14
14 -
 15
15 -
 16
16 -
 17
17 -
18
-
19
-
20
-
21
-
22
-
23
-
24
 |
 |
