Eureka Quick Up Cordless 96F Owners Guide - Page 8
How To Assemble
 |
View all Eureka Quick Up Cordless 96F manuals
Add to My Manuals
Save this manual to your list of manuals |
Page 8 highlights
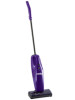
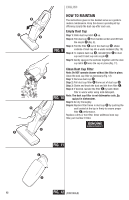
ENGLISH HOW TO ASSEMBLE Assemble completely and charge batteries for 14-16 hours before using. ●H CAUTION: Use only Eureka charger model 351-U-1025-1A Have a screwdriver available for assembly (not included). Hole to Front FIG. 1 Attach Handle Grip (Fig. 1) Step 1: Locate the 2-part bolt ●H in the assembly package. Step 2: Align the handle grip and handle tube holes and secure with the 2-part bolt ●H . Tighten the bolt. Note: The single hole in the handle tube faces forward in relation to the handle grip. Attach Handle (Fig. 2) Step 1: Use your thumb to pull back on the lock button ●M . Step 2: Push handle ●G into top of cleaner. ●G Step 3: Release lock button ●M and rotate handle ●G until it locks into place. Secure Wall Bracket on Wall (Fig. 3) Have a 1/4 inch drill available for assembly (not included). ●M Cleaner hangs in bracket with the nozzle end down. Mount on a wall in close proximity to an electrical outlet where there are not dangerous objects hidden beneath the wall FIG. 2 surface like electrical wires, pipes, etc. Leave 14 inches above the floor for clearance. Step 1: Hold bracket ●I against wall to mark location for screws. Make sure the wall bracket is positioned ●I ●N ●O ●L vertically, with the charger socket at the bottom. Step 2: Use a 1/4 inch drill for drilling holes for the plastic anchors ●N . Step 3: Insert the anchors ●N and drive the screws ●O into both holes. Step 4: Tighten the screws ●O to secure the bracket ●I . Step 5: Place cleaner, with the nozzle pointed down, on the wall bracket ●I . Step 6: Plug the charger ●L into an electrical outlet. Note: This charger has been designed to use as either FIG. 3 a wall mounted charger or to sit on a counter or ●C shelf ●P . To use on a counter or shelf, locate next to an electrical outlet. Take the battery ●C out of the cleaner and put in the counter bracket ●I . The charge light ●J or ●K will indicate that the battery is charging (Fig. 4). ●I ●P 8 ●J ●K FIG. 4 (CONTINUED)
-
 1
1 -
2
-
 3
3 -
 4
4 -
 5
5 -
 6
6 -
 7
7 -
 8
8 -
 9
9 -
 10
10 -
 11
11 -
 12
12 -
 13
13 -
14
-
15
-
16
-
17
-
18
-
19
-
20
-
21
-
22
-
23
-
24
 |
 |
