Fisher and Paykel DD24DCTX9 N Installation Guide - Page 5
Optionally Hard Wiring Prior To Installation, Refit The Drawer Onto The Runners & Close,
 |
View all Fisher and Paykel DD24DCTX9 N manuals
Add to My Manuals
Save this manual to your list of manuals |
Page 5 highlights
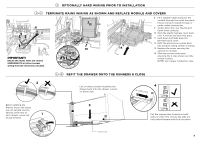
3 OPTIONALLY HARD WIRING PRIOR TO INSTALLATION 3-C TERMINATE MAINS WIRING AS SHOWN AND REPLACE MODULE AND COVERS 12 8 9 13 14 11 IMPORTANT! Ensure the mains wires are routed UNDERNEATH all other harness 10 wiring from the electronics module. 8 Fit a suitable cable clamp for the conduit through the metal knockout. Ensure wiring is routed through or under under housing ribs. 9 Screw down the Live, Neutral and Earth wires correctly. 10 Push the plastic harness cover back over. It should clip back into place 11 Fold down and slide back the terminal block cover. 12 Refit the electronics module back into position, being careful of wiring. 13 Replace the screw securing the electronics module. 14 Slide the access cover back, ensuring the 2 clips shown are fully locked in place. NOTE: Use copper conductors only. 3-D REFIT THE DRAWER ONTO THE RUNNERS & CLOSE 2 Lift or rotate counter-clockwise the 4 drawer back onto the drawer runners on either side. 4" (100 mm) Before refitting the 3 drawer, ensure the hoses are not twisted and the latches at the rear of each drawer runner are 1 facing forward. Pull the release tabs forward on both sides 4" (100 mm). Ensure the tabs are fully pulled forward and click into place. Release tab 4
-
 1
1 -
 2
2 -
 3
3 -
 4
4 -
 5
5 -
 6
6 -
 7
7 -
 8
8 -
 9
9 -
 10
10 -
 11
11 -
12
-
13
-
14
-
15
-
16
-
17
-
18
-
19
-
20
-
21
-
22
-
23
-
24
-
25
-
26
-
27
-
28
-
29
-
30
-
31
-
32
-
33
-
34
-
35
-
36
-
37
-
38
-
39
-
40
 |
 |
