Fisher and Paykel RS36A72J1 Installation Manual - Page 19
Important
 |
View all Fisher and Paykel RS36A72J1 manuals
Add to My Manuals
Save this manual to your list of manuals |
Page 19 highlights
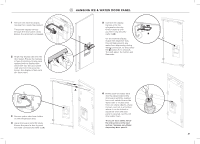
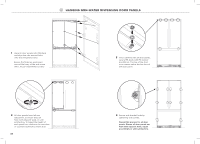
!0 CONNECT TO WATER AND ELECTRICAL SUPPLY 5 Position the appliance 1.5 - 2 ft. (450 - 600 mm) in front of the finished enclosure (refer to D). This will allow access behind the appliance for water and power connections. At the back of the appliance, cut the water tube to a suitable length for connecting to the water outlet. Ensure there is enough tubing to pull the appliance out for service, if required. 6 Assemble the following water fittings onto the other end of the water tube. Insert tube Compression Compression sleeve nut Water tube Final water tube connection 7 Fasten the faucet connection to the cold water supply. Take care not to over-tighten the faucet connection. Turn isolating faucet on and check that all connections are dry and free of drips. 8 Connecting power At the back of your appliance adhere the power cord clip. Connect the appliance to the electrical supply (115 VAC, 60 Hz with the fitted plug and lead, and turn on. Ensure the appliance is connected to its own isolating switch. Ensure excess power cord length is secured onto the clip (refer to E). When pushing the appliance into position, take care not to roll over or damage the power cord and/or water tubing. (450 D 1-.560- 02 ft. mm) E IMPORTANT! ●● Ensure water tubing is routed away from any sharp objects, sharp corners (beware of kinking the tube as this will stop water flow), and not in a location where it can be kinked or squashed. ●● Ensure a firm contact is observed as the appliance engages the anti-tip bracket, 2 ⅜" min. (60 mm) overlap. 17
-
 1
1 -
2
-
3
-
4
-
5
-
6
-
7
-
8
-
9
-
10
-
11
-
12
-
13
-
 14
14 -
 15
15 -
 16
16 -
 17
17 -
 18
18 -
 19
19 -
 20
20 -
 21
21 -
 22
22 -
 23
23 -
 24
24 -
25
-
26
-
27
-
28
 |
 |
