Fisher and Paykel RS36A72J1 Installation Manual - Page 21
Level Your Product, Attach Side Trims
 |
View all Fisher and Paykel RS36A72J1 manuals
Add to My Manuals
Save this manual to your list of manuals |
Page 21 highlights
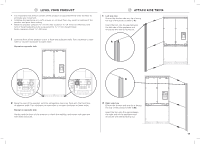
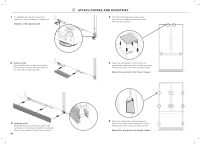
!2 LEVEL YOUR PRODUCT ●● It is important that all four corners of the product is supported firmly onto the floor to eliminate any movement. ●● Installing the appliance on a soft, uneven, or not level floor may result in twisting of the product and poor door sealing. ●● Raise the product using an 7/16" (11 mm) hex socket or 3/16" (4 mm) hex Allen key. One turn of height adjusting nuts is equivalent to 1/16" (1 mm) height travel. Note: maximum travel 13/16" (20 mm). 1 Level the front of the product until it is flush with adjacent walls. Turn clockwise to raise roller or counter-clockwise to lower roller. Repeat on opposite side. !3 ATTACH SIDE TRIMS 1 Left side trim Ensure the shorter side trim lip is facing the top of the product (refer to A). Insert the trim into the gap between the left side of the appliance and enclosure with the lip facing out. A B 2 Raise the rear of the product until the refrigerator doors are flush with the front face of adjacent walls. Turn clockwise to raise roller or counter-clockwise to lower roller. Repeat on opposite side. Gently push the front of the product to check the stability, and ensure side gaps are even with enclosure. 2 Right side trim Ensure the shorter side trim lip is facing the top of the product (refer to B). Insert the trim into the gap between the right side of the appliance and enclosure with the lip facing out. 19
-
 1
1 -
2
-
3
-
4
-
5
-
6
-
7
-
8
-
9
-
10
-
11
-
12
-
13
-
14
-
15
-
 16
16 -
 17
17 -
 18
18 -
 19
19 -
 20
20 -
 21
21 -
 22
22 -
 23
23 -
 24
24 -
 25
25 -
 26
26 -
27
-
28
 |
 |
