Frigidaire FAFS4272LW Wiring Diagram (All Languages) - Page 1
Frigidaire FAFS4272LW Manual
 |
UPC - 012505382208
View all Frigidaire FAFS4272LW manuals
Add to My Manuals
Save this manual to your list of manuals |
Page 1 highlights
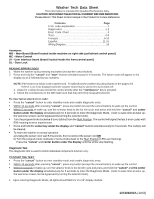
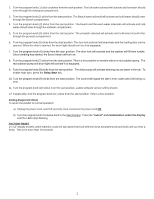
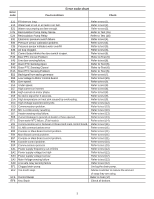
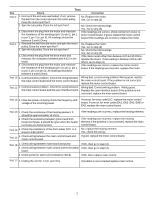
Washer Tech Data Sheet This information is intended for Qualified Technicians Only. CAUTION: DISCONNECT ELECTRICAL CURRENT BEFORE SERVICING Please Return This Sheet to its Envelope in the Product for Future Reference Contents Page Error code explanation 1 Diagnostics 1-2 Error Code Chart 3 Tests 4-5 Français 6-10 Español 11-15 Wiring Diagram 16 Acronyms: MB - Main Board (Board located inside machine on right side just behind control panel.) MC - Motor Control UI - User interface board (board located inside the front control panel) DL - Door Lock READING ERROR CODES 1. Wake the washer up by pressing any button (except the cancel button). 2. Press and hold the "cancel" and "start" buttons simultaneously for 6 seconds. The failure code will appear in the display as an E followed by two numbers. NOTE: E00 means no failure code experienced. Troubleshoot the problem by using charts on the pages 3-5. If there is no error displayed and the washer momentarily starts then turns back off: 1. Listen for a relay closure inside the control shortly after the "start/pause" key is pressed. 2. Check the connections on the MB make sure that they are firmly snug and secured. To clear latest stored error code: • Press the "cancel" button to enter standby mode and enable diagnostic entry. • Within 10 seconds after pressing "cancel", press any button (except the cancel button) to wake up the control. • Within 5 seconds of wake up, turn the selector knob to the far left cycle and press and hold the "cancel" and center button under the display simultaneously for 3 seconds to enter the Diagnostic Mode. (note: to save time at wake up, the welcome screen can be bypassed by turning the selector knob). • Turn the program knob clockwise 9 turns (clicks) from the Start Position. The control will signal the last 5 error codes with E00 meaning no error experienced. • Press and hold the center key under the display and "cancel" buttons simultaneously for 3 seconds. The code(s) will be cleared. • To return the washer to normal operation. a) Unplug the power cord, wait 5-8 seconds, then reconnect the power cord OR b) Turn the program knob clockwise 2 turns (clicks) back to the Start Position (LEDs are flashing). Press the "cancel" and center button under the display until the LEDs stop flashing. Diagnostic Test The diagnostic test is used to check individual component function only. TO START THE TEST: • Press the "cancel" button to enter standby mode and enable diagnostic entry. • Within 10 seconds after pressing "cancel", press any button (except the cancel button) to wake up the control. • Within 5 seconds of wake up, turn the selector knob to the far left cycle and press and hold the "cancel" and the center button under the display simultaneously for 3 seconds to enter the Diagnostic Mode. (note: to save time at wake up, the welcome screen can be bypassed by turning the selector knob). 1. Upon entering Diagnostic Mode, all lights should flash for 1¼"x2" display models. 1 137309200A (1003)
-
 1
1 -
 2
2 -
 3
3 -
 4
4 -
 5
5 -
 6
6 -
 7
7 -
8
-
9
-
10
-
11
-
12
-
13
-
14
-
15
-
16
 |
 |