Fujitsu S1500M Getting Started Guide - Page 6
Connect the USB cable to the ScanSnap, and your computer.
 |
UPC - 097564307584
View all Fujitsu S1500M manuals
Add to My Manuals
Save this manual to your list of manuals |
Page 6 highlights
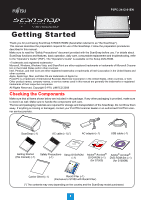
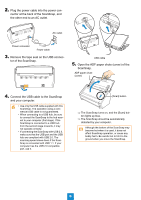
2. Plug the power cable into the power con- nector at the back of the ScanSnap, and the other end to an AC outlet. AC outlet Power connector Power cable 3. Remove the tape seal on the USB connec- tor of the ScanSnap. USB cable 5. Open the ADF paper chute (cover) of the ScanSnap. ADF paper chute (cover) 4. Connect the USB cable to the ScanSnap and your computer. • Use only the USB cable supplied with this ScanSnap. The operation using a commercial USB cable is not guaranteed. • When connecting to a USB hub, be sure to connect the ScanSnap to the hub nearest to your computer (first stage). If the ScanSnap is connected to a USB hub from the second stage onwards, it may not operate correctly. • If connecting the ScanSnap with USB 2.0, make sure that the USB port and the USB hub are compliant with USB 2.0. The scanning speed slows down if the ScanSnap is connected with USB 1.1. If your computer has the USB 2.0 compatible port, use it. [Scan] button ⇒ The ScanSnap turns on, and the [Scan] button lights up blue. ⇒ The ScanSnap should be automatically detected by your computer. Although the bottom of the ScanSnap may become hot when it is used, it does not affect ScanSnap operation, or cause any bodily harm. Be careful not to hit it to the ground when you move the ScanSnap. 6
-
 1
1 -
 2
2 -
 3
3 -
 4
4 -
 5
5 -
 6
6 -
 7
7 -
 8
8
 |
 |
