Fujitsu S510M Getting Started Guide - Page 10
Connecting the USB cable - scansnap not working
 |
UPC - 097564307324
View all Fujitsu S510M manuals
Add to My Manuals
Save this manual to your list of manuals |
Page 10 highlights
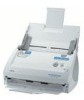
Use only the supplied AC cable and AC adapter (power cable). 2. Insert the connectors of the AC adapter to the scanner inlet, and then plug the cord in a power outlet. Outlet The installation of ScanSnap is complete! ATTENTION The ScanSnap Manager icon with a triangle below the icon appears in the Dock menu. When the icon remains inactive , press the [POWER] button to turn off the scanner, and then press the [POWER] button again to restart the scanner. (Allow at least 5 seconds when you turn on/off the scanner.) Inlet HINT 2.2.2. Connecting the USB cable Follow the procedures below to connect the USB cable. ATTENTION ● Use the USB cable supplied with this scanner. The operation with a commercially available USB cable is not guaranteed. ● When connecting to a USB hub, be sure to connect the scanner to the hub nearest to your computer (first stage). If you connect it to a USB hub from the second stage onwards, ScanSnap may not operate correctly. ● If you connect the scanner with USB 2.0, it is required that the USB port and the Hub are compliant with USB 2.0. The scanning speed may slow down when you connect the scanner with USB 1.1. If your computer has the USB 2.0 compatible port, use it. 1. Remove the seal from the USB connector. 2. Connect the scanner and your computer with the USB cable. When using the [POWER] button to turn off/on the scanner, press it for longer than one second. * To prevent miss-operation, the [POWER] button does not work unless it is pressed for longer than one second. USB cable 3. Open the Paper chute of the scanner. ATTENTION If the scanner does not turn on automatically, press the [POWER] button on the scanner. Ö Your computer will automatically detect the scanner. 8 |
-
 1
1 -
2
-
3
-
4
-
 5
5 -
 6
6 -
 7
7 -
 8
8 -
 9
9 -
 10
10 -
 11
11 -
 12
12 -
 13
13 -
 14
14 -
 15
15 -
16
-
17
-
18
-
19
-
20
-
21
-
22
-
23
-
24
 |
 |
