Garmin Edge 830 Mountain Bike Bundle Owners Manual - Page 7
Acquiring Satellite Signals, Going for a Ride, Segments
 |
View all Garmin Edge 830 Mountain Bike Bundle manuals
Add to My Manuals
Save this manual to your list of manuals |
Page 7 highlights
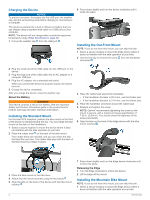
2 Use the 3 mm hex key to remove the screw from the handlebar connector . 9 Press down slightly and turn the Edge device clockwise until it locks into place. Acquiring Satellite Signals The device may need a clear view of the sky to acquire satellite signals. The time and date are set automatically based on the GPS position. 1 Go outdoors to an open area. The front of the device should be oriented toward the sky. 2 Wait while the device locates satellites. It may take 30-60 seconds to locate satellite signals. 3 Select an option: • If the handlebar diameter is 25.4 mm, place the thicker pad around the handlebar. • If the handlebar diameter is 31.8 mm, place the thinner pad around the handlebar. • If the handlebar diameter is 35 mm, do not use a rubber pad. 4 Place the handlebar connector around the handlebar, so that the mount arm is above the bike stem. 5 Use the 3 mm hex key to loosen the screw on the mount arm, position the mount arm, and tighten the screw. NOTE: Garmin recommends tightening the screw so the mount arm is secure, with a maximum torque specification of 20 lbf-in. (2.26 N-m). You should check the tightness of the screw periodically. Training Going for a Ride If you are using a wireless sensor or accessory, it can be paired and activated during initial setup (Pairing Your Wireless Sensors, page 16). If your device was packaged with a wireless sensor, they are already paired and can be activated during initial setup. 1 Hold to turn on the device. 2 Go outside, and wait while the device locates satellites. The satellite bars turn green when the device is ready. 3 From the home screen, select or to select an activity profile. 4 Select . 5 Select to start the activity timer. 6 If necessary, use the 2 mm hex key to remove the two screws on the back side of the mount , remove and rotate the connector, and replace the screws to change the orientation of the mount. 7 Replace and tighten the screw on the handlebar connector. NOTE: Garmin recommends tightening the screw so the mount is secure, with a maximum torque specification of 7 lbf-in. (0.8 N-m). You should check the tightness of the screw periodically. 8 Align the tabs on the back of the Edge device with the bike mount notches . Training NOTE: History is recorded only while the activity timer is running. 6 Swipe left or right to view additional data screens. You can swipe down from the top of the data screens to view the widgets. 7 If necessary, tap the screen to view the timer overlay. 8 Select to stop the activity timer. TIP: Before you save this ride and share it on your Garmin Connect account, you can change the ride type. Accurate ride type data is important for creating bike friendly courses. 9 Select Save Ride. 10Select . Segments Following a segment: You can send segments from your Garmin Connect account to your device. After a segment is saved to your device, you can follow the segment. NOTE: When you download a course from your Garmin Connect account, all segments in the course are downloaded automatically. Racing a segment: You can race a segment, trying to match or exceed your personal record or other cyclists who have ridden the segment. 3
-
 1
1 -
 2
2 -
 3
3 -
 4
4 -
 5
5 -
 6
6 -
 7
7 -
 8
8 -
 9
9 -
 10
10 -
 11
11 -
 12
12 -
13
-
14
-
15
-
16
-
17
-
18
-
19
-
20
-
21
-
22
-
23
-
24
-
25
-
26
-
27
-
28
-
29
-
30
-
31
-
32
-
33
-
34
-
35
-
36
 |
 |
