Gateway 838GM User Guide - Page 102
Networking Your Computer
 |
View all Gateway 838GM manuals
Add to My Manuals
Save this manual to your list of manuals |
Page 102 highlights
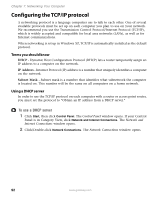
Chapter 7: Networking Your Computer 8 In the browser's Address box, type http://192.168.1.1, then press ENTER. 9 When prompted for a username and password, leave the username box empty and type admin in the password box, then click OK. The setup page opens. 10 Enter the following values in the appropriate fields: ■ Host Name and Domain Name - Check with your ISP to see if entries are required in these fields and, if so, what entries are required. ■ Enable/Disable wireless - Click Enable to turn on the wireless functions of your access point router. ■ SSID - Type a unique name for your wireless access point. ■ Allow Broadcast SSID to associate - Clicking Yes lets you automatically see the SSID in the Available Networks list (see "Connecting to an access point network" on page 97). Clicking No means that you will need to manually add the access point (see "Adding an access point" on page 100). Clicking No makes your wireless network more secure because intruders will not be able to connect to your network without knowing the name of your access point. Tips & Tricks If you live in an apartment building or dormitory, you may want to click No to prevent your neighbors from discovering and accessing your network. ■ Channel - In the United States, you can specify any channel between 1 and 11. ■ WEP - To use WEP (wired equivalent privacy) encryption, select Mandatory. If you use WEP encryption, all computers on your network must use the same WEP encryption. See the documentation that came with your access point on how to use WEP encryption. ■ WAN Connection Type - If your ISP assigns you a different IP address each time you log on, click Obtain an IP Address Automatically. If your ISP requires a fixed IP address, click Static IP, then type the values provided by your ISP. 11 Click Apply, then click Continue to save the settings. 12 If you temporarily connected a computer to the access point router in Step 6, disconnect it. 13 Reset the power on your cable or DSL modem. 14 Restart all of your computers on the network. 15 To connect to the access point, see "Connecting to an access point network" on page 97. 96 www.gateway.com
-
 1
1 -
2
-
3
-
4
-
5
-
6
-
7
-
8
-
9
-
10
-
11
-
12
-
13
-
14
-
15
-
16
-
17
-
18
-
19
-
20
-
21
-
22
-
23
-
24
-
25
-
26
-
27
-
28
-
29
-
30
-
31
-
32
-
33
-
34
-
35
-
36
-
37
-
38
-
39
-
40
-
41
-
42
-
43
-
44
-
45
-
46
-
47
-
48
-
49
-
50
-
51
-
52
-
53
-
54
-
55
-
56
-
57
-
58
-
59
-
60
-
61
-
62
-
63
-
64
-
65
-
66
-
67
-
68
-
69
-
70
-
71
-
72
-
73
-
74
-
75
-
76
-
77
-
78
-
79
-
80
-
81
-
82
-
83
-
84
-
85
-
86
-
87
-
88
-
89
-
90
-
91
-
92
-
93
-
94
-
95
-
96
-
 97
97 -
 98
98 -
 99
99 -
 100
100 -
 101
101 -
 102
102 -
 103
103 -
 104
104 -
 105
105 -
 106
106 -
 107
107 -
108
-
109
-
110
-
111
-
112
-
113
-
114
-
115
-
116
-
117
-
118
-
119
-
120
-
121
-
122
-
123
-
124
-
125
-
126
-
127
-
128
-
129
-
130
-
131
-
132
-
133
-
134
-
135
-
136
-
137
-
138
-
139
-
140
-
141
-
142
-
143
-
144
 |
 |
