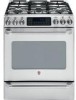
GE C2S980S Use and Care Manual
GE C2S980S - Cafe 30 in. Dual-Fuel Range Manual
 |
View all GE C2S980S manuals
Add to My Manuals
Save this manual to your list of manuals |
GE C2S980S manual content summary:
- GE C2S980S | Use and Care Manual - Page 1
Assemblies . . . .31 Self-Cleaning 29, 30 Stainless Steel Surfaces 34 Installation Owner's Manual Instructions 39-52 & Installation Anti-Tip Device 52 Instructions Check Ignition of Surface Burners 50, 51 C2S980 Connect Range to Electric 44, 46 Connect Range to Gas . . . . .43, 45 - GE C2S980S | Use and Care Manual - Page 2
your gas supplier from a neighbor's phone. Follow the gas supplier's instructions. ■ If you cannot reach your gas supplier, call the fire department. - Installation and service must be performed by a qualified installer, service agency or the gas supplier. 2 Consumer Support Troubleshooting Tips - GE C2S980S | Use and Care Manual - Page 3
not receive an anti-tip bracket with your purchase, call 1.800.626.8774 to receive one at no cost (in Canada, call 1.800.561.3344). For installation instructions of the bracket, visit GEAppliances.com (in Canada, GEAppliances.ca). Installation Instructions Troubleshooting Tips Consumer Support 3 - GE C2S980S | Use and Care Manual - Page 4
qualified gas range installers or service technicians. ■ Do not attempt to repair or replace any part of your range unless it is specifically recommended in this manual. All other service should be referred to a qualified technician. Installation Instructions Consumer Support Troubleshooting Tips - GE C2S980S | Use and Care Manual - Page 5
can be converted for use with either type of gas. See the Installation of the range section. WARNING: These adjustments must be made by a qualified service technician in accordance with the manufacturer's instructions and all codes and requirements of the authority having jurisdiction. Failure to - GE C2S980S | Use and Care Manual - Page 6
are set to the OFF the smoking point. position. This will preclude gas flow when the ■ Use the least possible amount of fat for range is turned on effective shallow or deep-fat frying. Filling the pan too full of fat can cause spillovers when food is added. 6 Consumer Support Troubleshooting - GE C2S980S | Use and Care Manual - Page 7
of the drawer and it could damage the interior finish. ■ Never place, use or self-clean the lower oven drawer pan in the upper oven. Installation Instructions Troubleshooting Tips Consumer Support 7 - GE C2S980S | Use and Care Manual - Page 8
Instructions Consumer Support Troubleshooting Tips SELF-CLEANING UPPER OVEN ■ Be sure to wipe up excess spillage before self-cleaning operation. ■ Before self-cleaning the oven, remove the shelves, any broiler pan, grid and other cookware. ■ Clean only parts listed in this Owner's Manual - GE C2S980S | Use and Care Manual - Page 9
burners and grates are cool before you place your hand, a pot holder, cleaning cloths or other materials on them. Installation Instructions Troubleshooting Tips Consumer Support Push the control knob in and turn it to the LITE position. How to Light a Gas Surface Burner Make sure all the surface - GE C2S980S | Use and Care Manual - Page 10
guide below, then switch to the desired cook setting. Type of Food Preheat Cook Setting ) 4 (MED) 5 (MED) Sear on HI for 1 minute each side 4 (MED) 5 (MED) 5 (MED) HI NOTE: Griddle settings may need to be adjusted if griddle Installation Instructions Consumer Support Troubleshooting Tips 10 - GE C2S980S | Use and Care Manual - Page 11
Instructions Troubleshooting Tips Consumer Support In Case of Power Failure In case of a power failure, you can light the gas surface burners on your range with a match. Hold a lit match to the burner, then push in and turn the control knob to the LITE position. Use extreme caution when - GE C2S980S | Use and Care Manual - Page 12
manual, features and appearance may vary from your model.) Installation Instructions Consumer Support Troubleshooting , the times set for the timer or automatic oven operations, and if the range is locked. power to the oven and call for service. If your oven was set for a timed oven operation and - GE C2S980S | Use and Care Manual - Page 13
Safety Instructions Operating Instructions Using the upper oven. ge.com may melt if left too close to the vent. Vent appearance and location vary. Upper Oven Vent Your oven is vented through ducts at the rear of the range. Do Installation Instructions Troubleshooting Tips Consumer Support 13 - GE C2S980S | Use and Care Manual - Page 14
or C R or A A or B Check food for doneness at minimum time on recipe. Cook longer if necessary. Touch the CLEAR/OFF pad when cooking is complete. Installation Instructions Consumer Support Troubleshooting Tips Preheating and Pan Placement Preheat the oven if the recipe calls for it. To preheat - GE C2S980S | Use and Care Manual - Page 15
Safety Instructions Operating Instructions Installation Instructions Close the door. Always broil with the door closed. NOTE: Broil will not work if the temperature probe is plugged in. ge.com How to Set the Upper Oven for Broiling-Close the oven door Place the meat or fish on a broiler grid in - GE C2S980S | Use and Care Manual - Page 16
be entered is 60. To set additional time, you will need to set it by hours and minutes. For example, to enter 1 hour and 30 minutes, touch 1, 3 and pads to enter the new time you want. Installation Instructions Consumer Support Troubleshooting Tips To Cancel the Timer Touch the KITCHEN TIMER - GE C2S980S | Use and Care Manual - Page 17
Instructions Operating Instructions Using the timed baking and roasting features (upper oven only). ge. Installation Instructions Troubleshooting Tips Consumer Support How to Set a Delayed Start and Automatic Stop You can set the upper oven control to delaystart the oven, cook for a specific - GE C2S980S | Use and Care Manual - Page 18
such as meat loaf or casseroles. Insert the probe into the meatiest part of the inner thigh from below and parallel to the leg of a whole turkey. Installation Instructions Consumer Support Troubleshooting Tips How to Set the Upper Oven For Roasting When Using the Probe Insert the probe into - GE C2S980S | Use and Care Manual - Page 19
in the recipe. ■ Some package instructions for frozen casseroles, main dishes or baked goods have been developed using commercial convection ovens. For best results in this oven, preheat the oven and use the temperature, for regular baking, on the package. Troubleshooting Tips Consumer Support 19 - GE C2S980S | Use and Care Manual - Page 20
circulate well around food in a pan with high sides. Installation Instructions How to Set the Upper Oven for Convection Baking or Roasting Touch the CONVECTION , with a pause in between. This is normal. Consumer Support Troubleshooting Tips When convection baking with only 1 shelf, follow the - GE C2S980S | Use and Care Manual - Page 21
Safety Instructions Operating Instructions ge.com How to Set the Upper Oven for Convection Roasting when Using the Probe For best results when use the timer even though you cannot use timed oven operations while using the probe. Installation Instructions Troubleshooting Tips Consumer Support 21 - GE C2S980S | Use and Care Manual - Page 22
Turkey Breast (4 to 6 lbs.) 16-19 325°F 170°F * Stuffed birds generally require 30-45 minutes additional roasting time. Shield legs and breast with foil to prevent overbrowning Book. Your Kitchen Guide. USDA Rev. June 1985.) Installation Instructions Consumer Support Troubleshooting Tips 22 - GE C2S980S | Use and Care Manual - Page 23
Instructions Operating Instructions Using the timed convection baking features (upper oven only). ge.com Installation Instructions Troubleshooting Tips Consumer Support How to Set a Delayed Start and Automatic Stop You can set the upper oven control to delaystart the oven, cook for a specific - GE C2S980S | Use and Care Manual - Page 24
(continual beep). Touch the KITCHEN TIMER ON/OFF pad again. The display shows BEEP. (This cancels the one beep every 6 seconds.) Touch the START pad. Installation Instructions Consumer Support Troubleshooting Tips 24 - GE C2S980S | Use and Care Manual - Page 25
Safety Instructions Operating Instructions ge.com Gas/Control Lockout (on some models) Your control will allow you to lock out the activate the cook and hold feature and leave the control set in this special features mode. Installation Instructions Troubleshooting Tips Consumer Support 25 - GE C2S980S | Use and Care Manual - Page 26
Operating Instructions Safety Instructions Installation Instructions Using the Sabbath Feature. (on some models) ( pad. If the oven is cooking, wait for a random delay period of approximately 30 seconds to 1 minute, until only ⊃ is in the display. Press and hold Support Troubleshooting Tips 26 - GE C2S980S | Use and Care Manual - Page 27
Instructions Operating Instructions Adjust the upper oven thermostat-Do it yourself! ge.com require products labeled "margarine" to contain at least 80% fat by weight. Low-fat spreads, on the other hand, contain less fat and oil. Installation Instructions Troubleshooting Tips Consumer Support 27 - GE C2S980S | Use and Care Manual - Page 28
WARM 10 minutes 350°F 20 minutes 425°F 30 minutes Installation Instructions Consumer Support Troubleshooting Tips T T LO Adjust the oven thermostat COOLER TURN DISK Back of Lower Oven Knob (Appearance may vary.) 28 K RETE Pull the OVEN CONTROL knob off the range and look at the back side. - GE C2S980S | Use and Care Manual - Page 29
birds is extremely sensitive to the fumes given off during the self-cleaning cycle of any range. Move birds to another well-ventilated room. NOTE: Use caution when opening the upper oven lower oven drawer during a self-clean cycle. Installation Instructions Troubleshooting Tips Consumer Support 29 - GE C2S980S | Use and Care Manual - Page 30
slide, apply a small amount of vegetable oil or cooking oil to a paper towel and wipe the edges of the oven shelves with the paper towel. Installation Instructions Consumer Support Troubleshooting Tips 30 - GE C2S980S | Use and Care Manual - Page 31
Instructions Operating Instructions Care and cleaning of the range. ge.com Be sure electrical power is off and all surfaces are cool before cleaning any part of the range. If your range is removed for cleaning, servicing . Installation Instructions Troubleshooting Tips Consumer Support 31 - GE C2S980S | Use and Care Manual - Page 32
the matching size caps onto the burner bases or heads. Medium cap Small cap Installation Instructions Consumer Support Troubleshooting Tips The oval burner head/cap assembly is removable. Simply lift it off the range for cleaning. Use a sewing needle or twist-tie to unclog the small hole in - GE C2S980S | Use and Care Manual - Page 33
grate support bumpers in the cooktop are missing or damaged, replacement parts can be obtained by calling 1.800.GE.CARES. To insert the new bumpers, simply insert the cone shaped end and push down while gently twisting or rocking the bumper. Cooktop Surface To avoid damaging the stainless steel - GE C2S980S | Use and Care Manual - Page 34
before removing the griddle. Use caution when handling a hot griddle. Installation Instructions Consumer Support Troubleshooting Tips Stainless Steel Surfaces (on some models) Protecting Cleaning Instructions: STAINLESS STEEL has a reputation for withstanding tough abuse for years. This is - GE C2S980S | Use and Care Manual - Page 35
Safety Instructions Operating Instructions ge.com Lift the door straight up and off the hinges. The gasket is designed with a gap at are heated. To clean the oven floor, gently lift the bake element. Clean with warm soapy water. Installation Instructions Troubleshooting Tips Consumer Support 35 - GE C2S980S | Use and Care Manual - Page 36
guide and slide it in slightly to hook it. Slide the drawer all the way in. Removable Lower Oven Drawer Pan NOTE: Before performing any adjustments, cleaning or service, disconnect the range electrical polish with a dry cloth. Installation Instructions Consumer Support Troubleshooting Tips 36 - GE C2S980S | Use and Care Manual - Page 37
control knob is not interchangeable with the surface burner knobs. Be sure to reinstall the lower oven drawer knob to the original location. The lower oven drawer knob may be identified by the increasing numbers from "WM" to "450." Installation Instructions Troubleshooting Tips Consumer Support - GE C2S980S | Use and Care Manual - Page 38
Oven Light Replacement CAUTION: Before replacing your oven light bulb, disconnect the electrical power to the range at the main fuse or circuit breaker panel. Be sure to let the of the cover. Connect electrical power to the range. Installation Instructions Consumer Support Troubleshooting Tips 38 - GE C2S980S | Use and Care Manual - Page 39
is completed. NOTE TO CONSUMER: Keep this Owner's Manual and Installation Instructions for future use. SERVICER: The electrical diagram is in an envelope attached to the back of the range. Installation Instructions Troubleshooting Tips Consumer Support FOR YOUR SAFETY Do not store or use - GE C2S980S | Use and Care Manual - Page 40
Code (ANSI/NFPA 70, latest edition). In Canada, electrical grounding must be in accordance with the current CSA C22.1 Canadian Electrical Code Part I and/or local codes. See Electrical Connections in this section. ■ Before installing your range on linoleum or any other synthetic floor covering - GE C2S980S | Use and Care Manual - Page 41
depending on model. See specifications sheet for your model. Height 47-3/4" 36-1/4" ± 1/4" Depth with door open: 46-3/8" Installation Instructions Troubleshooting Tips Consumer Support Minimum to cabinets on either side of the range 6" 18" Minimum clearance to left wall 30" 30" Minimum - GE C2S980S | Use and Care Manual - Page 42
range. (See the Installation Safety Instructions section.) IMPORTANT! Remove all tape and packaging. Make sure the burners are properly seated and level. Take the accessory pack out of the oven. Check to be sure that no range parts have come loose during shipping. Consumer Support Troubleshooting - GE C2S980S | Use and Care Manual - Page 43
metal appliance connector used to connect the range to the gas supply line should have an I.D. of 1/2″ and be 5 feet in length for ease of installation. In Canada, flexible connectors must be single wall metal connectors no longer than 6 feet in length. Troubleshooting Tips Consumer Support 43 - GE C2S980S | Use and Care Manual - Page 44
prong plug supplied with the range. If the electrical service provided does not meet the above specifications, it is recommended that a licensed electrician install an approved outlet. ■ Locate the electric supply as illustrated. Installation Instructions Consumer Support Troubleshooting Tips 44 - GE C2S980S | Use and Care Manual - Page 45
Installation Instructions Flexible Connector Hookup Rigid Pipe Hookup Options Troubleshooting Tips Consumer Support Pressure regulator Adapter Installer: Inform the consumer of the location of the gas shut-off valve. 1/2″ or 3/4″ Gas pipe Gas Flow into Range 45° Elbow Gas Flow into Range - GE C2S980S | Use and Care Manual - Page 46
conductor connection to an electric range. A range cord rated at 40 amps with 125/250 minimum volt range is required. A 50-amp range cord is not screws to remove wire cover Installation Instructions Consumer Support Troubleshooting Tips Retaining tab Back of range Wire cover Remove the 3 - GE C2S980S | Use and Care Manual - Page 47
terminals of the terminal block. Locate the copper ground strap on the lower back of the range. Loosen the upper center screw on the terminal block. Slide the open slotted end of ) Neutral terminal Ground strap Open slotted end Installation Instructions Troubleshooting Tips Consumer Support 47 - GE C2S980S | Use and Care Manual - Page 48
Instructions Safety Instructions Installation Instructions Installation of the range. Replace the Power Cord (Optional) Continued Perform this step only if the power cord shipped on the range does not match your wall receptacle. 3-Wire Conduit Installation models, Support Troubleshooting Tips 48 - GE C2S980S | Use and Care Manual - Page 49
Safety Instructions Operating Instructions Installation Instructions Read these instructions completely and carefully. Replace the Power Cord (Optional) Continued Perform this step only if the power cord shipped on the range does not match your wall receptacle. 4-Wire Conduit Installation Option - GE C2S980S | Use and Care Manual - Page 50
"OUTSIDE." Place the middle grate with its bowed front toward the front of the range. Outside grate Center grate Outside grate CAUTION:Do not operate the burner without all burner parts in place. Installation Instructions Consumer Support Troubleshooting Tips Front of range Slot Electrode 50 - GE C2S980S | Use and Care Manual - Page 51
burner in succession until all burners have been checked. Installation Instructions Troubleshooting Tips Consumer Support Quality of Flames The combustion quality of burner flames needs to be determined visually. (A) Yellow flames- Call for service (B) Yellow tips on outer cones- Normal for LP - GE C2S980S | Use and Care Manual - Page 52
to LP gas, the conversion be found attached to the range next to the must be performed by a qualified LP gas installer. pressure regulator. Keep these instructions and the orifices in case you want to convert back to natural gas. Installation Instructions Consumer Support Troubleshooting Tips 52 - GE C2S980S | Use and Care Manual - Page 53
Safety Instructions Operating Instructions Before you call for service... Troubleshooting Tips Save time and money! Review the charts on the following pages first and you may not need to call for service. ge.com Problem Top burners do not light or do not burn evenly Possible Causes Plug on range - GE C2S980S | Use and Care Manual - Page 54
Operating Instructions Safety Instructions Before you call for service... Troubleshooting Tips Installation Instructions Problem Possible Causes Gas/Control Lockout or Control Lockout feature is activated What To Do • If LOC ON appears in the display, the range control is locked. Turn this - GE C2S980S | Use and Care Manual - Page 55
Instructions Operating Instructions ge.com Installation Instructions Problem Oven not clean after a clean cycle Possible Causes Oven controls not properly set all power to the range for 5 minutes and then reconnect power. If the function error code repeats, call for service. "Probe" appears in - GE C2S980S | Use and Care Manual - Page 56
Instructions Safety Instructions Before you call for service... Troubleshooting Tips Problem of the range section. • Reduce weight. Redistribute drawer setting. • Cover food with lid or aluminum foil. • Push drawer in until latch engages. Installation Instructions Consumer Support Troubleshooting - GE C2S980S | Use and Care Manual - Page 57
model number ready. Grates Surface Burner Caps Installation Instructions Oven and Drawer Racks Broiler Pan Cleaner Troubleshooting Tips Consumer Support Light Bulbs Knobs Tired of discolored racks? Wishing you had extra-heavy-duty oven racks? NOW AVAILABLE for your range: GE's innovative - GE C2S980S | Use and Care Manual - Page 58
Notes. 58 Consumer Support Troubleshooting Tips Installation Instructions Operating Instructions Safety Instructions - GE C2S980S | Use and Care Manual - Page 59
• Backed by GE • All brands covered • Unlimited service calls • All parts and labor costs GE and call us in the U.S. toll-free at 800.626.2224 for more information. *All brands covered, up to 20 years old, in the continental U.S. ✁ Cut here Please place in envelope and mail to: General Electric - GE C2S980S | Use and Care Manual - Page 60
yt ! Model Number Serial Number First Name Mr. ■ Ms. ■ Mrs. ■ Miss ■ Street Address Last Name Apt. # E-mail Address* City Date Placed In Use Month Day Year State Phone _ Number Zip Code _ GE Consumer & Industrial Appliances General Electric Company Louisville, KY 40225 ge.com - GE C2S980S | Use and Care Manual - Page 61
which vary from state to state. To know what your legal rights are, consult your local or state consumer affairs office or your state's Attorney General. Warrantor: General Electric Company. Louisville, KY 40225 Installation Instructions Troubleshooting Tips Consumer Support 61 - GE C2S980S | Use and Care Manual - Page 62
Operating Instructions Safety Instructions GE Dual Fuel Range Warranty. (For customers in Canada) All warranty service provided by our Factory Service Centers or an authorized Customer Care® technician. For service, call 1.800.561.3344. Please have serial number and model number available when - GE C2S980S | Use and Care Manual - Page 63
Notes. 63 Safety Instructions Operating Instructions Installation Instructions Troubleshooting Tips Consumer Support - GE C2S980S | Use and Care Manual - Page 64
Support. GE Appliances Website In the U.S.: ge.com Have a question or need assistance with your appliance? Try the GE Appliances Website any day of the year! For greater convenience and faster service, you can now download Owner's Manuals, order parts or even schedule service on-line. In Canada
-
 1
1 -
 2
2 -
 3
3 -
 4
4 -
 5
5 -
 6
6 -
 7
7 -
8
-
9
-
10
-
11
-
12
-
13
-
14
-
15
-
16
-
17
-
18
-
19
-
20
-
21
-
22
-
23
-
24
-
25
-
26
-
27
-
28
-
29
-
30
-
31
-
32
-
33
-
34
-
35
-
36
-
37
-
38
-
39
-
40
-
41
-
42
-
43
-
44
-
45
-
46
-
47
-
48
-
49
-
50
-
51
-
52
-
53
-
54
-
55
-
56
-
57
-
58
-
59
-
60
-
61
-
62
-
63
-
64
 |
 |

Safety Instructions
. . . . . .2–8
Operating Instructions
Convection Oven . . . . . . . . . .19–23
Roasting Guide . . . . . . . . . . . . . .22
Timed Convection Baking . . . . . .23
Gas/Control Lockout
. . . . . . . . . . .25
Gas Surface Burners
. . . . . . .9, 11
Griddle . . . . . . . . . . . . . . . . . . . . . . . .10
Lower Oven Drawer
. . . . . . . . . .28
Thermostat . . . . . . . . . . . . . . . .27, 28
Upper Oven . . . . . . . . . . . . . . .12–27
Aluminum Foil . . . . . . . . . . . . . . .14
Baking or Roasting . . . . . . . . . .14
Broiling Guide
. . . . . . . . . . . . . . .15
Clock and Timer . . . . . . . . . . . . .16
Oven Controls . . . . . . . . . . . . . . .12
Preheating . . . . . . . . . . . . . . . . . . .14
Probe. . . . . . . . . . . . . . . . . . . . .18, 21
Sabbath Feature . . . . . . . . . . . .26
Self-Cleaning . . . . . . . . . . . . .29, 30
Special Features . . . . . . . . .24, 25
Timed Baking and
Roasting Features . . . . . . . . . . .17
Care and Cleaning
Burner Grates . . . . . . . . . . . . . . . . .33
Burner Caps and Heads . . . . . .32
Control Panel and Knobs
. . . . .37
Cooktop Surface . . . . . . . . . . . . . .33
Griddle . . . . . . . . . . . . . . . . . . . . . . . .34
Lift-Off Oven Door
. . . . . . . . . . . .35
Lower Oven Drawer
. . . . . . . . . .36
Oven Air Vents . . . . . . . . . . . . . . . .37
Oven Heating Elements . . . . . . .35
Oven Light Replacement . . . . . .38
Oven Shelves
. . . . . . . . . . . . . . . . .38
Sealed Burner Assemblies . . . .31
Self-Cleaning . . . . . . . . . . . . . .29, 30
Stainless Steel Surfaces . . . . . . .34
Installation
Instructions
. . . . . . . . . . . .39–52
Anti-Tip Device . . . . . . . . . . . . . . . .52
Check Ignition of
Surface Burners . . . . . . . . . . .50, 51
Connect Range
to Electric
. . . . . . . . . . . . . . . . .44, 46
Connect Range to Gas . . . . .43, 45
Dimensions and
Clearances . . . . . . . . . . . . . . . . . . . .41
Electrical Connections . . . . . .47–49
Level the Range . . . . . . . . . . . . . . .51
Location Guidelines . . . . . . . . . . .42
LP . . . . . . . . . . . . . . . . . . . . . . . . . . . . .52
Safety Instructions . . . . . . . .39, 40
Accessories
. . . . . . . . . . . . . . . . . .57
Troubleshooting Tips
.53–56
Consumer Support
Consumer
Support . . . . . . . . . . . . . .Back Cover
Product Registration
. . . . . .61, 62
Warranty for Customers
in Canada . . . . . . . . . . . . . . . . . . . . .62
Warranty for Customers
in the U.S.A. . . . . . . . . . . . . . . . . . . .61
Ranges
183D5580P229
49-85147
09-08 JR
C2S980
Owner’s Manual
& Installation
Instructions
ge.com
Self-Cleaning Dual Fuel Convection
Write the model and serial
numbers here:
Model #
____________________
Serial #______________________
You can find them on a label on the
front of the range behind the lower
oven drawer.
In Canada contact us at:
www.GEAppliances.ca