GE PDW8600NCC Installation Instructions
GE PDW8600NCC - on 24 Inch Full Console Dishwasher Manual
 |
View all GE PDW8600NCC manuals
Add to My Manuals
Save this manual to your list of manuals |
GE PDW8600NCC manual content summary:
- GE PDW8600NCC | Installation Instructions - Page 1
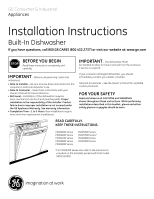
GE Consumer & Industrial Appliances Installation Instructions Junction Box Cover Within this user bag, ELECTRICAL CONNECTION STEPS TO AVOID THE RISK OF FIRE OR ELECTRIC SHOCK. SEE INSTALLATION INSTRUCTIONS. #282 French SPECIFICATIONS SUBJECT TO CHANGE WITHOUT NOTICE © 2006 General Electric - GE PDW8600NCC | Installation Instructions - Page 2
the consumer's and local inspector's use. • Note to Consumer - Keep these instructions with your Owner's Manual for future reference. • Skill Level - Installation of this dishwasher requires basic mechanical, electrical and plumbing skills. Proper installation is the responsibility of the installer - GE PDW8600NCC | Installation Instructions - Page 3
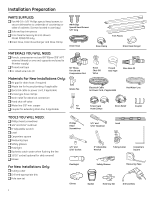
Two #8-18 x 5/8" Phillips special head screws, to secure dishwasher to underside of countertop or sides of cabinets. (Screws ■ Waste tee for house plumbing, if applicable ■ Electrical cable or power cord, if applicable 90 ° Elbow Waste Tee Electrical Cable (or Power Cord, if applicable) Hot Water - GE PDW8600NCC | Installation Instructions - Page 4
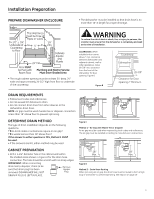
To reduce the risk of electric shock, fire, or injury to persons, the installer must ensure that the dishwasher is completely enclosed at the an�d�ordinances. The air gap must be installed according to manufacturer's instructions. CABINET PREPARATION • Drill a 1-1/2" diameter hole in the cabinet - GE PDW8600NCC | Installation Instructions - Page 5
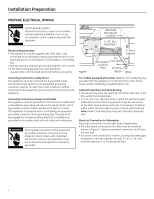
or lead on the appliance. Grounding Instructions-Power Cord Models This appliance must be a risk of electric shock. Check with a qualified electrician or service representative if you separate hole. Electrical Connection to Dishwasher Electrical connection is on the right front of dishwasher. • For - GE PDW8600NCC | Installation Instructions - Page 6
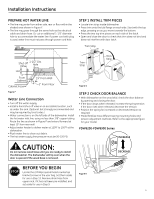
mounting holes and tension adjustment methods. Refer to the appropriate figure for your model. PDW8200-PDW8900 Series CAUTION: Do not remove wood base until you are ready to install the dishwasher. The dishwasher will tip over when the door is opened if the wood base is removed. STOP BEFORE - GE PDW8600NCC | Installation Instructions - Page 7
Instructions GE Appliance Dealer. The power cord and connections must comply with the National Electrical Code, Section 422 and/or local codes and ordinances. • Maximum power cord length is 6'. Approx. 1/8" Figure J • Screw leveling legs back into the dishwasher - GE PDW8600NCC | Installation Instructions - Page 8
Instructions STEP 7 INSTALL 90° ELBOW • Wrap 90° elbow with thread seal tape. • Install a 90° elbow onto the water valve. • Push hose over the drain outlet on the back side of the dishwasher cord is used, guide the end through a separate hole. STEP 10 SLIDE DISHWASHER PARTIALLY INTO CABINET DO - GE PDW8600NCC | Installation Instructions - Page 9
Installation Instructions STEP 11 POSITION DISHWASHER UNDER COUNTERTOP • Push the dishwasher into the cabinet. • Push the bunched-up" or interfere with the springs as you slide it into the cabinet. • Center the dishwasher in the opening. • Front of door panel should be flush with face of cabinet. • - GE PDW8600NCC | Installation Instructions - Page 10
Installation Instructions STEP 12 LEVEL DISHWASHER IMPORTANT - Dishwasher must be level for proper dish rack operation and wash performance. • For PDW9200-PDW9900 Series: Make sure 1/2" minimum gap is maintained (see Figure X). • Place level on door to check that the dishwasher is level side- to- - GE PDW8600NCC | Installation Instructions - Page 11
Installation Instructions STEP 14 CONNECT WATER SUPPLY Connect water supply line to the 90° elbow. check to be sure that drain plug has been removed. DISHWASHER WILL NOT DRAIN IF PLUG IS LEFT IN PLACE. ���� Tip: Avoid unnecessary service call charges. Always be sure disposer drain plug has - GE PDW8600NCC | Installation Instructions - Page 12
installing your dishwasher to avoid charges for a service call that is not covered by your warranty. ■ Check to be sure power is OFF. ■ Open door and remove all foam and paper packaging. ■ Locate the Owner's Manual in the user bag. ■ Read the Owner's Manual for operating instructions. ■ Check door - GE PDW8600NCC | Installation Instructions - Page 13
Installation Instructions STEP 18 DISHWASHER WET TEST ■ Turn on power supply (or plug power cord into outlet, if equipped). ■ Start the unit to check for leaks. PDW8200-PDW8900 Series: - Latch door - Push RINSE ONLY pad - Push START/RESET pad one time PDW9200-PDW9900 Series: - Push RINSE ONLY pad - - GE PDW8600NCC | Installation Instructions - Page 14
- GE PDW8600NCC | Installation Instructions - Page 15
- GE PDW8600NCC | Installation Instructions - Page 16
- GE PDW8600NCC | Installation Instructions - Page 17
SPECIFICATIONS SUBJECT TO CHANGE WITHOUT NOTICE GE Consumer & Industrial General Electric Company Louisville, Kentucky 40225 ge.com © 2005 General Electric Company Pub. No. 31-30588 Dwg. No. 206C1559P127 ND 05A-1183 (2/05)
-
 1
1 -
 2
2 -
 3
3 -
 4
4 -
 5
5 -
 6
6 -
 7
7 -
8
-
9
-
10
-
11
-
12
-
13
-
14
-
15
-
16
-
17
 |
 |
GE Consumer & Industrial
Appliances
Installation
Instructions
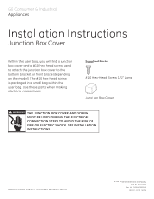
Junction Box Cover
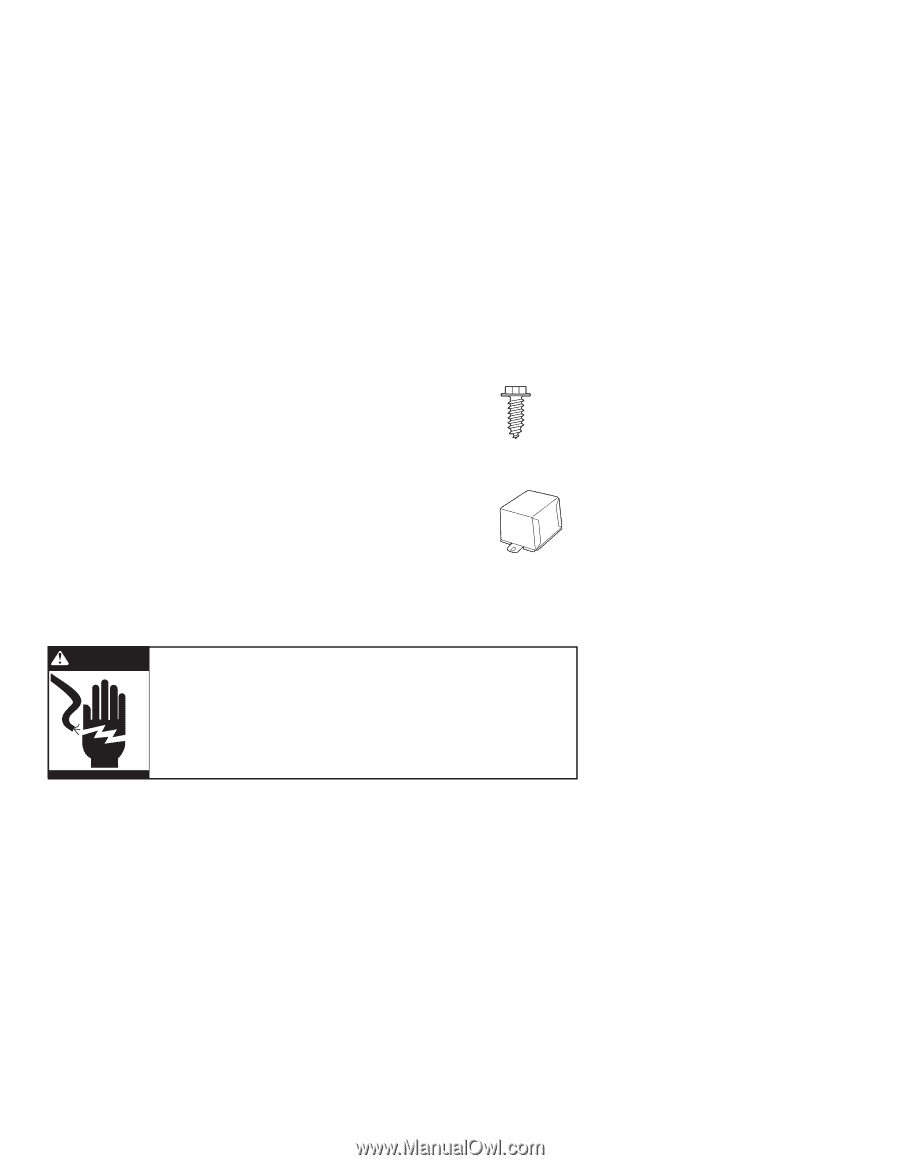
Supplied Parts:
#10
Hex-Head Screw 1/2"
Long
Junction Box Cover
Within this user bag, you will find a junction
box cover and a #10 hex head screw used
to attach the junction box cover to the
bottom bracket or front brace (depending
on the model). The #10 hex-head screw
is packaged in a small bag within the
user bag. Use these parts when making
electrical
connections.
© 2006 General Electric Company
Pub. No.
49-55020
Part No. 165D4700P340
ND
06C-1690 (4/06)
SPECIFICATIONS SUBJECT TO CHANGE WITHOUT NOTICE
THE JUNCTION BOX COVER AND SCREW
MUST BE USED DURING THE ELECTRICAL
CONNECTION STEPS TO AVOID THE RISK OF
FIRE OR ELECTRIC SHOCK. SEE INSTALLATION
INSTRUCTIONS.
WARNING