GE PDW8600NCC Installation Instructions - Page 8
Install Drain Hose, Guide
 |
View all GE PDW8600NCC manuals
Add to My Manuals
Save this manual to your list of manuals |
Page 8 highlights
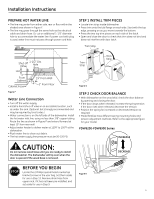
Installation Instructions STEP 7 INSTALL 90° ELBOW • Wrap 90° elbow with thread seal tape. • Install a 90° elbow onto the water valve. • Push hose over the drain outlet on the back side of the dishwasher. See Figure P. Push the hose over the outlet and against the shoulder stop. • Tighten the hose clamp with a 1/4" nut driver. Figure N • Do not over tighten the 90° elbow, water valve bracket could • bend or Position wtha�ete�ern�vda�ol�vfe�thfi�et�tein�lbgo�cwoutoldfabcreeatkh.e rear of the dishwasher. STEP 8 POSITION WATER LINE AND HOUSE WIRING • Position water supply line and house wiring on the floor of the opening to avoid interference with base of dishwasher and components under dishwasher. Figure O �� Figure Q • Position the�d�is�hw��as�h�er�in�front of the opening. Insert drain hose into the cabinet side. If power cord is used, guide the end through a separate hole. STEP 10 SLIDE DISHWASHER PARTIALLY INTO CABINET DO NOT PUSH AGAINST FRONT PANEL WITH KNEES. DAMAGE WILL OCCUR. • Slide dishwasher into the opening a few inches at a time. STEP 9 INSTALL DRAIN HO�S�E�, G��U�I�D�E� THROUGH CABINET • Stand the dishwasher upright. • Get the drain hose set aside earlier and remove hose clamp attached to hose. Be careful not to damage the drain hose. • Slip the hose clamp over the pump end of the hose. Figure R • As you proceed, p�u�ll t�he��d�ra�in�h�ose through the opening under the sink. Stop pushing when the dishwasher is a few inches forward of adjacent cabinets. • Make sure drain hose is not kinked under the dishwasher and there is no interference with the water line and wiring or any other component. Figure P 7
-
 1
1 -
2
-
 3
3 -
 4
4 -
 5
5 -
 6
6 -
 7
7 -
 8
8 -
 9
9 -
 10
10 -
 11
11 -
 12
12 -
 13
13 -
14
-
15
-
16
-
17
 |
 |
