GE PGB900 Owners Manual - Page 8
Using the gas surface burners., Safety Instructions, Installation, Instructions, Troubleshooting Tips
 |
View all GE PGB900 manuals
Add to My Manuals
Save this manual to your list of manuals |
Page 8 highlights
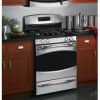
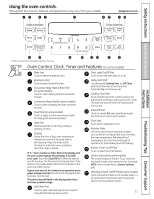
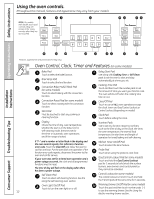
Operating Instructions Safety Instructions Using the gas surface burners. Throughout this manual, features and appearance may vary from your model. Before Lighting a Gas Burner ■ Make sure all burners are in place. ■ Make sure all grates on the range are properly placed before using any burner. ■ If your range has the Gas/Control Lockout feature, make sure it is disabled before attempting to light the surface burners. After Lighting a Gas Burner ■ Do not operate the burner for an extended period of time without cookware on the grate. The finish on the grate may chip without cookware to absorb the heat. ■ Be sure the burners and grates are cool before you place your hand, a pot holder, cleaning cloths or other materials on them. Push the control knob in and turn it to the LITE position. How to Light a Gas Surface Burner Make sure all the surface burners are placed in their respective positions. Push the control knob in and turn it to the LITE position. You will hear a little clicking noise- the sound of the electric spark igniting the burner. Turn the knob to adjust the flame size. If the knob stays at LITE, it will continue to click. When one burner is turned to LITE, all the burners spark. Do not attempt to disassemble or clean around any burner while another burner is on. An electric shock may result, which could cause you to knock over hot cookware. Installation Instructions Consumer Support Troubleshooting Tips Medium Small Large Center (oval) Extra Large (on some models) Sealed Gas Burners Your gas range cooktop has five sealed gas burners. They offer convenience, cleanability and flexibility to be used in a wide range of cooking applications. The smallest burner in the right-rear position is the simmer burner. This burner can be turned down to LO for a very low simmer setting. It provides precise cooking performance for delicate foods such as sauces or foods that require low heat for a long cooking time. The medium (left-rear) and the large (left-front) burners are the primary burners for most cooking. These general-purpose burners can be turned down from HI to LO to suit a wide range of cooking needs. The extra large burner (right-front) is the maximum output burner. Like the other four burners, it can be turned down from HI to LO for a wide range of cooking applications; however, this burner is designed to quickly bring large amounts of liquid to a boil. It has a special POWER BOIL™ setting designed to be used with cookware 12 inches or larger in diameter. Extra-large burner only The center oval burner (on some models) is for large pots/pans or for use with the griddle. How to Select Flame Size For safe handling of cookware, never let the Flames larger than the bottom of the flames extend up the sides of the cookware. cookware will not result in faster heating Watch the flame, not the knob, as you reduce of the cookware and could be hazardous. heat. When fast heating is desired, the flame size on a gas burner should match the 8 cookware you are using.
-
 1
1 -
2
-
 3
3 -
 4
4 -
 5
5 -
 6
6 -
 7
7 -
 8
8 -
 9
9 -
 10
10 -
 11
11 -
 12
12 -
 13
13 -
14
-
15
-
16
-
17
-
18
-
19
-
20
-
21
-
22
-
23
-
24
-
25
-
26
-
27
-
28
-
29
-
30
-
31
-
32
-
33
-
34
-
35
-
36
-
37
-
38
-
39
-
40
-
41
-
42
-
43
-
44
-
45
-
46
-
47
-
48
-
49
-
50
-
51
-
52
-
53
-
54
-
55
-
56
-
57
-
58
-
59
-
60
 |
 |
