Gigabyte GA-H77N-WIFI Manual - Page 71
Installing the WIFI Utilities, 4-7-1 Using the Wi-Fi Share Utility
 |
View all Gigabyte GA-H77N-WIFI manuals
Add to My Manuals
Save this manual to your list of manuals |
Page 71 highlights
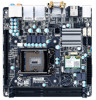
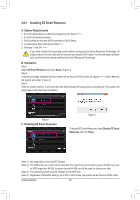
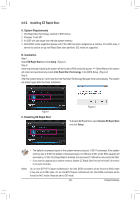
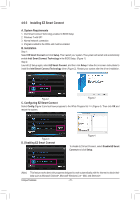
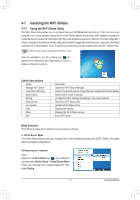
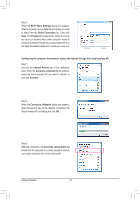
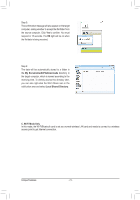
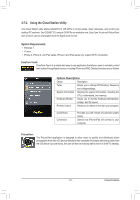
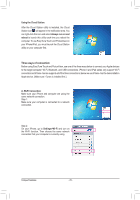
4-7 Installing the WIFI Utilities 4-7-1 Using the Wi-Fi Share Utility The Wi-Fi Share utility allows you to configure how your Wi-Fi/Bluetooth card will act. First it can turn your computer into a virtual wireless access point (Virtual Router Mode), which allows WiFi-capable computers or mobile devices to access the Internet through the virtual wireless access point. Second, it can be configured to let your computer share data to another computer by simply dragging the data from your computer to the target computer (Wi-Fi Share Mode). Third, it surely can be used as a normal wireless LAN card (Wi-Fi Mode Only). The Wi-Fi Share utility is supported in Windows 7 only. After the installation, the Wi-Fi Share icon will appear in the notification area. Right-click this icon to display configuration options. Option Descriptions Option Manage Wi-Fi Share Local Share Directory Mode Choice Setting Reset Router Live Update Help About Exit Description Opens the Wi-Fi Share Manager Goes to the directory where shared files are located (Wi-Fi Share Mode) Selects which mode to operate Configures further settings depending on the mode selected Reset the Wi-Fi Share utility Updates Wi-Fi Share online Displays the help file Displays the Wi-Fi Share version Exits Wi-Fi Share Mode Selection Wi-Fi Share provides three modes for users to select as follows: A. Virtual Router Mode The Virtual Router Mode turns your computer into a virtual wireless access point (WAP). Refer to the steps below for detailed configurations. Configuring your computer: Step 1: Right-click the Wi-Fi Share icon in the notification area and select Mode Choice > Virtual Router Mode to turn your computer into a virtual wireless AP. Then select Setting. - 71 - Unique Features
-
 1
1 -
2
-
3
-
4
-
5
-
6
-
7
-
8
-
9
-
10
-
11
-
12
-
13
-
14
-
15
-
16
-
17
-
18
-
19
-
20
-
21
-
22
-
23
-
24
-
25
-
26
-
27
-
28
-
29
-
30
-
31
-
32
-
33
-
34
-
35
-
36
-
37
-
38
-
39
-
40
-
41
-
42
-
43
-
44
-
45
-
46
-
47
-
48
-
49
-
50
-
51
-
52
-
53
-
54
-
55
-
56
-
57
-
58
-
59
-
60
-
61
-
62
-
63
-
64
-
65
-
 66
66 -
 67
67 -
 68
68 -
 69
69 -
 70
70 -
 71
71 -
 72
72 -
 73
73 -
 74
74 -
 75
75 -
 76
76 -
77
-
78
-
79
-
80
-
81
-
82
-
83
-
84
-
85
-
86
-
87
-
88
-
89
-
90
-
91
-
92
-
93
-
94
-
95
-
96
-
97
-
98
-
99
-
100
-
101
-
102
-
103
-
104
-
105
-
106
-
107
-
108
 |
 |