Gigabyte GA-K8VM800M User Manual - Page 77
Enter BIOS Configuration Utility, Please follow the steps below to construct a complete RAID array - sata driver
 |
View all Gigabyte GA-K8VM800M manuals
Add to My Manuals
Save this manual to your list of manuals |
Page 77 highlights
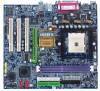
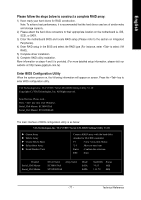
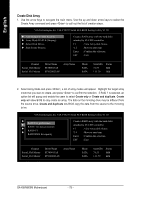
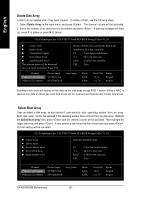
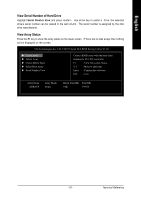
English Please follow the steps below to construct a complete RAID array: 1) Have ready your hard drives for RAID construction. Note: To achieve best performance, it is recommended that the hard drives used are of similar make and storage capacity. 2) Please attach the hard drive connectors to their appropriate location on the motherboard ie. IDE, SCSI, or SATA. 3) Enter the motherboard BIOS and locate RAID setup (Please refer to the section on Integrated Peripherals). 4) Enter RAID setup in the BIOS and select the RAID type (For instance, enter to select VIA RAID). 5) Complete driver installation. 6) Complete RAID utility installation. More information on steps 4 and 5 is provided. (For more detailed setup information, please visit our website at http:\\www.gigabyte.com.tw) Enter BIOS Configuration Utility When the system powers on, the following information will appear on screen. Press the key to enter BIOS configuration utility. VIA Technologies,Inc. VIA VT8237 Serial ATA BIOS Setting Utility V1.20 Copyright (C) VIA Technologies, Inc. All Right reserved. Scan Devices, Please wait... Press key into User Windows Serial_Ch0 Master: ST380013AS Serial_Ch1 Master: ST3120023AS The main interface of BIOS configuration utility is as below: VIA Technologies,Inc. VIA VT8237 Serial ATA BIOS Setting Utility V1.20 X Create Array X Delete Array X Create/Delete Spare X Select Boot Array X Serial Number View Create a RAID array with the hard disks attached to VIA IDE controller F1 : View Array/disk Status K, L : Move to next item Enter : Confirm the selection ESC : Exit Channel Serial_Ch0 Master Serial_Ch1 Master Driver Name ST380013AS ST9120023AS Array Name Mode SATA SATA Size(GB) 74.53 111.79 Status Hdd Hdd - 77 - Technical Reference
-
 1
1 -
2
-
3
-
4
-
5
-
6
-
7
-
8
-
9
-
10
-
11
-
12
-
13
-
14
-
15
-
16
-
17
-
18
-
19
-
20
-
21
-
22
-
23
-
24
-
25
-
26
-
27
-
28
-
29
-
30
-
31
-
32
-
33
-
34
-
35
-
36
-
37
-
38
-
39
-
40
-
41
-
42
-
43
-
44
-
45
-
46
-
47
-
48
-
49
-
50
-
51
-
52
-
53
-
54
-
55
-
56
-
57
-
58
-
59
-
60
-
61
-
62
-
63
-
64
-
65
-
66
-
67
-
68
-
69
-
70
-
71
-
 72
72 -
 73
73 -
 74
74 -
 75
75 -
 76
76 -
 77
77 -
 78
78 -
 79
79 -
 80
80 -
 81
81 -
 82
82 -
83
-
84
-
85
-
86
-
87
-
88
-
89
-
90
-
91
-
92
-
93
-
94
-
95
-
96
 |
 |
