Gigabyte GA-MA69G-S3H Manual - Page 19
Configuring an ATI CrossFire, System
 |
UPC - 818313003416
View all Gigabyte GA-MA69G-S3H manuals
Add to My Manuals
Save this manual to your list of manuals |
Page 19 highlights
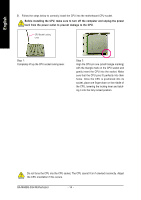
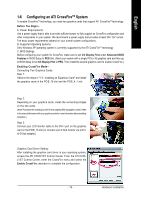
English 1-6 Configuring an ATI CrossFireTM System To enable CrossFireTM technology, you need two graphics cards that support ATI CrossFireTM technology. Before You Begin-A. Power Requirements: Use a power supply that is able to provide sufficient power to fully support an CrossFire configuration and other components in your system. We recommend a power supply that provides at least 20A 12V current. The exact power requirements depend on your overall system configurations. B. Supported Operating Systems: Only Windows XP operating system is currrently supported by the ATI CrossFireTM technology. C. BIOS Settings: Before configuring your system for CrossFire, make sure to set Init Display First under Advanced BIOS Features in BIOS Setup to PEG first. (Start your system with a single PCIe x16 graphics card and then go to BIOS Setup to set Init Display First to PEG. Then install the second graphics card to enable CrossFire.) Enabling CrossFire Mode-Connecting Two Graphics Cards: Step 1: Observe the steps in "1-5 Installing an Expansion Card" and install the graphics cards in the PCIE_16 slot and the PCIE_4_1 slot. Step 2: Depending on your graphics cards, install the connecting bridges on the two cards. (Note: Procedure for enabling CrossFire may slightly differ by graphics cards. Refer to the manual that came with your graphics cards for more information about enabling CrossFire.) Step 3: Connect your LCD monitor cable to the DVI-I port on the graphics card on the PCIE_16 slot (or connect your D-Sub monitor via a DVIto-D-Sub adapter). Graphics Card Driver Setting: After installing the graphics card driver in your operating system, access the ATI CATALYST Control Center. From the ATI CATALYST Control Center, enter the CrossFire menu and select the Enable CrossFire checkbox to complete the configuration. - 19 - Hardware Installation
-
 1
1 -
2
-
3
-
4
-
5
-
6
-
7
-
8
-
9
-
10
-
11
-
12
-
13
-
 14
14 -
 15
15 -
 16
16 -
 17
17 -
 18
18 -
 19
19 -
 20
20 -
 21
21 -
 22
22 -
 23
23 -
 24
24 -
25
-
26
-
27
-
28
-
29
-
30
-
31
-
32
-
33
-
34
-
35
-
36
-
37
-
38
-
39
-
40
-
41
-
42
-
43
-
44
-
45
-
46
-
47
-
48
-
49
-
50
-
51
-
52
-
53
-
54
-
55
-
56
-
57
-
58
-
59
-
60
-
61
-
62
-
63
-
64
-
65
-
66
-
67
-
68
-
69
-
70
-
71
-
72
-
73
-
74
-
75
-
76
-
77
-
78
-
79
-
80
-
81
-
82
-
83
-
84
-
85
-
86
-
87
-
88
-
89
-
90
-
91
-
92
-
93
-
94
-
95
-
96
-
97
-
98
-
99
-
100
-
101
-
102
-
103
-
104
 |
 |