Gigabyte GA-Z77-D3H User Manual - Page 34
BIOS Setup Menus, M.I.T., System, BIOS Features, Peripherals, Power Management, Save & Exit - boot from usb
 |
View all Gigabyte GA-Z77-D3H manuals
Add to My Manuals
Save this manual to your list of manuals |
Page 34 highlights
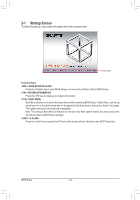
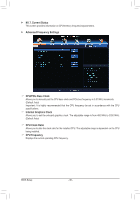
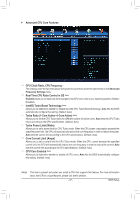
BIOS Setup Program Function Keys Move the selection bar to select a setup menu Move the selection bar to select an configuration item on a menu Execute command or enter a menu / Increase the numeric value or make changes / Decrease the numeric value or make changes Restore the previous BIOS settings for the current submenus Load the Optimized BIOS default settings for the current submenus Access the Q-Flash utility Display system information Save all the changes and exit the BIOS Setup program Capture the current screen as an image and save it to your USB drive Main Menu: Exit the BIOS Setup programSubmenus: Exit current submenu BIOS Setup Menus „ M.I.T. Use this menu to configure the clock, frequency, and voltages of your CPU and memory, etc. Or check the system/CPU temperatures, voltages, and fan speeds. „ System Use this menu to configure the default language used by the BIOS and system time and date. This menu also displays information on the devices connected to the SATA ports. „ BIOS Features Use this menu to configure the device boot order, advanced features available on the CPU, and the primary display adapter. „ Peripherals Use this menu to configure all peripheral devices, such as SATA, USB, integrated audio, and integrated LAN, etc. „ Power Management Use this menu to configure all the power-saving functions. „ Save & Exit Save all the changes made in the BIOS Setup program to the CMOS and exit BIOS Setup. You can save the current BIOS settings to a profile or load optimized defaults for optimal-performance system operations. • If the system is not stable as usual, load optimized defaults to set your system to its defaults. • The BIOS Setup menus described in this chapter are for reference only and may differ by BIOS version. BIOS Setup - 34 -
-
 1
1 -
2
-
3
-
4
-
5
-
6
-
7
-
8
-
9
-
10
-
11
-
12
-
13
-
14
-
15
-
16
-
17
-
18
-
19
-
20
-
21
-
22
-
23
-
24
-
25
-
26
-
27
-
28
-
 29
29 -
 30
30 -
 31
31 -
 32
32 -
 33
33 -
 34
34 -
 35
35 -
 36
36 -
 37
37 -
 38
38 -
 39
39 -
40
-
41
-
42
-
43
-
44
-
45
-
46
-
47
-
48
-
49
-
50
-
51
-
52
-
53
-
54
-
55
-
56
-
57
-
58
-
59
-
60
-
61
-
62
-
63
-
64
-
65
-
66
-
67
-
68
-
69
-
70
-
71
-
72
-
73
-
74
-
75
-
76
-
77
-
78
-
79
-
80
-
81
-
82
-
83
-
84
-
85
-
86
-
87
-
88
-
89
-
90
-
91
-
92
-
93
-
94
-
95
-
96
-
97
-
98
-
99
-
100
-
101
-
102
-
103
-
104
 |
 |