HTC Arrive User Manual - Page 49
Your Facebook Account, Date & Time Settings, Setting Local Date, Time Zone, and Time
 |
View all HTC Arrive manuals
Add to My Manuals
Save this manual to your list of manuals |
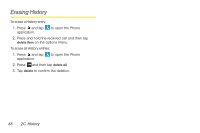
Page 49 highlights
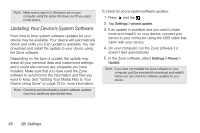
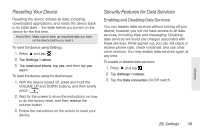
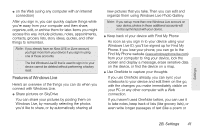
6. Under Contents to sync, choose the items (email, contacts, or calendar) that you want to synchronize or remove from your device. 7. Tap to apply your selected settings. To stop synchronization: ᮣ When the device is synchronizing, press to stop synchronization. Your Facebook Account If you set up a Facebook account when you first turned on your device, you can quickly log in and synchronize information such as status messages and friends lists between your device and your Facebook account on the Web. Note: You need to have an existing Facebook account to access it from your device. Logging in to Your Facebook Account If you previously skipped the sign-in process, follow the steps below to log in to your Facebook account. 1. Press and tap . 2. Tap Settings > email & accounts > add an account > Facebook. 3. Enter the email address and password that you use for signing in to Facebook. 4. Tap sign in. Date & Time Settings Setting Local Date, Time Zone, and Time By default, your device automatically uses the network-provided date, time zone, and time. However, you can set the date, time zone, and time manually if you need to. 1. Press and tap . 2. Tap Settings > date & time. 3. Tap the Set automatically On/Off switch to turn off automatic date and time setting. 4. Select values for Time zone, Time, and Date. Note: You can also choose to display the time in a 24-hour format by tapping the 24-hour clock On/Off switch. Settings 2B. Settings 43
-
 1
1 -
2
-
3
-
4
-
5
-
6
-
7
-
8
-
9
-
10
-
11
-
12
-
13
-
14
-
15
-
16
-
17
-
18
-
19
-
20
-
21
-
22
-
23
-
24
-
25
-
26
-
27
-
28
-
29
-
30
-
31
-
32
-
33
-
34
-
35
-
36
-
37
-
38
-
39
-
40
-
41
-
42
-
43
-
 44
44 -
 45
45 -
 46
46 -
 47
47 -
 48
48 -
 49
49 -
 50
50 -
 51
51 -
 52
52 -
 53
53 -
 54
54 -
55
-
56
-
57
-
58
-
59
-
60
-
61
-
62
-
63
-
64
-
65
-
66
-
67
-
68
-
69
-
70
-
71
-
72
-
73
-
74
-
75
-
76
-
77
-
78
-
79
-
80
-
81
-
82
-
83
-
84
-
85
-
86
-
87
-
88
-
89
-
90
-
91
-
92
-
93
-
94
-
95
-
96
-
97
-
98
-
99
-
100
-
101
-
102
-
103
-
104
-
105
-
106
-
107
-
108
-
109
-
110
-
111
-
112
-
113
-
114
-
115
-
116
-
117
-
118
-
119
-
120
-
121
-
122
-
123
-
124
-
125
-
126
-
127
-
128
-
129
-
130
-
131
-
132
-
133
-
134
-
135
-
136
-
137
-
138
-
139
-
140
-
141
-
142
-
143
-
144
-
145
-
146
-
147
-
148
-
149
-
150
-
151
-
152
-
153
-
154
-
155
-
156
-
157
-
158
-
159
-
160
 |
 |