Haier HWM5TL User Manual - Page 4
Table, Contents
 |
View all Haier HWM5TL manuals
Add to My Manuals
Save this manual to your list of manuals |
Page 4 highlights
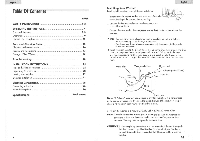
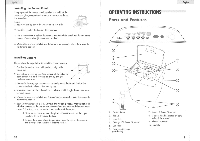
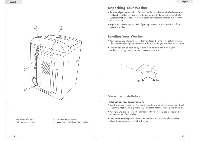
English Table Of Contents SAFETY INSTRUCTIONS OPERATING INSTRUCTIONS Parts and Features Operations Normal Operating Sounds Care and Cleaning Guide Cleaning and Maintenance Moving and Vacationing Storage of Your Washer Troubleshooting INSTALLATION INSTRUCTIONS Tools and Materials Required Unpacking Your Washer Leveling Your Washer Steps for Installation Electrical Connections Grounding Instructions Power Interruptions Specifications 3 PAGE 1-2 4 4-5 6 15 16 16 17 17 18 21 21 22 22 22 26 26 26 Back cover Installing Your Washer: Read install instructions carefully before installation. 1. Insert a new flat rubber washer into each end of the inlet hoses. Firmly put the washers in the coupling. 2. Conned the hot and cold water inlet hoses to the hot and cold water faucet. 3. Conned the other end to their respective washer inlet located at the back of the machine. Note: • You may have to use pliers to tighten the coupling. Do not over tighten because you may cause damage to the valve. • You should use the new hose-sets supplied with the washer. Old hose-sets should not be reused. 4. Install the drain hose to the side of the washer using the drain hose clamp. The drain hose must be placed into a drainpipe or sink al least 1 1/2 inches in diameter. Use the gooseneck to hold hose in place. To avoid passible water back up, the drain hose must reach height of at least 35 inches minimum and 47 inches maximum. Water Inlet Water Supply Hose Goose Neck "Y" Adapter (not inlcluded) Hose Bend Drain Hose Note: "Y Adapter" shown in above figure is only for illustration. It is not provided in the box as an accessory. If you need to utilize this type of hookup, you can purchase a "Y Adapter" from your nearest hardware store. 5. Plug in the Washer to a regular 230-240 Volt / 50 Hz, 10 Amps outlet. Note: Carefully inspect the around of the machine and back of the machine for any leaks. If there is a leak then double check to see if any connections are loose. You may need to tighten loose connections. CAUTION: If after completing these steps, you are unsure that the unit is properly installed, contact a qualified installer. To ensure that your Washer is properly installed it is recommended that it be installed by a certified installer. 24
-
 1
1 -
 2
2 -
 3
3 -
 4
4 -
 5
5 -
 6
6 -
 7
7 -
 8
8 -
 9
9 -
 10
10 -
11
-
12
-
13
-
14
-
15
 |
 |
