Haier HWM5TL User Manual - Page 5
Operating, Instructions
 |
View all Haier HWM5TL manuals
Add to My Manuals
Save this manual to your list of manuals |
Page 5 highlights
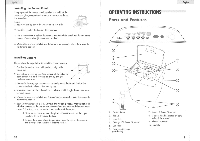
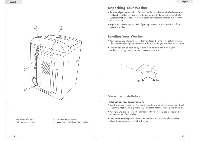
English Installing the Bottom Panel: The purpose of the bottom panel installation is to block the noise and give you quiet performance of the washer during the operation. Steps: 1. You must first lay down the washer on its rear side. 2. Insert the panel to the bottom of the machine. 3. Get a screwdriver to tighten the screw in the hole of the panel and the unit ot the bottom of the washer. (8 screws are supplied) 4. Once all screws are installed and the panel is set properly, return the washer to its standing position. Installing Castors Please follow the steps below to install the castors properly: 1. First lay the washer down with the left or right side facing up. sr 2. You will see 4 leveling legs. One located at the bottom of each corner. Turn each leveling leg one by one anti. clockwise to remove. 3. Once all 4 leveling legs are removed properly, match the thread shaft of the castor to the bottom hole of the leveling leg. 4. Insert the castor into the hole and turn clockwise until it is tight. Repeat the same for each castor. 5. Once all wheels are installed and "castors" are set properly, return the washer to its standing position. 6. Each Castor comes with a lock. During the wash process you must lock all the castors so the washer can stay stable at one place and does not move away. Follow the procedure below to lock and unlock the castors. A. To move your washer, keep the plastic clip on the costar at the upper position. This will release the lock. B. To keep the washer stable in one place, keep the clip on the castor at the lower position in order to lock the washer. 23 English OPERATING INSTRUCTIONS Parts and Features Hater 0. 0 0 ir•? OP • 00•141111•61(. 0 0 10 3 4 9 8 7 5 1. Control Panel 2. Top Lid 3. Inner Tub 4. Detergent/Softener Dispenser 5. Lint Filter 6. Front Leveling Legs (not shown) 6 7. Fabric Softener Dispenser 8. Cabinet Handle (located on both sides of the washer) 9. Bleach Dispenser 10. Agitator 4
-
 1
1 -
 2
2 -
 3
3 -
 4
4 -
 5
5 -
 6
6 -
 7
7 -
 8
8 -
 9
9 -
 10
10 -
 11
11 -
12
-
13
-
14
-
15
 |
 |
