Hannspree SN10E2 8 User Manual - Page 21
to delete the partition, then you can press
 |
View all Hannspree SN10E2 8 manuals
Add to My Manuals
Save this manual to your list of manuals |
Page 21 highlights
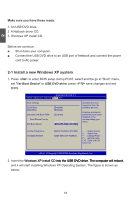
Windows XP Professional Setup Welcome to Setup. This portion of the Setup program prepares Microsoft(R) Windows(R) XP to run on your computer. ● To set up Windows XP now, press ENTER. ● To repair a Windows XP installation using Recovery Console, press R. ● To quit Setup without installing Windows XP, press F3. 2 ENTER=Continue R=Repair F3=Quit 3. Press to continue the installation and p�re�s��s� to agree the Licensing Agreement. Windows will display the partition of your system. First of all, you had better press [D] to delete the partition, then you can press [C] to create partitions as many as you can, assign them C:, D: or E: logical drive name. �In��t�h�i�s�e��x�a�m��p�l�e�,��w�e� will create a 50GB partition C: and leave the remaining space as a partition D:. The figure is shown as below: Windows XP Professional Setup The following list shows the existing partitions and unpartitioned space on this computer. Use the UP ad DOWN ARROW keys to select an item in the list. ● To set up Windows XP on the selected item, press ENTER. ● To create a partition in the unpartitioned space, press C. ● To delete the selected partitions, press D. 114471 MB Disk 0 at id 0 on bus 0 on atapi [MBR] C:Partition1 [NTFS] D: Partition2 [Unknown] Unpartitioned space Unknown Disk Unknown Disk 49999 MB < 48568 MB free> 64464 MB < 64463 MB free> 8 MB ENTER=Install D=Delete Partition F3=Quit 4. Press to install Windows XP. The process will ask you to format hard disk, copy files...etc, follow the installation steps until the system is installed completely. 17
-
 1
1 -
2
-
3
-
4
-
5
-
6
-
7
-
8
-
9
-
10
-
11
-
12
-
13
-
14
-
15
-
 16
16 -
 17
17 -
 18
18 -
 19
19 -
 20
20 -
 21
21 -
 22
22 -
 23
23 -
 24
24 -
 25
25 -
 26
26 -
27
-
28
-
29
-
30
-
31
-
32
-
33
-
34
-
35
-
36
-
37
-
38
-
39
-
40
-
41
-
42
-
43
-
44
 |
 |
