Harman Kardon AVR20 Owners Manual - Page 5
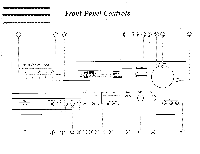
Front, Panel, Controls
 |
View all Harman Kardon AVR20 manuals
Add to My Manuals
Save this manual to your list of manuals |
Page 5 highlights
Front Panel Controls 1 POWER BUTTON Press this button to turn the power on. Press again to turn the power off. It can also be used as a system power button, if you connect the other components to the switched outlets. NOTE: In POWER OFF state, the STAND BY indicator will light up and power is partially supplied to the infrared remote control receiver and the memory circuitry. 2 SPEAKER SWITCHES These switches allow you to select various combinations of speakers as follows; ■ To drive 1 pair of speakers, push only the speaker 1 switch in. II To drive a second pair of speakers, push only the speaker 2 switch in. ■ To drive both pairs of speakers, push both 1 and 2 switches in. ■ To use headphones for private listening or monitoring, leave both 1 and 2 switches pushed out. NOTE: If both speaker switches are pushed in and only one set of speakers is connected to the receiver, no sound will be heard. 3 HEADPHONE JACK Stereo headphones can be plugged into this jack for private listening. Headphone impedance should be between 8 and 2K ohms. Best results between 200 and 400 ohms. 4 BASS CONTROL Modifies the low-frequency sound of the left and right channels as much as +/- 10dB. Set this control at a suitable position for your taste and room acoustics. 5 TREBLE CONTROL Modifies the high-frequency sound of the left and right channels as much as +/- 10dB. Set this control at a suitable position for your taste and room acoustics. 6 BALANCE CONTROL This control is used for balancing the relative sound volume of the left and right channel speakers. Clockwise rotation reduces the volume from the left speaker, counterclockwise rotation reduces the volume from the right speaker. 7 SURROUND MODE SELECTOR Press this switch to select the desired surround mode. The mode is changed as below, when it is pressed in succession. r DOLBY PRO LOGIC .4 DOLBY 3 STEREO -4 HALL- OFF The mode indicator, ► on the display window indicates the selected mode. In the OFF mode, the indicator disappears. -DELAY TIME (see page 16) 8 CENTER MODE SELECTOR This button operates only in Dolby Pro Logic and Dolby 3 Stereo mode. The mode changes as below, when the button is pressed in succession. DOLBY PRO LOGIC MODE r NORM -' WIDE --> PHANTOM DOLBY 3 STEREO MODE > NORM --> WIDE The display window shows each mode. NORM: Select this mode if you use a small center speaker., The bass sound of the center channel is reproduced from the front speakers, because the small speaker cannot produce enough bass. WIDE: Select this mode if you use a medium-to-large center speaker. The bass sound is reproduced from the center speaker. PHANTOM: Select this mode if you don't use a center speaker. The center speaker's sound is reproduced from the front speakers. 9 TEST TONE BUTTON This button operates only in Dolby Pro Logic and Dolby 3 Stereo mode. When the button is pressed, 2 seconds of test tone is generated in all channels (Left, Center, Right, and Surround) in succession. The display window shows TEST L, C, R and S in succession. The letter L, C, R or S (in Dolby Pro Logic mode) or L, C or R (in Dolby 3 Stereo mode) blinks 2 times in succession. Use this button to test speaker connections. 4
-
 1
1 -
 2
2 -
 3
3 -
 4
4 -
 5
5 -
 6
6 -
 7
7 -
 8
8 -
 9
9 -
 10
10 -
 11
11 -
12
-
13
-
14
-
15
-
16
-
17
-
18
-
19
-
20
 |
 |
