Harman Kardon AVR20 Owners Manual - Page 9
Rear., Panel, Connections
 |
View all Harman Kardon AVR20 manuals
Add to My Manuals
Save this manual to your list of manuals |
Page 9 highlights
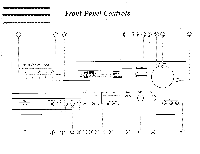
Rear. Panel Connections 1 FM INDOOR ANTENNA Connect the supplied antenna (the wire lead) to a 300Q/75Q adapter and connect the adapter to the 75Q T-shaped FM antenna terminal, as shown in the Rear Panel Connection Diagram. Change the position of the antenna until you get the best reception of your favorite stations. 2 FM OUTDOOR ANTENNA An outdoor FM antenna may be used to further improve the quality of reception. Disconnect the indoor antenna before replacing it with the outdoor one. A 755/30052 adaptor must be used. 3 AM LOOP ANTENNA Tune in your favorite AM station and position the loop antenna for best reception. Try other stations and find the position that gives the best overall reception. When this unit is mounted in a rack or placed on a shelf with insufficient space behind, hang the antenna on a wall in the direction which gives the best reception. NOTE: If noise is heard during AM reception, move the antenna for better reception. To prevent undesired noise, the AM LOOP ANTENNA should be located away from the remote control cord over 12 inches (30cm). 4 SYSTEM GROUND TERMINAL To reduce hum to a minimum, connect the ground lead from your turntable to this terminal. AM LOOP ANTENNA SETTING LEG Stand and place it on a shelf or hang it on a wall. 5 PHONO INPUT JACKS Input for TURNTABLE with an MM cartridge having 47K ohms of load impedance. Connect shielded cables from your phono to the LEFT and RIGHT input jacks. NOTE: Do not place your TURNTABLE on a speaker enclosure. This will avoid howling caused by transmission of the speaker vibration to the TURNTABLE. 6 TV/AUX INPUT JACKS This extra stereo input is provided for any source you want to hear. An additional compact disc player, a tape recorder, a video cassette recorder (VCR) etc. can be plugged into these jacks. 7 CD INPUT JACKS Connect the output cables of a compact disc player to these jacks. 8 TAPE 1 PLAY JACKS Connect the line output of your CASSETTE DECK to these jacks. 9 TAPE 1 REC JACKS Connect the line input of your CASSETTE DECK to these jacks. 10 TAPE 2 MONITOR PLAY JACKS Connect the line output of your cassette deck to these jacks. This input may be connected to the line output of the audio processor like an optional graphic equalizer or a Digital Signal Processor. 11 TAPE 2 MONITOR REC JACKS Connect the line input of your cassette deck to these jacks. EQ controls, loudness and volume settings have no effect on the signal from this output for recording. To monitor this input source while recording, press the TAPE 2 MONITOR button (MONITOR ON position). These REC jacks may be used for the line input of the audio processor like an optional graphic equalizer or a Digital Signal Processor. 12 VIDEO/AUDIO INPUT (PLAY) JACKS OF VCR 1 Connect these jacks to the corresponding OUTPUT jacks of your TV (if available) or VCR. 8
-
 1
1 -
2
-
3
-
 4
4 -
 5
5 -
 6
6 -
 7
7 -
 8
8 -
 9
9 -
 10
10 -
 11
11 -
 12
12 -
 13
13 -
 14
14 -
15
-
16
-
17
-
18
-
19
-
20
 |
 |
