HP 4020 HP Designjet 4020 and 4520 Printer Series - User's Guide: English - Page 47
The normal procedure (roll attached to spindle), Roll detached from spindle, Paper unload
 |
UPC - 884420909606
View all HP 4020 manuals
Add to My Manuals
Save this manual to your list of manuals |
Page 47 highlights
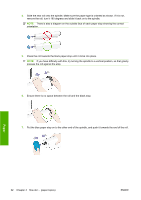
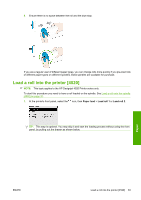
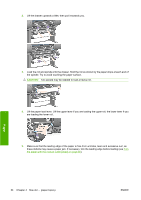
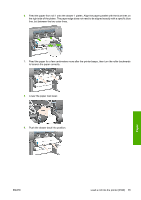
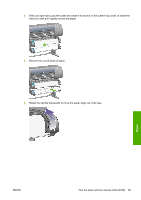
Before unloading a roll, check whether the end of the roll is still attached to the spindle, and follow the appropriate procedure as described below. The normal procedure (roll attached to spindle) If the end of the roll is still attached to the spindle, use the following procedure. 1. At the printer's front panel, select the icon, then Paper unload > Unload roll 1 or Unload roll 2. TIP: Alternatively, you may start the unloading process without using the front panel, by lifting and then lowering the paper load lever. 2. The paper will normally be removed from the printer. If the paper is not automatically removed from the printer, the front panel will prompt you to lift the paper load lever and turn the paper stop by hand until the paper is removed from the printer. When you have finished, lower the paper load lever. 3. Turn the paper stop by hand, until the paper is fully wound onto the roll. 4. Press the Select key. 5. Lift the drawer upwards a little, then pull it towards you. 6. Remove the roll from the printer, pulling out the right-hand end first. Do not insert your fingers into the spindle supports during the removal process. Roll detached from spindle If the end of the roll is visible but no longer attached to the spindle: 1. If you have already selected Paper unload at the front panel, press the Cancel key to cancel that procedure. 2. Lift the paper load lever. 3. Lift the drive pinch lever. Paper If the front panel displays a warning about the levers, ignore it. 4. Pull out the paper from the front of the printer. ENWW Unload a roll from the printer [4520] 37
-
 1
1 -
2
-
3
-
4
-
5
-
6
-
7
-
8
-
9
-
10
-
11
-
12
-
13
-
14
-
15
-
16
-
17
-
18
-
19
-
20
-
21
-
22
-
23
-
24
-
25
-
26
-
27
-
28
-
29
-
30
-
31
-
32
-
33
-
34
-
35
-
36
-
37
-
38
-
39
-
40
-
41
-
 42
42 -
 43
43 -
 44
44 -
 45
45 -
 46
46 -
 47
47 -
 48
48 -
 49
49 -
 50
50 -
 51
51 -
 52
52 -
53
-
54
-
55
-
56
-
57
-
58
-
59
-
60
-
61
-
62
-
63
-
64
-
65
-
66
-
67
-
68
-
69
-
70
-
71
-
72
-
73
-
74
-
75
-
76
-
77
-
78
-
79
-
80
-
81
-
82
-
83
-
84
-
85
-
86
-
87
-
88
-
89
-
90
-
91
-
92
-
93
-
94
-
95
-
96
-
97
-
98
-
99
-
100
-
101
-
102
-
103
-
104
-
105
-
106
-
107
-
108
-
109
-
110
-
111
-
112
-
113
-
114
-
115
-
116
-
117
-
118
-
119
-
120
-
121
-
122
-
123
-
124
-
125
-
126
-
127
-
128
-
129
-
130
-
131
-
132
-
133
-
134
-
135
-
136
-
137
-
138
-
139
-
140
-
141
-
142
-
143
-
144
-
145
-
146
-
147
-
148
-
149
-
150
-
151
-
152
-
153
-
154
-
155
-
156
-
157
-
158
-
159
-
160
-
161
-
162
-
163
-
164
-
165
-
166
-
167
-
168
-
169
-
170
-
171
-
172
-
173
-
174
-
175
-
176
-
177
-
178
-
179
-
180
-
181
-
182
-
183
-
184
-
185
-
186
-
187
-
188
-
189
-
190
-
191
-
192
-
193
-
194
-
195
-
196
-
197
-
198
-
199
-
200
-
201
-
202
-
203
-
204
-
205
-
206
-
207
-
208
-
209
-
210
-
211
-
212
-
213
-
214
-
215
-
216
-
217
-
218
-
219
-
220
-
221
-
222
-
223
-
224
-
225
-
226
-
227
-
228
-
229
-
230
-
231
-
232
-
233
-
234
-
235
 |
 |
