HP 410 HP Digital Copier printer 410 - (English) Reference Guide - Page 5
get started, front-panel features
 |
UPC - 844844844303
View all HP 410 manuals
Add to My Manuals
Save this manual to your list of manuals |
Page 5 highlights
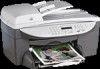
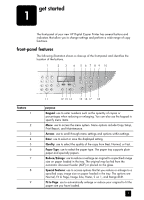
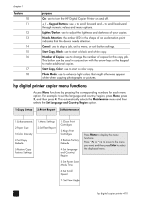
get started 1 The front-panel of your new HP Digital Copier Printer has several buttons and indicators that allow you to change settings and perform a wide range of copy functions. front-panel features The following illustration shows a close-up of the front-panel and identifies the location of the buttons. 1 2 3 4 5 6 7 8 9 10 feature 1 2 3 4 5 6 7 8 9 11 12 13 14 15 16 17 18 purpose Keypad: use to enter numbers such as the quantity of copies or percentages when reducing or enlarging. You can also use the keypad to specify menu items. Menu: use to access the menu system. Menu options include Copy Setup, Print Report, and Maintenance. Arrows: use to scroll through menu settings and options within settings. Enter: use to select or save the displayed setting. Quality: use to select the quality of the copy from Best, Normal, or Fast. Paper Type: use to select the paper type. The paper tray supports plain paper and specialty papers. Reduce/Enlarge: use to reduce or enlarge an original to a specified image size on paper loaded in the tray. The original may be fed from the automatic document feeder (ADF) or placed on the glass. Special Features: use to access options that let you reduce or enlarge to a specified copy image size on paper loaded in the tray. The options are Normal, Fit to Page, Image Size, Poster, 2 on 1, and MarginShift. Fit to Page: use to automatically enlarge or reduce your original to fit the paper size you have loaded. 1
-
 1
1 -
 2
2 -
 3
3 -
 4
4 -
 5
5 -
 6
6 -
 7
7 -
 8
8 -
 9
9 -
 10
10 -
 11
11 -
12
-
13
-
14
-
15
-
16
-
17
-
18
-
19
-
20
-
21
-
22
-
23
-
24
-
25
-
26
-
27
-
28
-
29
-
30
-
31
-
32
-
33
-
34
-
35
-
36
-
37
-
38
-
39
-
40
-
41
-
42
-
43
-
44
-
45
-
46
-
47
-
48
-
49
-
50
-
51
-
52
-
53
-
54
-
55
-
56
-
57
-
58
-
59
-
60
-
61
-
62
-
63
-
64
 |
 |
