HP 7310 Users Guide - Page 181
then press until the center of the face plate snaps into place.
 |
View all HP 7310 manuals
Add to My Manuals
Save this manual to your list of manuals |
Page 181 highlights
Chapter 16 Figure 8 1 Notch 2 Plastic catch 2 Line up the right edge of the face plate with the right side of the HP all-in-one, and then press the right side of the face plate until it snaps securely into place, as shown in Figure 9. Figure 9 3 Place your hands towards the center of the face plate, as shown in Figure 10, then press until the center of the face plate snaps into place. You should hear clicks when the left side snaps into place and when the right side snaps into place. 178 HP Officejet 7300/7400 series all-in-one Troubleshooting information
-
 1
1 -
2
-
3
-
4
-
5
-
6
-
7
-
8
-
9
-
10
-
11
-
12
-
13
-
14
-
15
-
16
-
17
-
18
-
19
-
20
-
21
-
22
-
23
-
24
-
25
-
26
-
27
-
28
-
29
-
30
-
31
-
32
-
33
-
34
-
35
-
36
-
37
-
38
-
39
-
40
-
41
-
42
-
43
-
44
-
45
-
46
-
47
-
48
-
49
-
50
-
51
-
52
-
53
-
54
-
55
-
56
-
57
-
58
-
59
-
60
-
61
-
62
-
63
-
64
-
65
-
66
-
67
-
68
-
69
-
70
-
71
-
72
-
73
-
74
-
75
-
76
-
77
-
78
-
79
-
80
-
81
-
82
-
83
-
84
-
85
-
86
-
87
-
88
-
89
-
90
-
91
-
92
-
93
-
94
-
95
-
96
-
97
-
98
-
99
-
100
-
101
-
102
-
103
-
104
-
105
-
106
-
107
-
108
-
109
-
110
-
111
-
112
-
113
-
114
-
115
-
116
-
117
-
118
-
119
-
120
-
121
-
122
-
123
-
124
-
125
-
126
-
127
-
128
-
129
-
130
-
131
-
132
-
133
-
134
-
135
-
136
-
137
-
138
-
139
-
140
-
141
-
142
-
143
-
144
-
145
-
146
-
147
-
148
-
149
-
150
-
151
-
152
-
153
-
154
-
155
-
156
-
157
-
158
-
159
-
160
-
161
-
162
-
163
-
164
-
165
-
166
-
167
-
168
-
169
-
170
-
171
-
172
-
173
-
174
-
175
-
 176
176 -
 177
177 -
 178
178 -
 179
179 -
 180
180 -
 181
181 -
 182
182 -
 183
183 -
 184
184 -
 185
185 -
 186
186 -
187
-
188
-
189
-
190
-
191
-
192
-
193
-
194
-
195
-
196
-
197
-
198
-
199
-
200
-
201
-
202
-
203
-
204
-
205
-
206
-
207
-
208
-
209
-
210
-
211
-
212
-
213
-
214
-
215
-
216
-
217
-
218
-
219
-
220
-
221
-
222
-
223
 |
 |

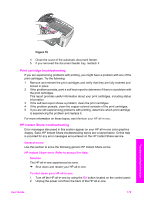
Figure 8
1
Notch
2
Plastic catch
2
Line up the right edge of the face plate with the right side of the HP all-in-one,
and then press the right side of the face plate until it snaps securely into place,
as shown in Figure 9.
Figure 9
3
Place your hands towards the center of the face plate, as shown in Figure 10,
then press until the center of the face plate snaps into place.
You should hear clicks when the left side snaps into place and when the right
side snaps into place.
Chapter 16
178
HP Officejet 7300/7400 series all-in-one
Troubleshooting information