HP 7310 Users Guide - Page 59
Select an input tray for copying, Change default copy settings, Upper Tray, Rear Tray, Select Function
 |
View all HP 7310 manuals
Add to My Manuals
Save this manual to your list of manuals |
Page 59 highlights
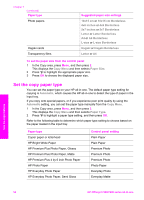
Chapter 7 Select an input tray for copying If you have one of the supported paper tray accessories installed, you can specify which input tray to use for making copies: ● You can load all types of supported paper types and sizes, such as photo paper or transparencies, in the main paper tray (Upper Tray). ● You can load up to 250 sheets of plain white full-size paper in the optional 250 Sheet Plain Paper Tray (Lower Tray). ● You can load small paper such as photo paper or Hagaki cards in the optional HP Auto Two-sided Print Accessory with Small Paper Tray (Rear Tray). For example, if you copy a lot of photos, you might load the main paper tray with photo paper and load the optional lower tray with letter or A4 paper. You could also load the optional rear tray with 10 by 15 cm (4 by 6 inch) photo paper and the main input tray with full-size paper. Using the optional input trays saves time because you don't have to remove and reload paper each time you make copies on different sizes and types of paper. Note For information on loading paper in an accessory, read and follow the instructions that came with the accessory. To select an input tray from the control panel 1 Load paper in the input tray from which you want to make copies. 2 Press Tray Select and then press 1. This displays the Select Function menu and then selects Copy. 3 Press to select the input tray, and then press OK. This chooses the input tray and then displays the Copy Menu. 4 Make any needed changes to the settings in the Copy Menu. 5 Press Start Copy Black or Start Copy Color. Change default copy settings When you change copy settings from the control panel, the settings apply only to the current copy job. To apply copy settings to all future copy jobs, you can save the settings as defaults. When you change copy settings from the control panel or the HP Director, the settings apply only to the current copy job. To apply copy settings to all future copy jobs, you can save the settings as defaults. 1 Make any needed changes to the settings in the Copy Menu. 2 From the Copy Menu, press to highlight Set New Defaults. 3 Press OK to select Set New Defaults from the Copy Menu. 4 Press OK to accept the settings as the new default settings. The settings you specify here are only saved on the HP all-in-one itself. They do not adjust the settings in the software. You can save your most frequently used settings by using the HP Image Zone software that came with your HP all-in-one. For more information, see the onscreen HP Image Zone Help. Use the copy features 56 HP Officejet 7300/7400 series all-in-one
-
 1
1 -
2
-
3
-
4
-
5
-
6
-
7
-
8
-
9
-
10
-
11
-
12
-
13
-
14
-
15
-
16
-
17
-
18
-
19
-
20
-
21
-
22
-
23
-
24
-
25
-
26
-
27
-
28
-
29
-
30
-
31
-
32
-
33
-
34
-
35
-
36
-
37
-
38
-
39
-
40
-
41
-
42
-
43
-
44
-
45
-
46
-
47
-
48
-
49
-
50
-
51
-
52
-
53
-
 54
54 -
 55
55 -
 56
56 -
 57
57 -
 58
58 -
 59
59 -
 60
60 -
 61
61 -
 62
62 -
 63
63 -
 64
64 -
65
-
66
-
67
-
68
-
69
-
70
-
71
-
72
-
73
-
74
-
75
-
76
-
77
-
78
-
79
-
80
-
81
-
82
-
83
-
84
-
85
-
86
-
87
-
88
-
89
-
90
-
91
-
92
-
93
-
94
-
95
-
96
-
97
-
98
-
99
-
100
-
101
-
102
-
103
-
104
-
105
-
106
-
107
-
108
-
109
-
110
-
111
-
112
-
113
-
114
-
115
-
116
-
117
-
118
-
119
-
120
-
121
-
122
-
123
-
124
-
125
-
126
-
127
-
128
-
129
-
130
-
131
-
132
-
133
-
134
-
135
-
136
-
137
-
138
-
139
-
140
-
141
-
142
-
143
-
144
-
145
-
146
-
147
-
148
-
149
-
150
-
151
-
152
-
153
-
154
-
155
-
156
-
157
-
158
-
159
-
160
-
161
-
162
-
163
-
164
-
165
-
166
-
167
-
168
-
169
-
170
-
171
-
172
-
173
-
174
-
175
-
176
-
177
-
178
-
179
-
180
-
181
-
182
-
183
-
184
-
185
-
186
-
187
-
188
-
189
-
190
-
191
-
192
-
193
-
194
-
195
-
196
-
197
-
198
-
199
-
200
-
201
-
202
-
203
-
204
-
205
-
206
-
207
-
208
-
209
-
210
-
211
-
212
-
213
-
214
-
215
-
216
-
217
-
218
-
219
-
220
-
221
-
222
-
223
 |
 |
