HP 8/20q HP StorageWorks 8/20q Fibre Channel Switch installation and reference - Page 39
Adding a switch to an existing fabric
 |
View all HP 8/20q manuals
Add to My Manuals
Save this manual to your list of manuals |
Page 39 highlights
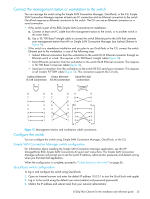
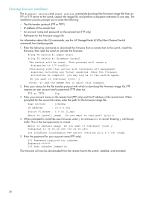
Custom firmware installation A custom firmware installation downloads the firmware image file from an FTP or TFTP server to the switch, unpacks the image file, and resets the switch in separate steps. This allows you to choose the type of switch reset and whether the activation will be disruptive (reset switch command) or nondisruptive (hotreset command). The following example illustrates a custom firmware installation with a nondisruptive activation. 1. Download the firmware image file from the server to the switch. • If your server has an FTP server, you can enter the image fetch command: 8/20q FC Switch (admin) #> image fetch account_name ip_address filename • If your server has a TFTP server, you can enter the image tftp command to download the firmware image file. 8/20q FC Switch (admin) #> image tftp ip_address filename • If your server has neither an FTP nor a TFTP server, open an FTP session and enter FTP commands: >ftp ip_address or switchname user:images password: images ftp>bin ftp>put filename ftp>quit 2. Display the list of firmware image files on the switch to confirm that the file was loaded. 8/20q FC Switch (admin) $>image list 3. Unpack the firmware image file to install the new firmware in flash memory. 8/20q FC Switch (admin) $>image unpack filename 4. Wait for the unpack to complete. image unpack command result: Passed 5. A message will prompt you to reset the switch to activate the firmware. Use the hotreset command to attempt a non-disruptive activation. 8/20q FC Switch (admin) $>hotreset Adding a switch to an existing fabric If there are no special conditions to be configured for the new switch, plug in the switch. The switch becomes functional with the default fabric configuration. The default fabric configuration settings are as follows: • Fabric zoning is sent to the switch from the fabric. • All ports will be GL_Ports. • The default IP address 10.0.0.1 is assigned to the switch without a gateway or boot protocol configured: Reverse Address Resolution Protocol (RARP) Bootstrap Protocol (BOOTP), and Dynamic Host Configuration Protocol (DHCP). If you are adding a switch to a fabric and do not want to accept the default fabric configuration: 1. If the switch is not new from the factory, reset the switch to the factory configuration before adding the switch to the fabric. 2. If you want to manage the switch through the Ethernet port, you must first configure the IP address. 3. Plug in the inter-switch links (ISL), but do not connect the devices. 4. Configure the port types for the new switch. The ports can be G_Port, GL_Port, F_Port, FL_Port, or Donor. 5. Connect the devices to the switch. 6. Make any necessary zoning changes. 8/20q Fibre Channel Switch installation and reference guide 39
-
 1
1 -
2
-
3
-
4
-
5
-
6
-
7
-
8
-
9
-
10
-
11
-
12
-
13
-
14
-
15
-
16
-
17
-
18
-
19
-
20
-
21
-
22
-
23
-
24
-
25
-
26
-
27
-
28
-
29
-
30
-
31
-
32
-
33
-
 34
34 -
 35
35 -
 36
36 -
 37
37 -
 38
38 -
 39
39 -
 40
40 -
 41
41 -
 42
42 -
 43
43 -
 44
44 -
45
-
46
-
47
-
48
-
49
-
50
-
51
-
52
-
53
-
54
-
55
-
56
-
57
-
58
-
59
-
60
-
61
-
62
-
63
-
64
-
65
-
66
-
67
-
68
-
69
-
70
-
71
-
72
 |
 |
