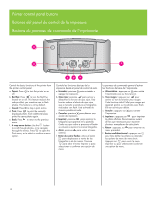
HP A440 Quick Start Guide - Page 12
Connect the printer to your computer Windows, Conecte la impresora al equipo Windows, Connectez l'
 |
UPC - 808736862721
View all HP A440 manuals
Add to My Manuals
Save this manual to your list of manuals |
Page 12 highlights
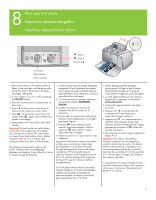
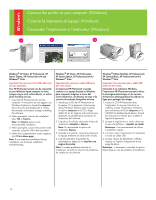
Connect the printer to your computer (Windows) Conecte la impresora al equipo (Windows) Connectez l'imprimante à l'ordinateur (Windows) 1 2 3 Windows® XP Home, XP Professional, XP Starter Edition, XP Professional x64 and Windows® Vista Important! Do not connect the USB cable until you are prompted. Your HP Photosmart printer can be connected to your Windows based computer to share images using e-mail, online albums, or online photo finishing services. 1. Insert the HP Photosmart CD into the computer. If instructions do not appear, use Windows Explorer to locate the setup.exe file on the CD and double-click it. Follow the onscreen instructions to begin installing the software. 2. When prompted, choose the installation type: Full or Express. Note: The Express option is the recommended installation. 3. When prompted, connect the printer to the computer using the USB cable provided. 4. When the Congratulations screen appears, click Print a demo page. Note: If you experience problems during installation, see Software installation troubleshooting. Windows® XP Home, XP Professional, XP Starter Edition, XP Professional x64 y Windows® Vista Importante No conecte el cable USB hasta que se le solicite. La impresora HP Photosmart se puede conectar a un equipo basado en Windows para compartir imágenes a través del correo electrónico, de álbumes en línea o de servicios de acabado fotográfico en línea. 1. Introduzca el CD de HP Photosmart en el equipo. Si no aparecen instrucciones, utilice Windows Explorer para localizar el archivo setup.exe en el CD y haga doble clic en él. Siga las instrucciones que aparecen en pantalla para comenzar la instalación del software. 2. Cuando se le solicite, seleccione el tipo de instalación: Completa o Express. Nota: Se recomienda la opción de instalación Express. 3. Cuando se le solicite, conecte la impresora al equipo mediante el cable USB incluido. 4. Cuando aparezca la pantalla de enhorabuena, haga clic en Imprimir una página de prueba. Nota: Si surgen problemas durante la instalación, consulte la solución de problemas de instalación de software. Windows® Edition familiale, XP Professionnel, XP Starter Edition, XP Professionnel x64 et Windows® Vista Important ! Ne connectez pas le câble USB avant d'y être invité. Connectée à un ordinateur Windows, l'imprimante HP Photosmart permet d'utiliser la messagerie électronique ou les services d'impression photographique/les albums en ligne pour partager des images. 1. Insérez le CD HP Photosmart dans l'ordinateur. Si aucune instruction ne s'affiche, ouvrez l'Explorateur Windows, puis recherchez le fichier setup.exe sur le CD-ROM et double-cliquez dessus. Suivez les instructions à l'écran pour installer le logiciel d'impression. 2. Lorsque le logiciel vous y invite, choisissez le type d'installation : complète ou rapide. Remarque : il est recommandé de choisir l'installation rapide. 3. A l'invite, reliez l'imprimante et l'ordinateur à l'aide du câble USB. 4. Lorsque l'écran de félicitations s'affiche, cliquez sur l'option d'impression d'une page de démo. Remarque : si nécessaire, consultez la section Dépannage en cas de problème d'installation. 12
-
 1
1 -
2
-
3
-
4
-
5
-
6
-
 7
7 -
 8
8 -
 9
9 -
 10
10 -
 11
11 -
 12
12 -
 13
13 -
 14
14 -
 15
15 -
 16
16
 |
 |
