HP BL680c HP Insight Control Environment User Guide - Page 40

Editing a rack, Data Center ID, Data Center Location, Available Enclosures, Class, Cancel, All Racks

Page 40 highlights

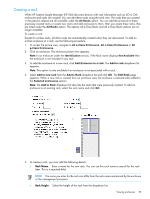
• Data Center ID. Enter an ID for the data center. This ID can be alphanumeric and can include hyphens and underscores (- and _) only. • Data Center Location. Enter the location of the data center. It can be the geographic location or the actual physical location of the data center. NOTE: You can use the Data Center ID and Data Center Location details to search the rack later. • Row Number. Enter the row number where the rack is located. You can enter only numerals for this field. • Position in Row. Enter the position in the row where the rack is located. You can enter only numerals for this field. 6. From the Available Enclosures dropdown list, select the filter by which you want to view the list of enclosures. You can select All Enclosures or Class. You can filter the collection by entering a class. For example, if you enter p-Class, then all p-Class enclosures are available to be added to the rack. 7. Select one or more of the relevant enclosures and click the >> symbol to add them to the rack. You can click

  • 1
  • 2
  • 3
  • 4
  • 5
  • 6
  • 7
  • 8
  • 9
  • 10
  • 11
  • 12
  • 13
  • 14
  • 15
  • 16
  • 17
  • 18
  • 19
  • 20
  • 21
  • 22
  • 23
  • 24
  • 25
  • 26
  • 27
  • 28
  • 29
  • 30
  • 31
  • 32
  • 33
  • 34
  • 35
  • 36
  • 37
  • 38
  • 39
  • 40
  • 41
  • 42
  • 43
  • 44
  • 45
  • 46
  • 47
  • 48
  • 49
  • 50
  • 51
  • 52
  • 53
  • 54
  • 55
  • 56
  • 57
  • 58
  • 59
  • 60
  • 61
  • 62
  • 63
  • 64
  • 65
  • 66
  • 67
  • 68
  • 69
  • 70
  • 71
  • 72
  • 73
  • 74
  • 75
  • 76
  • 77
  • 78
  • 79
  • 80
  • 81
  • 82
  • 83
  • 84
  • 85
  • 86
  • 87
  • 88
  • 89
  • 90
  • 91
  • 92
  • 93
  • 94
  • 95
  • 96
  • 97
  • 98
  • 99
  • 100
  • 101
  • 102
  • 103
  • 104
  • 105
  • 106
  • 107
  • 108
  • 109
  • 110
  • 111
  • 112
  • 113
  • 114
  • 115
  • 116
  • 117
  • 118
  • 119
  • 120
  • 121
  • 122
  • 123
  • 124
  • 125
  • 126
  • 127
  • 128
  • 129
  • 130
  • 131
  • 132
  • 133
  • 134
  • 135
  • 136
  • 137
  • 138
  • 139
  • 140
  • 141
  • 142
  • 143
  • 144
  • 145
  • 146
  • 147
  • 148
  • 149
  • 150
  • 151
  • 152
  • 153
  • 154
  • 155
  • 156
  • 157
  • 158
  • 159
  • 160
  • 161
  • 162
  • 163
  • 164
  • 165
  • 166
  • 167
  • 168
  • 169
  • 170
  • 171
  • 172
  • 173
  • 174
  • 175
  • 176
  • 177
  • 178
  • 179
  • 180
  • 181

Data Center ID.
Enter an ID for the data center. This ID can be alphanumeric and can include
hyphens and underscores (- and _) only.
Data Center Location.
Enter the location of the data center. It can be the geographic location or
the actual physical location of the data center.
NOTE:
You can use the
Data Center ID
and
Data Center Location
details to search the rack
later.
Row Number.
Enter the row number where the rack is located. You can enter only numerals for
this field.
Position in Row.
Enter the position in the row where the rack is located. You can enter only
numerals for this field.
6.
From the
Available Enclosures
dropdown list, select the filter by which you want to view the list of
enclosures. You can select
All Enclosures
or
Class
. You can filter the collection by entering a class.
For example, if you enter
p-Class
, then all p-Class enclosures are available to be added to the rack.
7.
Select one or more of the relevant enclosures and click the >> symbol to add them to the rack. You can
click << to remove enclosures from the rack. You can also drag and drop the enclosure in the desired
position within the rack.
Note:
indicates enclosures which are daisy chained.
8.
Click
Save
. The enclosure is added to the rack and the picture of the new rack with the added enclosure
appears. If an enclosure has already been added to another rack, a message appears indicating the
enclosure is already assigned to another rack. You can confirm your intention to remove the enclosure
from the existing rack and it is added to the new rack. You can click
Cancel
to discard the rack and
close the window.
Editing a rack
From the picture view of a rack, you can edit the rack to add or remove enclosures.
To edit a rack:
1.
To access the picture view, navigate to
All Racks
and select the rack to be edited and click
Edit Rack
.
The
Rack View
page appears.
Note:
The rack can be edited and deleted only from the picture view.
2.
To edit a rack, you can change any of the following details:
Rack Name.
Enter a name for the new rack. You can use this rack name to search for the rack
later.
Rack Height.
Select the height of the rack from the dropdown list.
Data Center ID.
Enter the data center ID. This ID can be alphanumeric and can include hyphens
and underscores (- and _) only.
Data Center Location
Enter the data center location. It can be the geographic location or the
actual physical location of the data center.
NOTE:
You can use the
Data Center ID
and
Data Center Location
details to search the rack
later.
Row Number.
Enter the row number where the rack is located. You can enter only numerals for
this field.
Position in Row.
Enter the position in the row where the rack is located. You can enter only
numerals for this field.
3.
From the
Available Enclosures
dropdown list, select the filter by which you want to view the list of
enclosures. You can select
All Enclosures
or
Class
.
40
Managing server blades from HP SIM