HP Color LaserJet 5550 HP Color LaserJet 5550 series - User Guide - Page 106
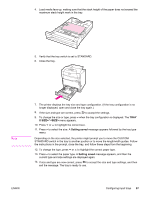
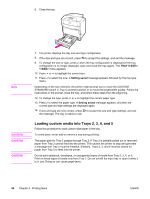
Close the tray., The printer displays the tray configuration. Look at the display.
 |
View all HP Color LaserJet 5550 manuals
Add to My Manuals
Save this manual to your list of manuals |
Page 106 highlights
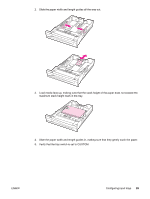
3. Load media face-up, making sure that the stack height of the paper does not exceed the maximum stack height mark in the tray. 4. Slide the paper width and length guides in, making sure that they gently touch the paper. 5. Note the orientation of the paper and which dimension is the X dimension and which is the Y dimension. X and Y dimensions are marked in the tray, for your convenience. X Y 1 CUSTOM/STANDARD switch 2 Page width (X dimension) 3 Page length (Y dimension) 6. Verify that the tray switch is set to CUSTOM. 7. Close the tray. 8. The printer displays the tray configuration. Look at the display. 92 Chapter 4 Printing tasks ENWW
-
 1
1 -
2
-
3
-
4
-
5
-
6
-
7
-
8
-
9
-
10
-
11
-
12
-
13
-
14
-
15
-
16
-
17
-
18
-
19
-
20
-
21
-
22
-
23
-
24
-
25
-
26
-
27
-
28
-
29
-
30
-
31
-
32
-
33
-
34
-
35
-
36
-
37
-
38
-
39
-
40
-
41
-
42
-
43
-
44
-
45
-
46
-
47
-
48
-
49
-
50
-
51
-
52
-
53
-
54
-
55
-
56
-
57
-
58
-
59
-
60
-
61
-
62
-
63
-
64
-
65
-
66
-
67
-
68
-
69
-
70
-
71
-
72
-
73
-
74
-
75
-
76
-
77
-
78
-
79
-
80
-
81
-
82
-
83
-
84
-
85
-
86
-
87
-
88
-
89
-
90
-
91
-
92
-
93
-
94
-
95
-
96
-
97
-
98
-
99
-
100
-
 101
101 -
 102
102 -
 103
103 -
 104
104 -
 105
105 -
 106
106 -
 107
107 -
 108
108 -
 109
109 -
 110
110 -
 111
111 -
112
-
113
-
114
-
115
-
116
-
117
-
118
-
119
-
120
-
121
-
122
-
123
-
124
-
125
-
126
-
127
-
128
-
129
-
130
-
131
-
132
-
133
-
134
-
135
-
136
-
137
-
138
-
139
-
140
-
141
-
142
-
143
-
144
-
145
-
146
-
147
-
148
-
149
-
150
-
151
-
152
-
153
-
154
-
155
-
156
-
157
-
158
-
159
-
160
-
161
-
162
-
163
-
164
-
165
-
166
-
167
-
168
-
169
-
170
-
171
-
172
-
173
-
174
-
175
-
176
-
177
-
178
-
179
-
180
-
181
-
182
-
183
-
184
-
185
-
186
-
187
-
188
-
189
-
190
-
191
-
192
-
193
-
194
-
195
-
196
-
197
-
198
-
199
-
200
-
201
-
202
-
203
-
204
-
205
-
206
-
207
-
208
-
209
-
210
-
211
-
212
-
213
-
214
-
215
-
216
-
217
-
218
-
219
-
220
-
221
-
222
-
223
-
224
-
225
-
226
-
227
-
228
-
229
-
230
-
231
-
232
-
233
-
234
-
235
-
236
-
237
-
238
-
239
-
240
-
241
-
242
-
243
-
244
-
245
-
246
-
247
-
248
-
249
-
250
-
251
-
252
-
253
-
254
-
255
-
256
-
257
-
258
-
259
-
260
-
261
-
262
-
263
-
264
-
265
-
266
-
267
-
268
-
269
-
270
-
271
-
272
-
273
-
274
-
275
-
276
-
277
-
278
-
279
-
280
-
281
-
282
-
283
-
284
-
285
-
286
-
287
-
288
-
289
-
290
-
291
-
292
-
293
-
294
 |
 |
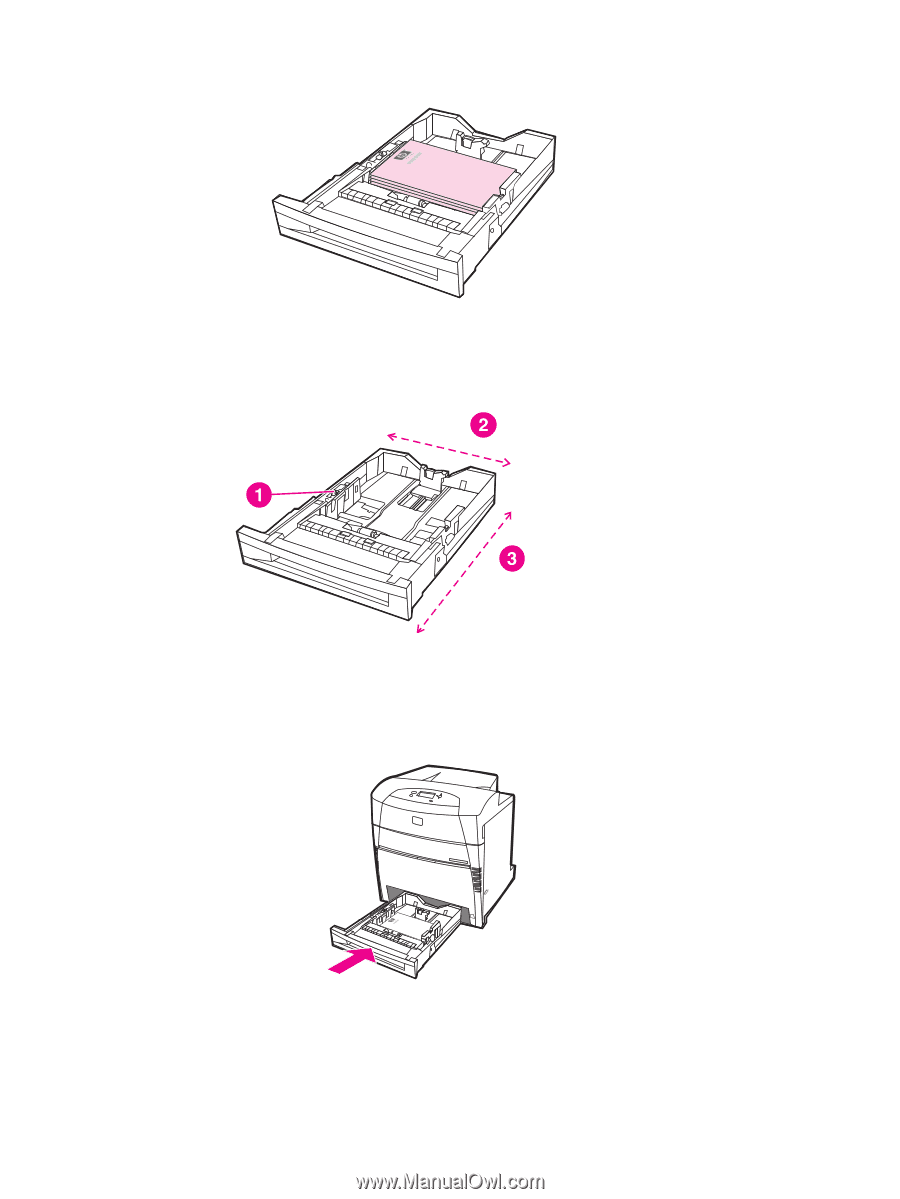
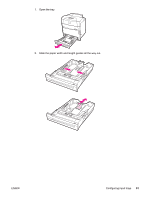
3.
Load media face-up, making sure that the stack height of the paper does not exceed the
maximum stack height mark in the tray.
4.
Slide the paper width and length guides in, making sure that they gently touch the paper.
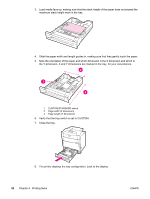
5.
Note the orientation of the paper and which dimension is the X dimension and which is
the Y dimension. X and Y dimensions are marked in the tray, for your convenience.
X
Y
1
CUSTOM/STANDARD switch
2
Page width (X dimension)
3
Page length (Y dimension)
6.
Verify that the tray switch is set to CUSTOM.
7.
Close the tray.
8.
The printer displays the tray configuration. Look at the display.
92
Chapter 4
Printing tasks
ENWW