HP Color LaserJet 9500 HP Color LaserJet 9500n/9500hdn - User Reference Guide - Page 272
Skewed, stretched, or off-center Misaligned colors, lower left door
 |
View all HP Color LaserJet 9500 manuals
Add to My Manuals
Save this manual to your list of manuals |
Page 272 highlights
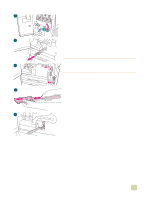
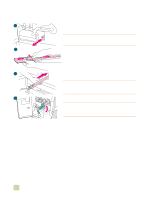
Skewed, stretched, or off-center page q Make sure that the humidity, temperature, and other operation and location requirements of the printer are met. See "Remove the printer from its packaging" on page 12. q Make sure to use supported media. See "Supported types of media" on page 88. Use different supported media or use supported media from a previously unopened package. q Make sure that the media is loaded correctly, the size guides are touching the edges of the stack of media, and the custom-media lever is set appropriately. See "Load media in the input trays" on page 29 and "Configure the input trays" on page 39. q For problems with page skew, turn over the stack of media and rotate the stack 180 degrees. q Make sure that the image transfer belt is seated correctly. To do this, open the front doors, and lower and raise the green lever. The lever clicks when it is latched securely. q Make sure that the fuser is seated correctly. To do this, turn off the printer and allow it to cool for 30 minutes. Open the lower left door, and pull out the duplexer (if one is installed). Pull the fuser out a short distance, and then slide it gently but firmly into place, making sure that it is completely inside the printer, and rotate the blue levers outward until they click into place. For reference, see "Replacing the image fuser kit" on page 198, steps 1 through 5 and 7 through 9. q Remove any undetected jammed or torn media. See "Clearing jams from the input-tray areas" on page 215 and "Clearing jams from the duplexer" on page 223. q For the latest information and problem-solving procedures, go to http://www.hp.com/support/lj9500. Misaligned colors q Calibrate the printer. See "To calibrate the printer" on page 272. q For the latest information and problem-solving procedures, go to http://www.hp.com/support/lj9500. 270 Solving print-quality problems ENWW
-
 1
1 -
2
-
3
-
4
-
5
-
6
-
7
-
8
-
9
-
10
-
11
-
12
-
13
-
14
-
15
-
16
-
17
-
18
-
19
-
20
-
21
-
22
-
23
-
24
-
25
-
26
-
27
-
28
-
29
-
30
-
31
-
32
-
33
-
34
-
35
-
36
-
37
-
38
-
39
-
40
-
41
-
42
-
43
-
44
-
45
-
46
-
47
-
48
-
49
-
50
-
51
-
52
-
53
-
54
-
55
-
56
-
57
-
58
-
59
-
60
-
61
-
62
-
63
-
64
-
65
-
66
-
67
-
68
-
69
-
70
-
71
-
72
-
73
-
74
-
75
-
76
-
77
-
78
-
79
-
80
-
81
-
82
-
83
-
84
-
85
-
86
-
87
-
88
-
89
-
90
-
91
-
92
-
93
-
94
-
95
-
96
-
97
-
98
-
99
-
100
-
101
-
102
-
103
-
104
-
105
-
106
-
107
-
108
-
109
-
110
-
111
-
112
-
113
-
114
-
115
-
116
-
117
-
118
-
119
-
120
-
121
-
122
-
123
-
124
-
125
-
126
-
127
-
128
-
129
-
130
-
131
-
132
-
133
-
134
-
135
-
136
-
137
-
138
-
139
-
140
-
141
-
142
-
143
-
144
-
145
-
146
-
147
-
148
-
149
-
150
-
151
-
152
-
153
-
154
-
155
-
156
-
157
-
158
-
159
-
160
-
161
-
162
-
163
-
164
-
165
-
166
-
167
-
168
-
169
-
170
-
171
-
172
-
173
-
174
-
175
-
176
-
177
-
178
-
179
-
180
-
181
-
182
-
183
-
184
-
185
-
186
-
187
-
188
-
189
-
190
-
191
-
192
-
193
-
194
-
195
-
196
-
197
-
198
-
199
-
200
-
201
-
202
-
203
-
204
-
205
-
206
-
207
-
208
-
209
-
210
-
211
-
212
-
213
-
214
-
215
-
216
-
217
-
218
-
219
-
220
-
221
-
222
-
223
-
224
-
225
-
226
-
227
-
228
-
229
-
230
-
231
-
232
-
233
-
234
-
235
-
236
-
237
-
238
-
239
-
240
-
241
-
242
-
243
-
244
-
245
-
246
-
247
-
248
-
249
-
250
-
251
-
252
-
253
-
254
-
255
-
256
-
257
-
258
-
259
-
260
-
261
-
262
-
263
-
264
-
265
-
266
-
 267
267 -
 268
268 -
 269
269 -
 270
270 -
 271
271 -
 272
272 -
 273
273 -
 274
274 -
 275
275 -
 276
276 -
 277
277 -
278
-
279
-
280
-
281
-
282
-
283
-
284
-
285
-
286
-
287
-
288
-
289
-
290
-
291
-
292
-
293
-
294
-
295
-
296
-
297
-
298
-
299
-
300
-
301
-
302
-
303
-
304
-
305
-
306
-
307
-
308
-
309
-
310
-
311
-
312
-
313
-
314
-
315
-
316
-
317
-
318
-
319
-
320
-
321
-
322
-
323
-
324
-
325
-
326
-
327
-
328
-
329
-
330
-
331
-
332
-
333
-
334
-
335
-
336
-
337
-
338
-
339
-
340
-
341
-
342
-
343
-
344
-
345
-
346
-
347
-
348
-
349
-
350
 |
 |
