HP Color LaserJet Enterprise CP4020 HP Designjet 4020 and 4520 Printer Series - Page 33
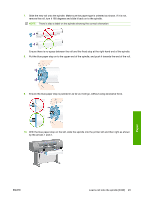
With the blue paper stop on the left, slide the spindle into the printer left and then right as shown
 |
View all HP Color LaserJet Enterprise CP4020 manuals
Add to My Manuals
Save this manual to your list of manuals |
Page 33 highlights
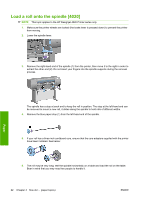
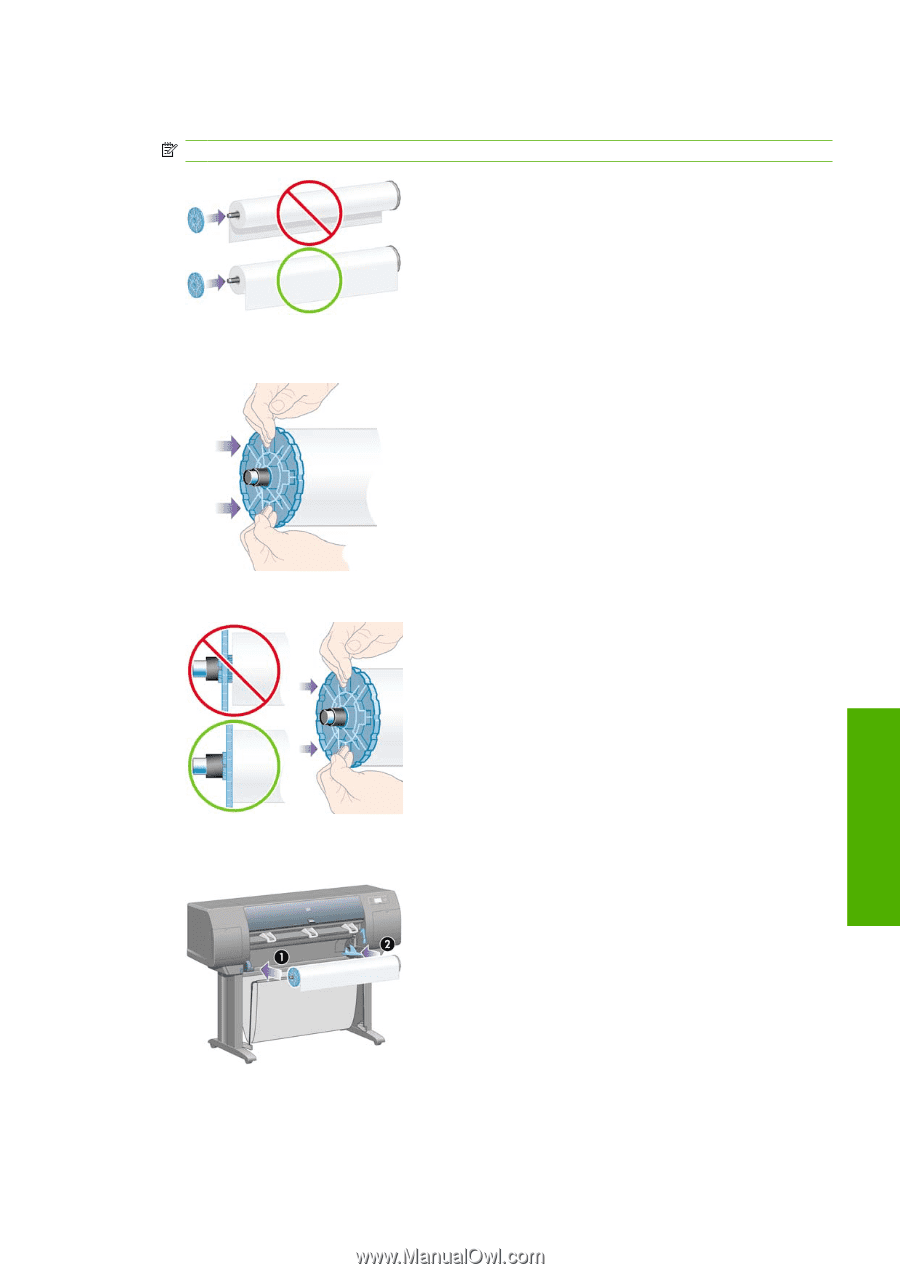
7. Slide the new roll onto the spindle. Make sure the paper type is oriented as shown. If it is not, remove the roll, turn it 180 degrees and slide it back on to the spindle. NOTE: There is also a label on the spindle showing the correct orientation. Ensure there is no space between the roll and the fixed stop at the right-hand end of the spindle. 8. Put the blue paper stop on to the upper end of the spindle, and push it towards the end of the roll. 9. Ensure the blue paper stop is pushed in as far as it will go, without using excessive force. 10. With the blue paper stop on the left, slide the spindle into the printer left and then right as shown by the arrows 1 and 2. Paper ENWW Load a roll onto the spindle [4020] 23
-
 1
1 -
2
-
3
-
4
-
5
-
6
-
7
-
8
-
9
-
10
-
11
-
12
-
13
-
14
-
15
-
16
-
17
-
18
-
19
-
20
-
21
-
22
-
23
-
24
-
25
-
26
-
27
-
 28
28 -
 29
29 -
 30
30 -
 31
31 -
 32
32 -
 33
33 -
 34
34 -
 35
35 -
 36
36 -
 37
37 -
 38
38 -
39
-
40
-
41
-
42
-
43
-
44
-
45
-
46
-
47
-
48
-
49
-
50
-
51
-
52
-
53
-
54
-
55
-
56
-
57
-
58
-
59
-
60
-
61
-
62
-
63
-
64
-
65
-
66
-
67
-
68
-
69
-
70
-
71
-
72
-
73
-
74
-
75
-
76
-
77
-
78
-
79
-
80
-
81
-
82
-
83
-
84
-
85
-
86
-
87
-
88
-
89
-
90
-
91
-
92
-
93
-
94
-
95
-
96
-
97
-
98
-
99
-
100
-
101
-
102
-
103
-
104
-
105
-
106
-
107
-
108
-
109
-
110
-
111
-
112
-
113
-
114
-
115
-
116
-
117
-
118
-
119
-
120
-
121
-
122
-
123
-
124
-
125
-
126
-
127
-
128
-
129
-
130
-
131
-
132
-
133
-
134
-
135
-
136
-
137
-
138
-
139
-
140
-
141
-
142
-
143
-
144
-
145
-
146
-
147
-
148
-
149
-
150
-
151
-
152
-
153
-
154
-
155
-
156
-
157
-
158
-
159
-
160
-
161
-
162
-
163
-
164
-
165
-
166
-
167
-
168
-
169
-
170
-
171
-
172
-
173
-
174
-
175
-
176
-
177
-
178
-
179
-
180
-
181
-
182
-
183
-
184
-
185
-
186
-
187
-
188
-
189
-
190
-
191
-
192
-
193
-
194
-
195
-
196
-
197
-
198
-
199
-
200
-
201
-
202
-
203
-
204
-
205
-
206
-
207
-
208
-
209
-
210
-
211
-
212
-
213
-
214
-
215
-
216
-
217
-
218
-
219
-
220
-
221
-
222
-
223
-
224
-
225
-
226
-
227
-
228
-
229
-
230
-
231
-
232
-
233
-
234
-
235
 |
 |
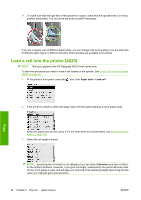
7.
Slide the new roll onto the spindle. Make sure the paper type is oriented as shown. If it is not,
remove the roll, turn it 180 degrees and slide it back on to the spindle.
NOTE:
There is also a label on the spindle showing the correct orientation.
Ensure there is no space between the roll and the fixed stop at the right-hand end of the spindle.
8.
Put the blue paper stop on to the upper end of the spindle, and push it towards the end of the roll.
9.
Ensure the blue paper stop is pushed in as far as it will go, without using excessive force.
10.
With the blue paper stop on the left, slide the spindle into the printer left and then right as shown
by the arrows 1 and 2.
ENWW
Load a roll onto the spindle [4020]
23
Paper