HP DL760 HP ProLiant DL760 Generation 2 Server Upgrade Poster - Page 4
Removing the I/O Lid, Replacing the System Midplane
 |
UPC - 613326397428
View all HP DL760 manuals
Add to My Manuals
Save this manual to your list of manuals |
Page 4 highlights
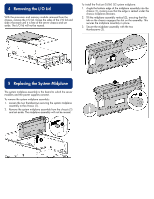
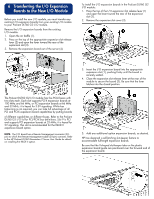
4 Removing the I/O Lid With the processor and memory module removed from the chassis, remove the I/O lid. Grasp the sides of the I/O lid and slide it forward until it is free of the server chassis and set aside. The I/O lid will not be reused. To install the ProLiant DL760 G2 system midplane: 1. Angle the bottom edge of the midplane assembly into the chassis (1), making sure that the edge is seated under the chassis midplane retainers. 2. Tilt the midplane assembly vertical (2), ensuring that the tab on the chassis engages the slot on the assembly. This secures the midplane assembly in place. 3. Secure the midplane assembly with the two thumbscrews (3). 5 Replacing the System Midplane The system midplane assembly is the board to which the server modules and the power supplies connect. To remove the system midplane assembly: 1. Loosen the two thumbscrews securing the system midplane assembly to the chassis (1). 2. Remove the system midplane assembly from the chassis (2) and set aside. The midplane assembly will not be reused.
-
 1
1 -
 2
2 -
 3
3 -
 4
4 -
 5
5 -
 6
6 -
 7
7 -
 8
8
 |
 |
