HP DL760 HP ProLiant DL760 Generation 2 Server Upgrade Poster - Page 6
Reassembling the Server, Installing the Server Labels - proliant g2 serial number location
 |
UPC - 613326397428
View all HP DL760 manuals
Add to My Manuals
Save this manual to your list of manuals |
Page 6 highlights
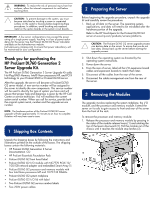
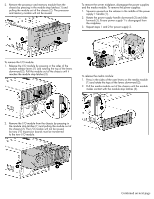
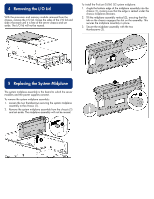
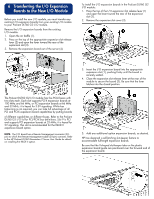
7 Reassembling the Server Reassemble the server with all the new ProLiant DL760 G2 components. 1. Install the ProLiant DL760 G2 I/O module into the server chassis. 2. Reseat the media module into the chassis. 3. Reseat the two power supplies: a. Slide power supply 1 into the power supply cage until the supply is seated securely (1). This action automatically pushes the spring-loaded trap door open. b. Raise the handle to lock the power supply into place (2). The power supply fan starts immediately if the system is running. 8 Installing the Server Labels Install the ProLiant DL760 G2 specific labels. 1. Install the front hood label (accessing module and memory information). Align the corners of the label and carefully lower it over the existing front label on your server. 2. Install the front service number label (1) next to the existing server serial number (2) on the front top edge of the server. c. Repeat steps a and b for the second power supply. 4. Install the new I/O lid by sliding it into the front of the server. The hood label is oriented to be read from the front of the server. 5. Install a processor board option kit into the ProLiant DL760 G2 processor and memory module if an eight-processor configuration is desired. Refer to the documentation provided with the processor board option. 6. Install any additional memory into the five memory cartridges located at the front of the ProLiant DL760 G2 processor and memory module. Refer to the memory requirements and installation procedures in the HP ProLiant DL760 Generation 2 Server User Guide located on the Documentation CD in the upgrade kit. 7. Install the ProLiant DL760 G2 processor and memory module into the server chassis. WARNING: The processor and memory module weighs more than 15.9 kg (35 lb). HP recommends either removing ALL the memory cartridges before handling the module, or having two people handling the module together. Continued on next page
-
 1
1 -
 2
2 -
 3
3 -
 4
4 -
 5
5 -
 6
6 -
 7
7 -
 8
8
 |
 |
