HP DL760 HP ProLiant DL760 Generation 2 Server Upgrade Poster - Page 5
Transferring the I/O Expansion, Boards to the New I/O Module
 |
UPC - 613326397428
View all HP DL760 manuals
Add to My Manuals
Save this manual to your list of manuals |
Page 5 highlights
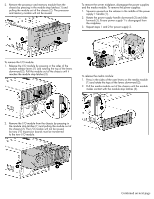
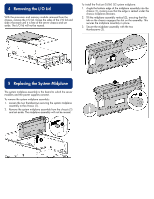
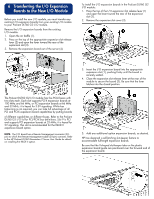
6 Transferring the I/O Expansion Boards to the New I/O Module Before you install the new I/O module, you must transfer any existing I/O expansion boards from your existing I/O module to your ProLiant DL760 G2 I/O module. Remove the I/O expansion boards from the existing I/O module: 1. Open the air baffle (1). 2. Press on the top of the appropriate expansion slot release lever (2) and open the lever toward the rear of the expansion slot (3). 3. Remove the expansion board out of the server (4). To install the I/O expansion boards in the ProLiant DL760 G2 I/O module: 1. Press the top of the I/O expansion slot release lever (1) and open the lever toward the rear of the expansion slot (2). 2. Remove the expansion slot cover (3). 3. Insert the I/O expansion board into the appropriate expansion slot (1), pushing firmly until the board is securely seated. 4. Close the expansion slot release lever at the rear of the module to secure the board (2). Be sure that the lever latches into the closed position. The ProLiant DL760 G2 I/O module has five PCI-X buses with two slots each. Each slot supports PCI-X expansion boards at 100 MHz and 66 MHz, or PCI expansion boards at 66 MHz and 33 MHz; it is keyed for 3.3V signaling. While bus balancing is not required, you can take full advantage of all PCI and PCI-X expansion board capabilities by putting boards of different capabilities on different buses. Refer to the ProLiant DL760 G2 I/O lid for PCI/PCI-X bus definitions. Slot 9 is PCI and supports PCI expansion boards at 33 MHz; it is keyed for 5V signaling. This slot is recommended for the RILOE II expansion board option. NOTE: The I/O board has a Remote Management connector (30pin) to which the Remote Management cable (30-pin) connects. Refer to the HP ProLiant DL760 Generation 2 Server User Guide for details on installing the RILOE II option. 5. Add any additional option expansion boards, as desired. HP has designed a self-latching slot-keeper feature to accommodate full-length expansion boards. Be sure that the V-shaped slot-keeper tabs on the plastic expansion board guide are positioned over the forward end of the expansion board.
-
 1
1 -
 2
2 -
 3
3 -
 4
4 -
 5
5 -
 6
6 -
 7
7 -
 8
8
 |
 |
