HP Designjet 700 Service Manual - Page 96
Removing the Spittoon, Do not turn upĆside down. The, spittoon may be full of ink.
 |
View all HP Designjet 700 manuals
Add to My Manuals
Save this manual to your list of manuals |
Page 96 highlights
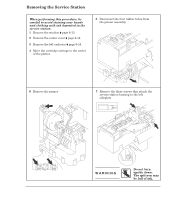
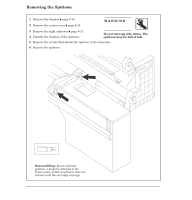
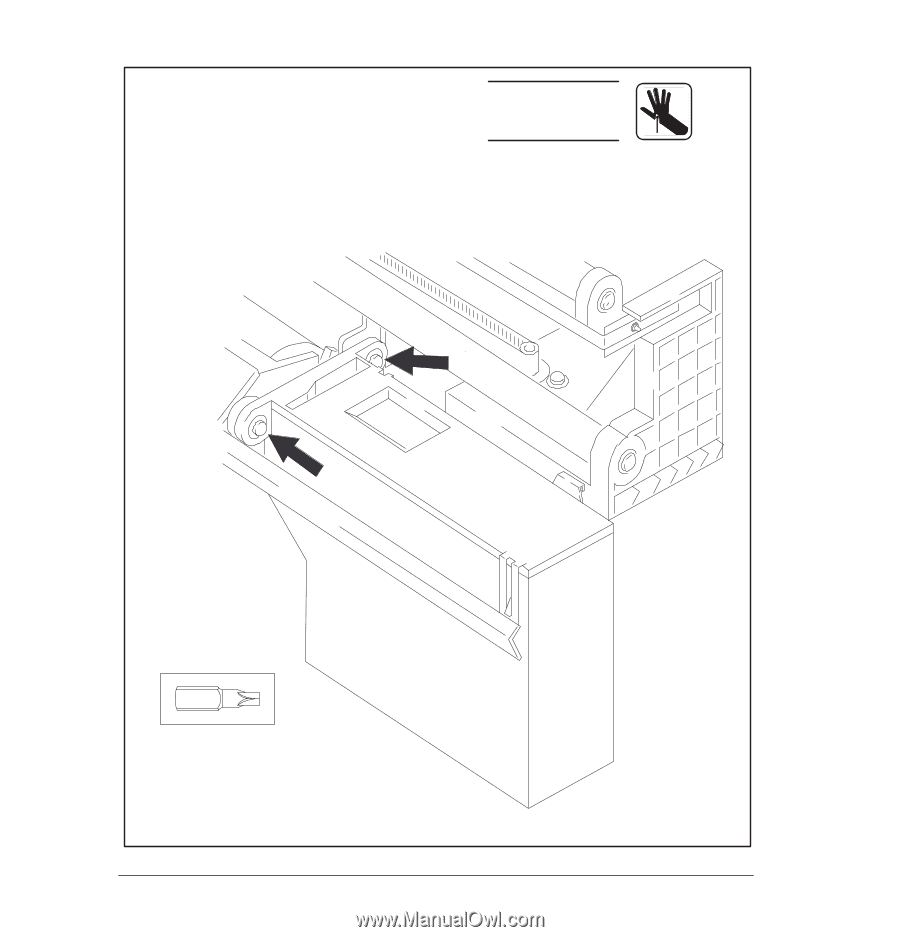
Removing the Spittoon 1 Remove the window ' page 6Ć13. 2 Remove the center cover ' page 6Ć14. WĂAĂRĂNĂIĂNĂG 3 Remove the right endcover ' page 6Ć17. 4 Identify the location of the spittoon. Do not turn upĆside down. The spittoon may be full of ink. 5 Remove the screws that attach the spittoon to the structure. 6 Remove the spittoon. Tx 15 Reassembling: Ensure that the spittoon is properly attached to the YĆaxis motor holder and that it does not interact with the cartridge carriage. 6-44 Removal and Replacement C4705-90000
-
 1
1 -
2
-
3
-
4
-
5
-
6
-
7
-
8
-
9
-
10
-
11
-
12
-
13
-
14
-
15
-
16
-
17
-
18
-
19
-
20
-
21
-
22
-
23
-
24
-
25
-
26
-
27
-
28
-
29
-
30
-
31
-
32
-
33
-
34
-
35
-
36
-
37
-
38
-
39
-
40
-
41
-
42
-
43
-
44
-
45
-
46
-
47
-
48
-
49
-
50
-
51
-
52
-
53
-
54
-
55
-
56
-
57
-
58
-
59
-
60
-
61
-
62
-
63
-
64
-
65
-
66
-
67
-
68
-
69
-
70
-
71
-
72
-
73
-
74
-
75
-
76
-
77
-
78
-
79
-
80
-
81
-
82
-
83
-
84
-
85
-
86
-
87
-
88
-
89
-
90
-
 91
91 -
 92
92 -
 93
93 -
 94
94 -
 95
95 -
 96
96 -
 97
97 -
 98
98 -
 99
99 -
 100
100 -
 101
101 -
102
-
103
-
104
-
105
-
106
-
107
-
108
-
109
-
110
-
111
-
112
-
113
-
114
-
115
-
116
-
117
-
118
-
119
-
120
-
121
-
122
-
123
-
124
-
125
-
126
-
127
-
128
-
129
-
130
-
131
-
132
-
133
-
134
-
135
-
136
-
137
-
138
-
139
-
140
-
141
-
142
-
143
-
144
-
145
-
146
-
147
-
148
-
149
-
150
-
151
-
152
-
153
-
154
-
155
-
156
-
157
-
158
-
159
-
160
-
161
-
162
-
163
-
164
-
165
-
166
-
167
-
168
-
169
-
170
-
171
-
172
-
173
-
174
-
175
-
176
-
177
-
178
-
179
-
180
-
181
-
182
-
183
-
184
-
185
-
186
-
187
-
188
-
189
-
190
-
191
-
192
-
193
-
194
-
195
-
196
-
197
-
198
-
199
-
200
-
201
-
202
-
203
-
204
-
205
-
206
-
207
-
208
-
209
-
210
-
211
-
212
-
213
-
214
-
215
-
216
-
217
-
218
-
219
-
220
-
221
-
222
-
223
-
224
-
225
-
226
-
227
-
228
-
229
-
230
-
231
-
232
-
233
-
234
-
235
-
236
-
237
-
238
-
239
-
240
-
241
-
242
-
243
-
244
-
245
-
246
-
247
-
248
-
249
-
250
-
251
-
252
-
253
-
254
-
255
-
256
-
257
-
258
-
259
-
260
-
261
-
262
-
263
-
264
-
265
-
266
-
267
-
268
-
269
-
270
-
271
-
272
-
273
-
274
-
275
-
276
-
277
-
278
-
279
-
280
-
281
-
282
-
283
-
284
-
285
-
286
-
287
-
288
 |
 |
1
Remove the window
'
page 6Ć13.
2
Remove the center cover
'
page 6Ć14.
3
Remove the right endcover
'
page 6Ć17.
4
Identify the location of the spittoon.
5
Remove the screws that attach the spittoon to the structure.
6
Remove the spittoon.
Tx 15
Reassembling:
Ensure that the
spittoon is properly attached to the
YĆaxis motor holder and that it does not
interact with the cartridge carriage.
Do not turn upĆside down. The
spittoon may be full of ink.
WĂAĂRĂNĂIĂNĂG
6-44
Removal and Replacement
C4705-90000
Removing the Spittoon