HP Designjet T1500 HP Designjet T920 and T1500 ePrinter series - User's Guide - Page 176
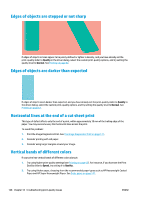
Edges of objects are stepped or not sharp, Edges of objects are darker than expected
 |
View all HP Designjet T1500 manuals
Add to My Manuals
Save this manual to your list of manuals |
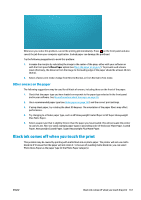
Page 176 highlights
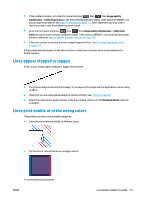
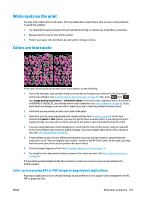
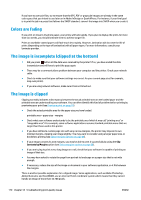
Edges of objects are stepped or not sharp If edges of objects or lines appear to be poorly defined or lighter in density, and you have already set the print-quality slider to Quality in the driver dialog, select the custom print-quality options, and try setting the quality level to Normal. See Printing on page 62. Edges of objects are darker than expected If edges of objects seem darker than expected, and you have already set the print-quality slider to Quality in the driver dialog, select the custom print-quality options, and try setting the quality level to Normal. See Printing on page 62. Horizontal lines at the end of a cut sheet print This type of defect affects only the end of a print, within approximately 30 mm of the trailing edge of the paper. You may see some very thin horizontal lines across the print. To avoid this problem: 1. Print the Image Diagnostics Print. See The Image Diagnostics Print on page 171. 2. Consider printing with roll paper. 3. Consider using larger margins around your image. Vertical bands of different colors If your print has vertical bands of different colors along it: 1. Try using higher print-quality settings (see Printing on page 62). For instance, if you have set the Print Quality slider to Speed, try setting it to Quality. 2. Try using thicker paper, choosing from the recommended paper types such as HP Heavyweight Coated Paper and HP Super Heavyweight Paper. See Order paper on page 141. 168 Chapter 18 Troubleshooting print-quality issues ENWW
-
 1
1 -
2
-
3
-
4
-
5
-
6
-
7
-
8
-
9
-
10
-
11
-
12
-
13
-
14
-
15
-
16
-
17
-
18
-
19
-
20
-
21
-
22
-
23
-
24
-
25
-
26
-
27
-
28
-
29
-
30
-
31
-
32
-
33
-
34
-
35
-
36
-
37
-
38
-
39
-
40
-
41
-
42
-
43
-
44
-
45
-
46
-
47
-
48
-
49
-
50
-
51
-
52
-
53
-
54
-
55
-
56
-
57
-
58
-
59
-
60
-
61
-
62
-
63
-
64
-
65
-
66
-
67
-
68
-
69
-
70
-
71
-
72
-
73
-
74
-
75
-
76
-
77
-
78
-
79
-
80
-
81
-
82
-
83
-
84
-
85
-
86
-
87
-
88
-
89
-
90
-
91
-
92
-
93
-
94
-
95
-
96
-
97
-
98
-
99
-
100
-
101
-
102
-
103
-
104
-
105
-
106
-
107
-
108
-
109
-
110
-
111
-
112
-
113
-
114
-
115
-
116
-
117
-
118
-
119
-
120
-
121
-
122
-
123
-
124
-
125
-
126
-
127
-
128
-
129
-
130
-
131
-
132
-
133
-
134
-
135
-
136
-
137
-
138
-
139
-
140
-
141
-
142
-
143
-
144
-
145
-
146
-
147
-
148
-
149
-
150
-
151
-
152
-
153
-
154
-
155
-
156
-
157
-
158
-
159
-
160
-
161
-
162
-
163
-
164
-
165
-
166
-
167
-
168
-
169
-
170
-
 171
171 -
 172
172 -
 173
173 -
 174
174 -
 175
175 -
 176
176 -
 177
177 -
 178
178 -
 179
179 -
 180
180 -
 181
181 -
182
-
183
-
184
-
185
-
186
-
187
-
188
-
189
-
190
-
191
-
192
-
193
-
194
-
195
-
196
-
197
-
198
-
199
-
200
-
201
-
202
-
203
-
204
-
205
-
206
-
207
-
208
-
209
-
210
 |
 |