HP ENVY x2 HP Envy x2 Maintenance and Service Guide IMPORTANT! This document i - Page 36
Base enclosure, with adhesive, and have alignment pins that fit into the screw holes.
 |
View all HP ENVY x2 manuals
Add to My Manuals
Save this manual to your list of manuals |
Page 36 highlights
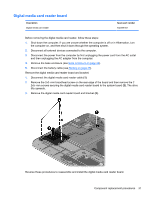
Base enclosure Description Base enclosure (Black) Rubber feet Spare part number 702349-001 702363-001 Before disassembling the keyboard dock, follow these steps: 1. Shut down the keyboard dock. If you are unsure whether the computer is off or in Hibernation, turn the computer on, and then shut it down through the operating system. 2. Disconnect all external devices connected to the computer. 3. Disconnect the power from the computer by first unplugging the power cord from the AC outlet and then unplugging the AC adapter from the computer. Remove the base enclosure: 1. Turn the computer face down, and then remove the rubber feet (1). The rubber feet are attached with adhesive, and have alignment pins that fit into the screw holes. 2. Remove the 2 3.0-mm screws located under the front rubber feet (2), and then remove the 2 polished 4.5-mm screws on the front row (3). 3. Remove the 2 remaining 4.5-mm screws under rear rubber feet (4). 28 Chapter 4 Removal and replacement procedures
-
 1
1 -
2
-
3
-
4
-
5
-
6
-
7
-
8
-
9
-
10
-
11
-
12
-
13
-
14
-
15
-
16
-
17
-
18
-
19
-
20
-
21
-
22
-
23
-
24
-
25
-
26
-
27
-
28
-
29
-
30
-
 31
31 -
 32
32 -
 33
33 -
 34
34 -
 35
35 -
 36
36 -
 37
37 -
 38
38 -
 39
39 -
 40
40 -
 41
41 -
42
-
43
-
44
-
45
-
46
-
47
-
48
-
49
-
50
-
51
-
52
-
53
-
54
-
55
-
56
-
57
-
58
-
59
-
60
-
61
-
62
-
63
-
64
-
65
-
66
-
67
-
68
-
69
-
70
-
71
-
72
-
73
-
74
-
75
-
76
-
77
-
78
-
79
-
80
-
81
-
82
-
83
-
84
-
85
-
86
-
87
 |
 |
