HP G4050 User Guide - Page 15
Transparent Materials Adapter TMA, Show Preview - scan slides
 |
UPC - 882780686793
View all HP G4050 manuals
Add to My Manuals
Save this manual to your list of manuals |
Page 15 highlights
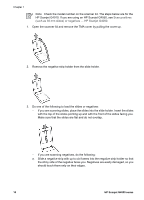
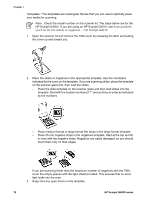
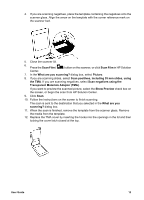
4. If you are scanning negatives, place the template containing the negatives onto the scanner glass. Align the arrow on the template with the corner reference mark on the scanner bed. 5. Close the scanner lid. 6. Press the Scan Film ( ) button on the scanner, or click Scan Film in HP Solution Center. 7. In the What are you scanning? dialog box, select Picture. 8. If you are scanning slides, select Scan positives, including 35 mm slides, using the TMA. If you are scanning negatives, select Scan negatives using the Transparent Materials Adapter (TMA). If you want to preview the scanned picture, select the Show Preview check box on the screen, or begin the scan from HP Solution Center. 9. Click Scan. 10. Follow the instructions on the screen to finish scanning. The scan is sent to the destination that you selected in the What are you scanning? dialog box. 11. When the scan is finished, remove the template from the scanner glass. Remove the media from the template. 12. Replace the TMA cover by inserting the hooks into the openings in the lid and then locking the cover latch closed at the top. User Guide 13
-
 1
1 -
2
-
3
-
4
-
5
-
6
-
7
-
8
-
9
-
 10
10 -
 11
11 -
 12
12 -
 13
13 -
 14
14 -
 15
15 -
 16
16 -
 17
17 -
 18
18 -
 19
19 -
 20
20 -
21
-
22
-
23
-
24
-
25
-
26
-
27
-
28
 |
 |