HP J8697A User Manual - Page 33
Install Switch Modules, Caution, Module, Installation, Notes
 |
View all HP J8697A manuals
Add to My Manuals
Save this manual to your list of manuals |
Page 33 highlights
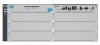
Installing the Series 5400zl Switches Caution Module Installation Notes Installing the Series 5400zl Switches Installation Procedures 2. Install Switch Modules Install switch modules into the slots as shown in the illustration below. For installation details, see the instructions in the manual that comes with the module. Make sure you install only ProCurve Switch zl Modules. Avoid any electrostatic discharge problems by handling the modules only by their bulkheads. The slot cover can be removed, and the module can be installed with either a flat-bladed or Torx T-10 screwdriver. Retain the slot cover for future use. ■ Any of the supported Switch zl Modules can be installed in any of the slots. ■ The modules can be "hot swapped", installed after the switch is already powered on, and normally will be immediately operational. But, if you are replacing a module with a different type than what was previously installed in the slot, the switch must be rebooted after the module is installed. See "Hot Swapping the Switch Module" on page 2-28. ■ Ensure you fully insert the modules. That is, press the module into the slot using the extractor handles, until the bulkhead on the module is contacting the front face of the switch chassis. ■ Once the module is fully inserted, screw in the two retaining screws to secure the module in place. The screws should be tightened until they are secure, but not overtightened. ■ If you do not use one or more of the slots, ensure the slot cover plate is still attached over the slot for safe operation and proper switch cooling. For safety, you should not have more than one module slot uncovered at a time. ■ Although these procedures show the 6-slot chassis, the procedures are the same for the 12-slot chassis. 2-9
-
 1
1 -
2
-
3
-
4
-
5
-
6
-
7
-
8
-
9
-
10
-
11
-
12
-
13
-
14
-
15
-
16
-
17
-
18
-
19
-
20
-
21
-
22
-
23
-
24
-
25
-
26
-
27
-
 28
28 -
 29
29 -
 30
30 -
 31
31 -
 32
32 -
 33
33 -
 34
34 -
 35
35 -
 36
36 -
 37
37 -
 38
38 -
39
-
40
-
41
-
42
-
43
-
44
-
45
-
46
-
47
-
48
-
49
-
50
-
51
-
52
-
53
-
54
-
55
-
56
-
57
-
58
-
59
-
60
-
61
-
62
-
63
-
64
-
65
-
66
-
67
-
68
-
69
-
70
-
71
-
72
-
73
-
74
-
75
-
76
-
77
-
78
-
79
-
80
-
81
-
82
-
83
-
84
-
85
-
86
-
87
-
88
-
89
-
90
-
91
-
92
-
93
-
94
-
95
-
96
-
97
-
98
-
99
-
100
-
101
-
102
-
103
-
104
-
105
-
106
-
107
-
108
-
109
-
110
-
111
-
112
-
113
-
114
-
115
-
116
-
117
-
118
 |
 |
